
A bottom roast is one of those classic, comforting dishes that brings back memories of Sunday dinners at grandmother’s house. This cut of beef, when prepared correctly, transforms into the most tender, succulent main course that will have everyone asking for seconds. The beauty of a bottom roast lies in its simplicity – it doesn’t require fancy techniques or exotic ingredients, just quality beef, time, and a little bit of love.
Bottom roast comes from the sirloin area of the cow and benefits tremendously from slow cooking methods that break down the connective tissues and create that fall-apart tenderness we all crave. Whether you’re planning a family dinner or impressing guests, this recipe will deliver restaurant-quality results right in your own kitchen. The key is understanding that low and slow is the way to go, allowing the meat to become infused with the aromatics and develop a rich, deeply satisfying flavor.
What I love most about this recipe is its versatility. You can serve it with creamy mashed potatoes, roasted vegetables, or even shred it for sandwiches the next day. The cooking liquid transforms into the most incredible gravy that perfectly complements the tender meat. I’ve included tried-and-true techniques that ensure success every single time you make this dish.
This bottom roast recipe is naturally gluten-free and can easily be adapted to fit various dietary preferences. Many home cooks struggle with achieving that perfect balance of tenderness and flavor, but I’m confident this recipe will become your go-to for any occasion. The combination of searing, braising, and slow-roasting creates layers of flavor that simply cannot be rushed. Pair this with creamy sauces or rich pasta dishes for a complete meal, or keep it simple with fresh salads on the side. For additional inspiration on complete meal planning, check out complementary main dishes or vegetable sides. For more detailed cooking techniques, Serious Eats offers excellent roasting guides, while Bon Appétit provides professional tips and The New York Times has comprehensive beef cooking resources.
Ingredients
- 1 bottom roast (4-5 pounds), room temperature
- 3 tablespoons kosher salt
- 2 tablespoons freshly ground black pepper
- 2 tablespoons garlic powder
- 1 tablespoon onion powder
- 1 tablespoon dried thyme
- 1 tablespoon dried rosemary
- 3 tablespoons olive oil
- 3 medium carrots, cut into 2-inch pieces
- 3 medium potatoes, cut into 2-inch chunks
- 1 large yellow onion, quartered
- 6 cloves garlic, smashed
- 2 cups beef broth
- 1 cup red wine (optional but recommended)
- 2 bay leaves
- 4 sprigs fresh thyme
- 2 tablespoons tomato paste
- 1 tablespoon balsamic vinegar
- 2 tablespoons cornstarch mixed with 3 tablespoons water (optional, for gravy)
- Fresh parsley for garnish
Instructions
- Remove your bottom roast from the refrigerator 30-45 minutes before cooking to bring it to room temperature. This ensures even cooking throughout the meat and helps achieve a beautiful crust.
- Preheat your oven to 325°F. Position the oven rack to the lower-middle position to allow proper air circulation around your roasting pan.
- In a small bowl, combine kosher salt, black pepper, garlic powder, onion powder, dried thyme, and dried rosemary. Mix thoroughly until well combined.
- Pat the bottom roast completely dry with paper towels. Moisture on the surface will prevent proper browning and crust development.
- Generously coat all sides of the roast with the spice mixture, pressing gently so the seasonings adhere to the meat. Don’t be shy – this creates incredible flavor.
- Heat olive oil in a large heavy-bottomed roasting pan or Dutch oven over medium-high heat until it shimmers and is almost smoking.
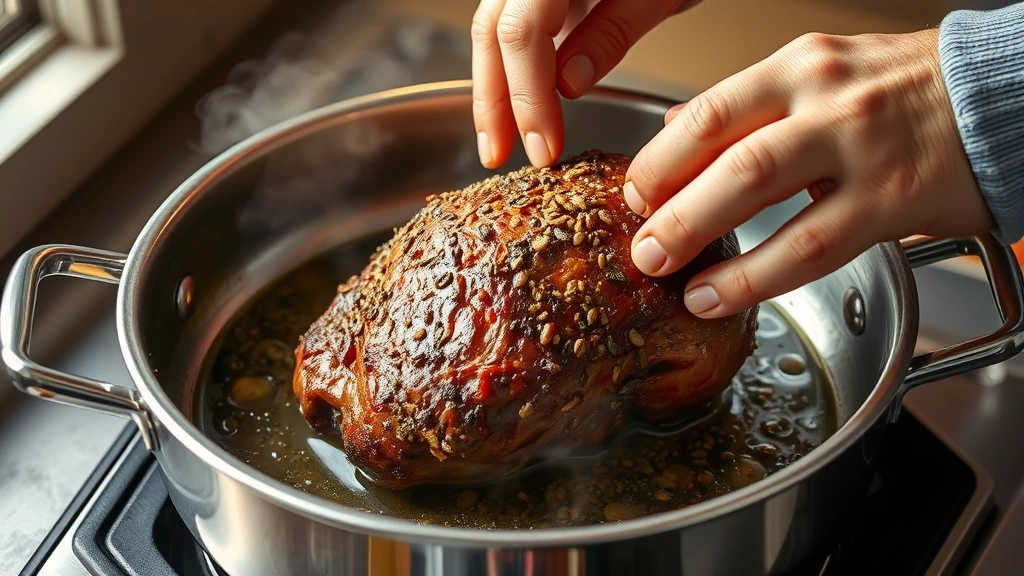
- Carefully place the seasoned roast into the hot oil. Sear for 3-4 minutes on the first side without moving it, allowing a golden-brown crust to form.
- Flip the roast and sear for another 3-4 minutes on the second side until similarly browned.
- Sear the remaining sides for 2-3 minutes each until all exterior surfaces have a deep golden-brown color.
- Remove the roast from the pan and set aside on a clean cutting board. Do not wash the pan – those browned bits are liquid gold for flavor.
- Add the quartered onion, carrot pieces, and smashed garlic cloves to the same pan. Stir and cook for 3-4 minutes until the vegetables begin to soften and release their aromas.
- Stir in the tomato paste and cook for 1-2 minutes, stirring constantly to coat the vegetables and develop deeper flavor.
- If using red wine, pour it into the pan and use a wooden spoon to scrape up all the browned bits from the bottom. Let it simmer for 2 minutes.
- Add the beef broth, bay leaves, fresh thyme sprigs, and balsamic vinegar to the pan. Stir well to combine.
- Nestle the seared roast back into the pan on top of the vegetables and broth. The liquid should come about halfway up the sides of the meat.
- Cover the pan tightly with aluminum foil or a fitted lid. Place in the preheated 325°F oven.
- Roast for 2 hours and 30 minutes for a medium doneness, or up to 3 hours and 30 minutes for a more well-done roast with maximum tenderness.
- After 1 hour and 30 minutes of cooking, carefully remove the pan from the oven and add the potato chunks around the roast. Return to the oven.
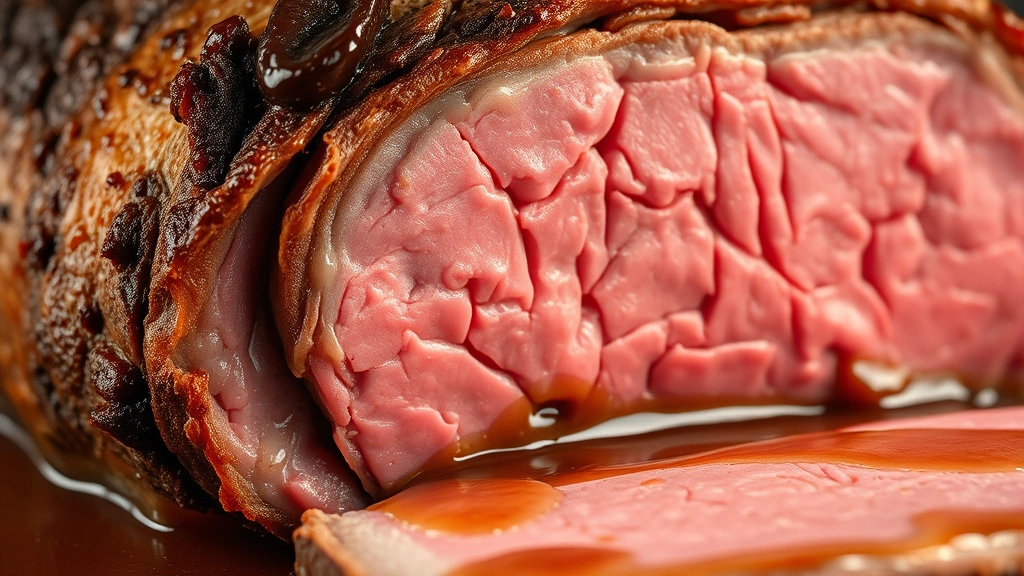
- Check the roast after 2 hours total cooking time by inserting a fork into the thickest part – the meat should be very tender and easily pierced.
- In the final 30 minutes of cooking, add the carrot chunks around the roast if you prefer them slightly firmer, or add them earlier for softer vegetables.
- When the roast is fork-tender and vegetables are cooked through, carefully remove the pan from the oven using oven mitts.
- Transfer the roast to a clean cutting board and tent loosely with foil. Let it rest for 10-15 minutes before carving. This allows the juices to redistribute throughout the meat.
- Using a slotted spoon, transfer the vegetables to a serving platter and keep warm.
- Pour the cooking liquid through a fine-mesh strainer into a saucepan, discarding the bay leaves and thyme sprigs. Press on the solids gently to extract maximum flavor.
- If you prefer a thicker gravy, bring the strained liquid to a simmer over medium heat and whisk in the cornstarch slurry. Stir constantly for 2-3 minutes until thickened.
- Taste the gravy and adjust seasoning with salt and pepper as needed.
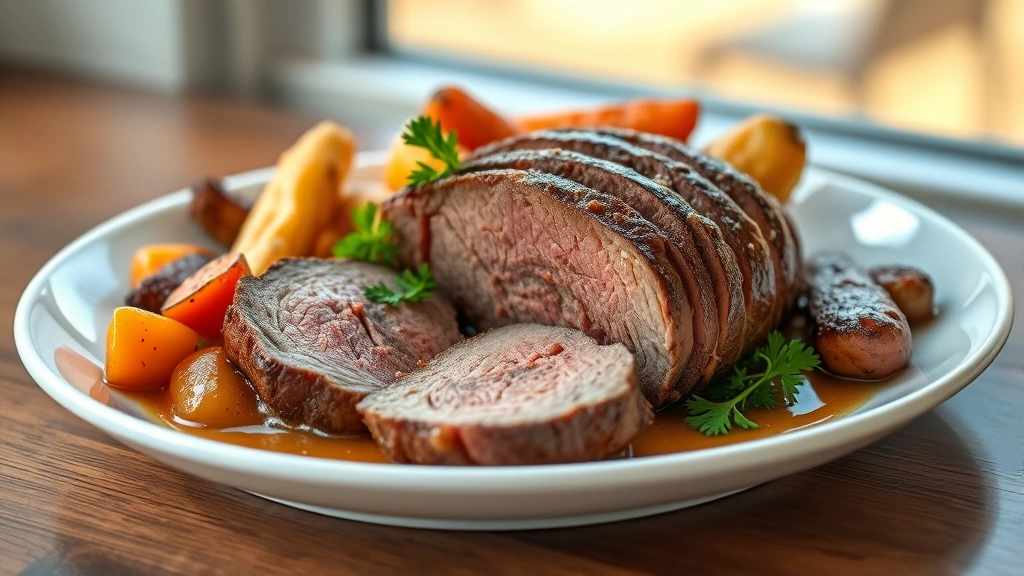
- Slice the rested roast against the grain into ¼-inch thick slices.
- Arrange the sliced roast on your serving platter with the vegetables, drizzle generously with gravy, and garnish with fresh parsley before serving.
Pro Tips
The Searing Step: Don’t skip the searing step! This creates a flavorful crust through the Maillard reaction, which adds incredible depth to your finished dish. Make sure your oil is hot enough that it shimmers – you want an aggressive sear.
Liquid Ratio: The braising liquid should come about halfway up the sides of the roast. Too much liquid will steam the meat rather than braise it, resulting in less flavorful results. Too little and your roast may dry out.
Oven Temperature: Using a lower oven temperature (325°F) ensures the meat cooks gently and remains moist. Higher temperatures can toughen the exterior while leaving the interior undercooked.
Vegetable Timing: Add harder vegetables like potatoes later in the cooking process so they don’t become mushy. If you prefer very tender vegetables, add them from the beginning, but stir occasionally.
Resting Period: This is crucial! Resting allows the muscle fibers to relax and reabsorb the juices, resulting in more tender, juicy meat. Never skip this step.
Wine Selection: Use a wine you would actually drink. Cheap cooking wine can impart off-flavors. A decent red wine like Cabernet Sauvignon or Merlot works beautifully.
Make-Ahead Option: You can prepare this roast up to 2 days ahead. Cool completely, store covered in the refrigerator, and reheat gently at 300°F until warmed through.
Gravy Thickness: Cornstarch slurry creates a silky gravy, but some prefer the natural consistency of the braising liquid. Taste first before thickening.
Leftovers: Shred any remaining roast and use for sandwiches, tacos, or grain bowls the next day. The meat stays incredibly moist and flavorful.