
If you’ve ever craved those perfectly crispy, golden Cane’s chicken tenders from your favorite fast-casual restaurant, you’re in for a treat! This homemade version captures all that magic right in your own kitchen. These tenders are absolutely divine—with a super crispy exterior and juicy, tender chicken inside that’ll have everyone asking for seconds.
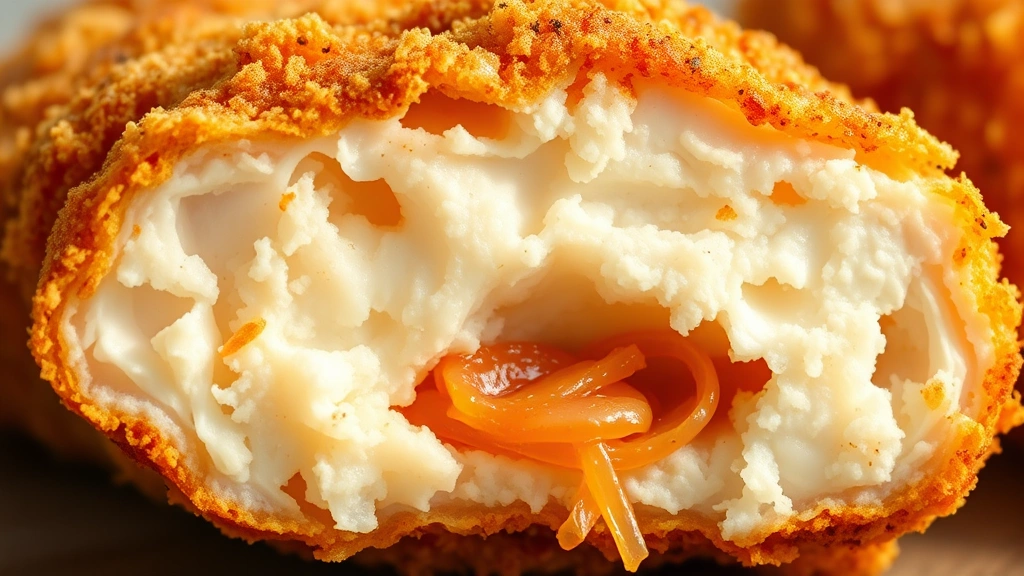
The secret to achieving that signature Cane’s texture is all about the breading technique and frying temperature. We’re talking ultra-crispy, almost shatteringly crunchy on the outside while keeping the chicken moist and flavorful within. This recipe uses a simple but effective two-step breading process that creates that iconic golden crust you know and love.
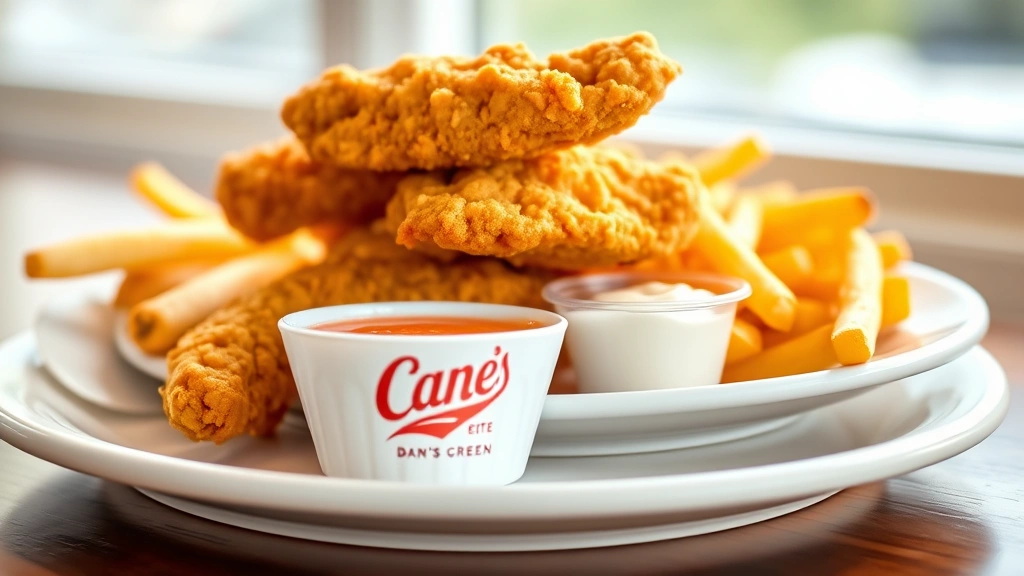
What makes this recipe so special is how straightforward it actually is. You don’t need any fancy equipment or hard-to-find ingredients. Just quality chicken tenders, some pantry staples, and a little patience. Serve these alongside their famous sauce (which we’ll show you how to make), creamy coleslaw, and crispy fries for the ultimate copycat experience. Whether you’re meal prepping for the week or planning a casual dinner party, these tenders are always a crowd-pleaser.
The beauty of making these at home is that you can customize everything to your liking. Want them extra spicy? Add cayenne pepper to the seasoning mix. Prefer a lighter version? Try our lighter cooking methods for inspiration. You can also prep the tenders ahead of time and freeze them before frying, making weeknight dinners incredibly convenient.
I absolutely love serving these with homemade sides. Pair them with pickled red onions for brightness and tang, or go classic with a fresh chickpea salad on the side. For more sauce inspiration, check out this fried chicken guide from Bon Appétit or Serious Eats’ chicken tender breakdown. And if you want to explore other crispy chicken options, The New York Times has an excellent fried chicken recipe worth exploring.
Once you master this recipe, you’ll have a go-to dinner that’s faster and more affordable than hitting up your local Cane’s. Plus, your family will love knowing exactly what’s going into their food. Let’s get started on creating these crispy, golden tenders that’ll rival anything you can buy!
Ingredients
- 2 pounds boneless, skinless chicken tenders (about 8-10 pieces)
- 1 cup all-purpose flour
- 1 tablespoon salt
- 1 teaspoon black pepper
- 1 teaspoon garlic powder
- 1 teaspoon paprika
- ½ teaspoon cayenne pepper (optional, for heat)
- 1 cup buttermilk or whole milk
- Oil for frying (vegetable or peanut oil recommended)
- Cane’s Sauce (see notes for homemade version)
- Sea salt for finishing
Instructions
- Pat the chicken tenders dry with paper towels. This is crucial for achieving maximum crispiness—any excess moisture will create steam and prevent proper browning.
- In a shallow bowl, whisk together the flour, salt, black pepper, garlic powder, paprika, and cayenne pepper until fully combined.
- Pour the buttermilk into another shallow bowl. If using regular milk, add a tablespoon of lemon juice or vinegar to create a makeshift buttermilk substitute.
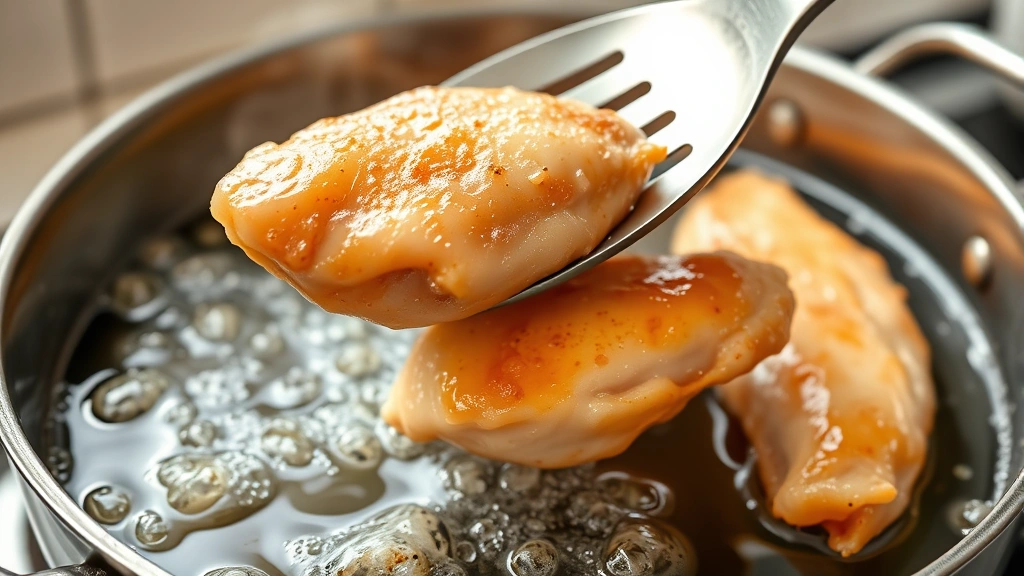
- Heat your oil to 350°F in a deep skillet or Dutch oven. Use a thermometer to ensure accurate temperature—this is essential for the perfect texture.
- Working with one tender at a time, dip the chicken into the buttermilk, coating completely and letting excess drip off.
- Transfer the wet tender to the flour mixture and coat thoroughly on all sides, pressing gently so the coating adheres well.
- Place the coated tender on a plate and repeat with remaining tenders. For extra-crispy results, dip each tender back into the buttermilk and flour mixture a second time.
- Once all tenders are coated and the oil reaches 350°F, carefully place 3-4 tenders into the hot oil. Don’t overcrowd the pan, as this drops the oil temperature and prevents proper crisping.
- Fry for 6-7 minutes, turning halfway through cooking, until the exterior is deep golden brown and the internal temperature reaches 165°F when checked with a meat thermometer.
- Using a slotted spoon or spider strainer, remove the cooked tenders and place them on a paper towel-lined plate to drain excess oil.
- While still warm, sprinkle with a pinch of sea salt for that restaurant-quality finish.
- Repeat frying process with remaining tenders, maintaining the oil temperature at 350°F throughout.
- Serve immediately while still hot and crispy, accompanied by Cane’s sauce, coleslaw, and fries for the ultimate experience.
Pro Tips
For the homemade Cane’s sauce, combine ½ cup mayo, 3 tablespoons ketchup, 2 tablespoons Worcestershire sauce, 1 tablespoon hot sauce, 1 teaspoon garlic powder, ½ teaspoon smoked paprika, and a squeeze of fresh lemon juice. Whisk until smooth and refrigerate until serving.
Don’t skip the buttermilk soak. It’s what keeps the chicken incredibly moist and tender on the inside while creating that signature crispy exterior. If you absolutely can’t find buttermilk, regular milk with lemon juice works in a pinch.
You can prepare the tenders through the double-coating step up to 8 hours ahead. Store them on a parchment-lined plate in the refrigerator, uncovered, so the coating can dry slightly. Fry them fresh when ready to serve.
For frozen storage, freeze the uncooked, coated tenders on a baking sheet for 2 hours, then transfer to a freezer bag for up to 3 months. Fry from frozen, adding 2-3 minutes to the cooking time.
The oil can be reused up to 3-4 times if strained through fine mesh or cheesecloth while still warm. Store in an airtight container in a cool, dark place.
If you don’t have a deep skillet, a Dutch oven or heavy-bottomed pot works beautifully. Just ensure you have at least 2 inches of oil depth for proper frying.
For a lighter version, try air frying at 400°F for 10-12 minutes, though the texture won’t be quite as crispy as deep-fried.