
There’s something absolutely magical about sinking your teeth into an authentic Chicago beef sandwich – that tender, juicy roast beef piled high on a soft roll with just the right amount of gravy and peppers. This iconic sandwich has been a Chicago staple since the 1930s, and today I’m sharing my foolproof method to recreate this beloved classic right in your own kitchen.
While many people think making Chicago beef requires special equipment or restaurant secrets, I’m here to tell you that this is completely achievable at home. The key lies in understanding a few fundamental principles: proper meat selection, low and slow cooking, and building layers of flavor through a rich beef broth. When you master these elements, you’ll produce beef so tender and flavorful that your family and friends will think you’ve been perfecting this recipe for decades.
The beauty of Chicago beef is its simplicity paired with incredible depth of flavor. Unlike some recipes that rely on complicated techniques or hard-to-find ingredients, this one celebrates quality ingredients treated with respect. I’m talking about a good cut of beef, aromatics that have been properly caramelized, and a cooking method that transforms tough cuts into melt-in-your-mouth perfection. Building rich, flavorful sauces and gravies is an art form, and once you understand the principles here, you’ll apply them to countless other dishes.
What makes this recipe truly special is the gravy – that gorgeous, beefy liquid that you dip your sandwich into. This isn’t just any gravy; it’s the soul of the sandwich, infused with beef flavors that have been coaxed out through patient simmering. Some recipes skip this step, but not us. We’re going to do this right, creating a broth so good you might find yourself sipping it straight from a spoon (I won’t judge).
I’ve tested this recipe multiple times, adjusting cook times, temperatures, and ingredient ratios to find the perfect balance. The result is a Chicago beef sandwich that rivals the best delis in the Windy City. Whether you’re making this for a casual weeknight dinner or impressing guests at a gathering, this recipe delivers authentic flavor with reliable results every single time.
One thing I love about making Chicago beef at home is the customization factor. Want your peppers charred and caramelized? Done. Prefer your meat sliced thicker or thinner? You control that. This is your kitchen, and you get to make it exactly how you like it. Adding pickled red onions or other garnishes is totally up to you too.
I’m going to walk you through every single step with the kind of detail that leaves zero room for confusion. From selecting your beef to the final assembly, you’ll know exactly what to expect. This recipe serves a crowd and actually tastes even better the next day as the flavors continue to develop and meld together. Some of my favorite Chicago beef memories involve leftover sandwiches the day after I’ve made them – the meat seems to absorb even more of that incredible gravy overnight.
Let me also mention that this recipe is incredibly budget-friendly. You’re not buying expensive cuts of beef here; in fact, the tougher, more affordable cuts work beautifully for this application. The long, slow cooking breaks down the connective tissue and transforms what might otherwise be a tough piece of meat into something incredibly tender. This is one of those recipes where patience and technique matter far more than premium ingredients.
If you’ve never made Chicago beef before, don’t be intimidated. This recipe is forgiving and straightforward. There’s no complicated knife work, no finicky techniques, and no need for specialized equipment beyond what most home cooks already have in their kitchen. You’ll need a good heavy pot or Dutch oven, a sharp knife for slicing, and an oven. That’s it. Just like with other classic comfort food preparations, the magic happens through time and temperature management.
I also want to touch on the rolls – because they matter. You want something sturdy enough to hold up to the gravy and meat, but soft enough to be pleasant to bite through. Many Chicago delis use specific rolls that are hard to find outside the Midwest, but I’ve found that good quality Italian rolls or hoagie rolls work beautifully as a substitute. Toast them lightly if you want to add a bit of structure and prevent them from getting too soggy.
The seasoning in this recipe is deliberately restrained, which allows the natural beef flavor to shine through. We’re not covering up the meat with heavy spices; instead, we’re enhancing and highlighting what’s already there. This is sophisticated, classic flavor – the kind that makes you close your eyes and smile with each bite.
For serving, I recommend having the gravy in a separate bowl for dipping rather than pouring it all over the sandwich at once. This gives people control over how much gravy they want, and it prevents the rolls from becoming oversaturated. Understanding how to properly construct layered dishes is a skill that extends across many types of cooking.
One final note: this recipe makes enough for a gathering, which means you might have leftovers. Don’t treat these as an afterthought – they’re genuinely wonderful. Store the meat and gravy separately in airtight containers in the refrigerator for up to four days. You can reheat them together gently on the stovetop, and they’ll be just as delicious as day one. Some people even freeze the gravy and meat for up to three months, which means you can have Chicago beef on the table any time the craving strikes.
Now, let’s get into the recipe itself. I’m confident that following these instructions will result in Chicago beef that’s absolutely restaurant-quality. This is the kind of recipe that becomes a family favorite, the one people request you make for special occasions, the one you find yourself craving on random Tuesday afternoons. Let’s make something truly special together.
Ingredients
- 4-5 pounds beef chuck roast or brisket, cut into chunks
- 2 tablespoons vegetable oil
- 1 large yellow onion, quartered
- 6 cloves garlic, smashed
- 4 bay leaves
- 2 teaspoons dried thyme
- 1 teaspoon dried oregano
- 1 teaspoon black peppercorns
- 8 cups beef broth, divided
- 2 tablespoons tomato paste
- 2 tablespoons Worcestershire sauce
- 1 tablespoon soy sauce
- 2 teaspoons kosher salt, plus more to taste
- 1 teaspoon black pepper
- 3 tablespoons butter
- 3 tablespoons all-purpose flour
- 2 large sweet onions, sliced thin
- 2 large green bell peppers, sliced into strips
- 1 tablespoon balsamic vinegar
- Soft Italian rolls or hoagie rolls for serving
- Pepperoncini peppers for serving (optional)
- Fresh parsley for garnish (optional)
Instructions
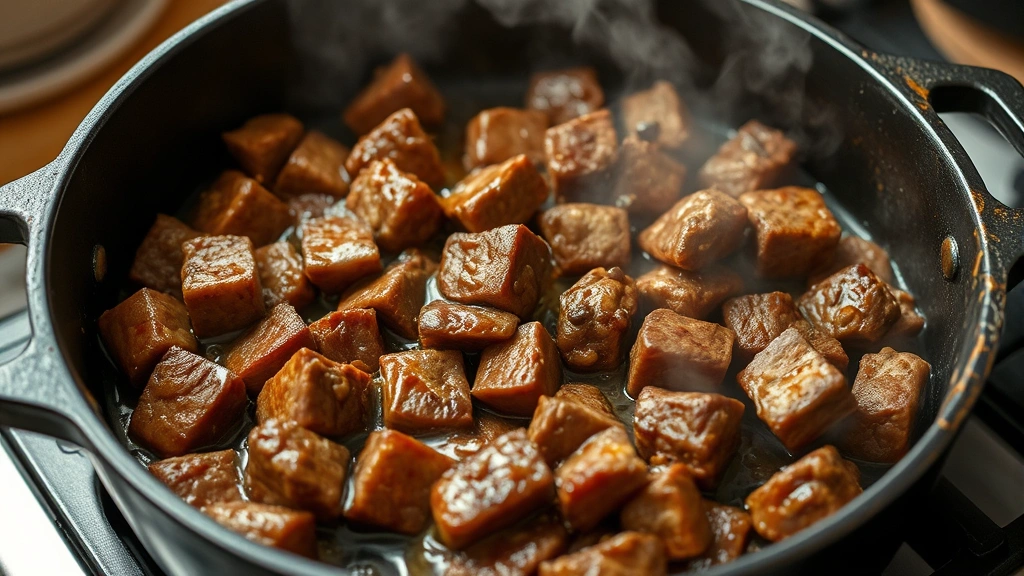
- Pat the beef chunks dry with paper towels and season generously on all sides with salt and pepper. This ensures proper browning and flavor development.
- Heat vegetable oil in a large heavy pot or Dutch oven over medium-high heat until it shimmers. Working in batches to avoid crowding, add beef chunks and brown on all sides for 3-4 minutes per side. Transfer browned beef to a clean plate and set aside.
- In the same pot, add the quartered onion and cook for 3-4 minutes until beginning to soften and caramelize. Add smashed garlic cloves and cook for another minute until fragrant.
- Stir in tomato paste and cook for 2 minutes, stirring constantly to coat the bottom of the pot and deglaze any browned bits.
- Add the bay leaves, thyme, oregano, and peppercorns to the pot, stirring for about 30 seconds until the spices become aromatic.
- Pour in 7 cups of beef broth, scraping the bottom of the pot with a wooden spoon to release all the flavorful browned bits. Add Worcestershire sauce and soy sauce.
- Return the browned beef to the pot along with any accumulated juices. Bring the mixture to a gentle simmer, then reduce heat to low.
- Cover the pot partially and simmer for 2 to 2.5 hours, stirring occasionally, until the beef is very tender and breaks apart easily with a fork.
- While the beef cooks, prepare the gravy roux: melt butter in a small saucepan over medium heat. Once melted and foaming, whisk in the flour to create a paste. Cook for 1-2 minutes, stirring constantly, until it turns light golden brown. Set aside.
- Remove the beef from the pot using a slotted spoon and transfer to a clean bowl. Strain the cooking liquid through a fine-mesh strainer into another bowl, discarding the solids. You should have approximately 6 cups of flavorful broth.
- Return 5 cups of the strained broth to the pot over medium heat. Slowly whisk in the butter-flour roux, a little at a time, until fully incorporated and smooth. Continue whisking for 2-3 minutes until the gravy thickens to a coating consistency that lightly coats the back of a spoon.
- Return the shredded beef to the gravy, add the remaining 1 cup of beef broth, and stir well to combine. Taste and adjust seasoning with additional salt and pepper as needed. Keep warm over low heat.
- In a large skillet, heat 1 tablespoon of oil over medium-high heat. Add the sliced sweet onions and cook for 8-10 minutes, stirring occasionally, until deeply caramelized and golden brown. Season with salt and pepper.
- Push the caramelized onions to the side of the skillet and add the green bell pepper strips. Cook for 5-7 minutes, stirring occasionally, until the peppers are tender with some charred edges. Drizzle with balsamic vinegar and stir to combine.
- Lightly toast the Italian rolls in a 350°F oven for 3-4 minutes or in a skillet until just warmed through and slightly crispy on the outside.
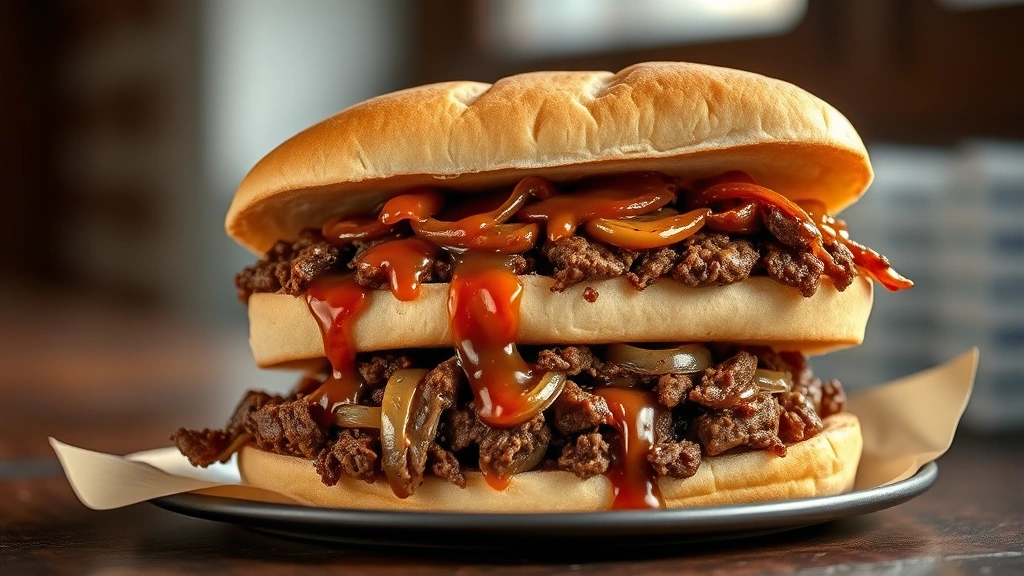
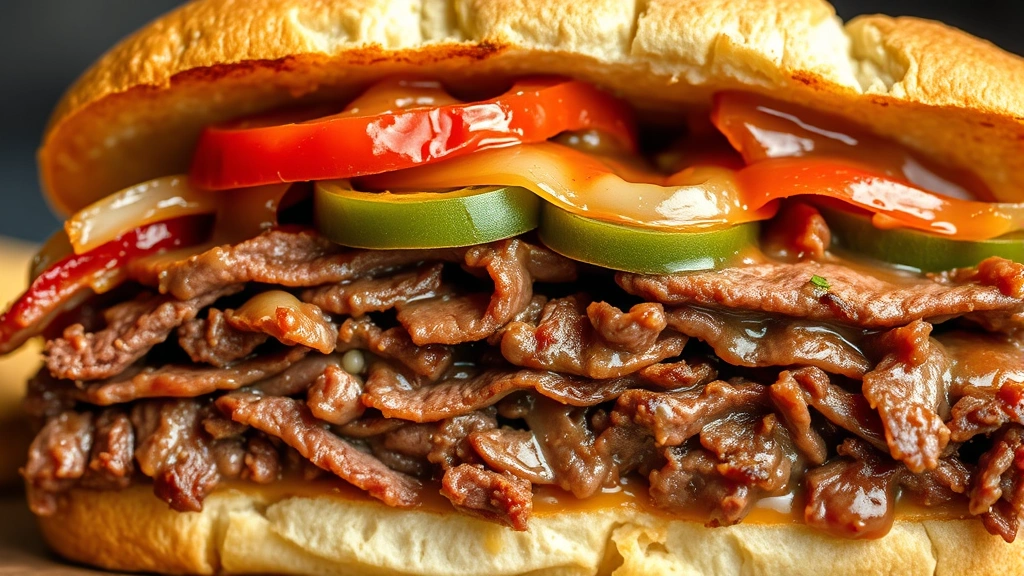
- To assemble each sandwich, place a toasted roll on a plate or in a shallow bowl. Spoon a generous amount of beef with gravy onto the bottom half of each roll.
- Top the beef with a spoonful of the caramelized onions and charred green peppers. Place the top half of the roll on the sandwich.
- Serve immediately with a small bowl of the remaining warm gravy on the side for dipping. Offer pepperoncini peppers and additional pepper slices as desired.
- Garnish with fresh parsley if desired and serve while everything is still hot and steaming.
Pro Tips
- This recipe uses chuck roast or brisket because these tougher cuts contain more connective tissue and fat, which break down during the long cooking process to create incredibly tender, flavorful meat. Avoid lean cuts like sirloin or tenderloin as they will become dry.
- For best results, don’t skip the browning step. This develops the deep, complex flavors through the Maillard reaction, which is fundamental to creating that authentic Chicago beef taste.
- The gravy is absolutely essential to the sandwich experience. It’s not optional. The ratio of liquid to meat should be such that you have plenty of savory broth to dip each bite into.
- If your gravy seems too thin after adding the roux, continue simmering for another 5-10 minutes to allow it to reduce and thicken further. If it’s too thick, whisk in a bit more broth.
- Make-ahead tip: This recipe actually improves when made a day ahead. Prepare through step 12, then refrigerate the beef and gravy separately overnight. The next day, reheat gently over medium-low heat until warmed through. The flavors will be even more developed and melded.
- Leftover beef and gravy freeze beautifully for up to three months. Portion into airtight containers and thaw overnight in the refrigerator before reheating.
- For vegetable variations, some Chicago delis include giardiniera (spicy pickled vegetables) in addition to or instead of the green peppers. Feel free to experiment with what you enjoy.
- The peppers should have some char and caramelization on them. Don’t be afraid to let them sit in the hot skillet for a minute or two to develop color and deeper flavor.
- If you can’t find quality Italian rolls, focus on finding rolls that are sturdy rather than fluffy. They need to hold up to the liquid without falling apart.
- Serve this sandwich with napkins nearby – it’s intended to be a bit messy and is best eaten with your hands.
- The total cooking time of 3+ hours allows the beef to become fall-apart tender and the flavors to develop fully. Don’t rush this process by using high heat.
- Taste the gravy before serving and adjust seasoning carefully. The Worcestershire sauce, soy sauce, and beef broth already contain salt, so taste first before adding more.