
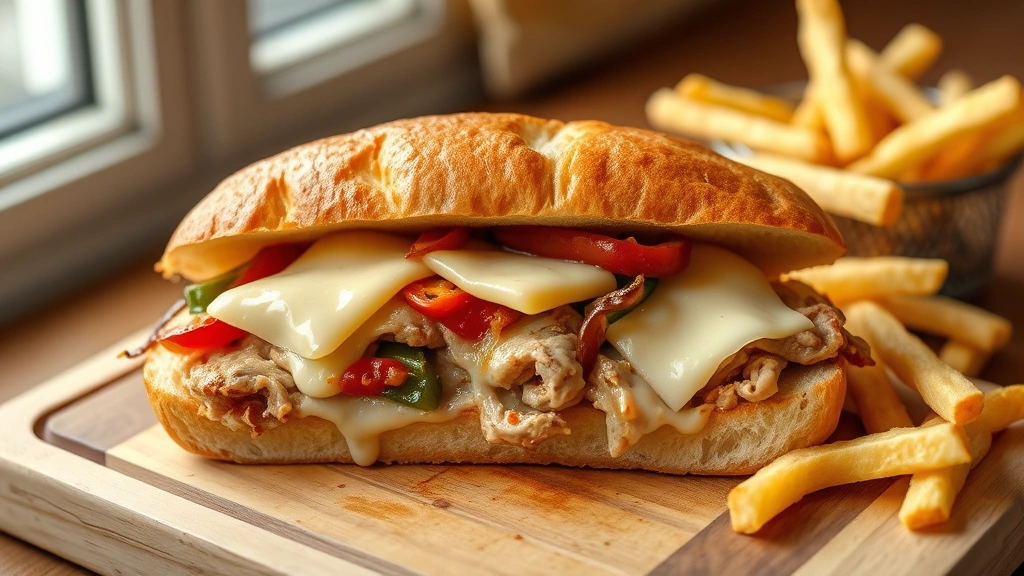
There’s nothing quite like sinking your teeth into a warm, gooey Chicken Philly Cheesesteak fresh off the griddle. This beloved sandwich has been a staple of American comfort food for decades, and today I’m sharing my foolproof method for creating the absolute best version right in your own kitchen.
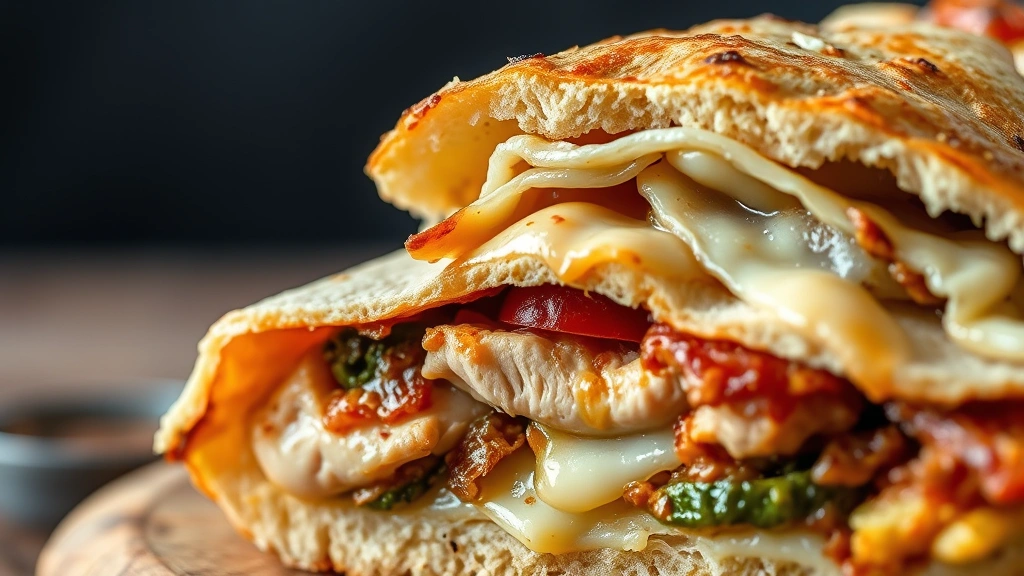
The beauty of a chicken Philly cheesesteak lies in its simplicity—tender, seasoned chicken breast, sautéed peppers and onions, melted provolone cheese, all nestled in a perfectly toasted hoagie roll. But as with any classic dish, the magic is in the details. I’ve perfected this recipe through countless iterations, and I’m thrilled to share all my secrets with you.
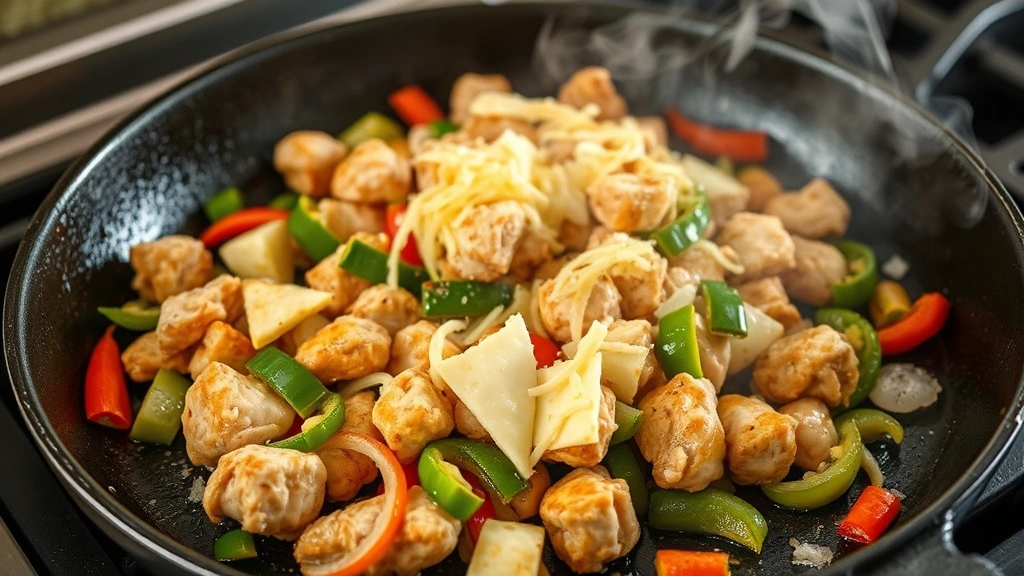
What makes this version stand out is the technique I use to slice and cook the chicken. Rather than using pre-sliced deli chicken, I start with fresh chicken breast and slice it thin myself, which gives you much better texture and flavor. The key is partially freezing the chicken first—about 45 minutes in the freezer makes slicing incredibly easy and ensures even cooking. I also use a well-seasoned cast iron skillet or griddle, which creates those beautiful caramelized edges on the chicken while keeping the interior juicy and tender.
The vegetables are equally important. I use a combination of bell peppers and onions, sliced thin and cooked low and slow until they’re perfectly caramelized and sweet. This isn’t a quick sauté—patience here pays off in spades. The peppers and onions should be golden and slightly charred at the edges, which adds depth and complexity to every bite.
For the cheese, I strongly recommend using real provolone slices rather than American cheese. While American cheese certainly works and melts beautifully, provolone has a more sophisticated flavor that elevates the entire sandwich. If you can find a good quality deli counter provolone, you’re in for a real treat. The cheese should be added just before the sandwich comes together, allowing it to melt slightly from the residual heat of the chicken and vegetables.
I’ve also included tips for creating the perfect toasted roll and suggestions for customization. Whether you like to add sautéed mushrooms (like in a classic preparation with pickled vegetables), jalapeños for heat, or even a spread of garlic aioli, this recipe is incredibly versatile.
This sandwich is perfect for lunch, dinner, or even a casual game day meal. Serve it with crispy fries, a cold beverage, and you’ve got yourself a restaurant-quality meal that your family will absolutely love. Trust me, once you master this recipe, you’ll be making it again and again. Let’s get started!
Ingredients
- 2 pounds boneless, skinless chicken breast
- 4 tablespoons butter, divided
- 2 large bell peppers (any color), thinly sliced
- 2 large yellow onions, thinly sliced
- 2 teaspoons salt, divided
- 1 teaspoon black pepper, divided
- 1 teaspoon garlic powder
- 1 teaspoon paprika
- ½ teaspoon cayenne pepper (optional)
- 8 slices provolone cheese
- 4 hoagie rolls or sub rolls
- 2 tablespoons olive oil
- Fresh parsley for garnish (optional)
Instructions
- Place chicken breasts on a cutting board and carefully slice them in half horizontally to create thinner pieces, about ½-inch thick. This helps them cook evenly and quickly.
- Place the chicken pieces on a baking sheet and freeze for 45 minutes to 1 hour. You want them partially frozen so they’re firm enough to slice cleanly without being rock solid.
- Remove the partially frozen chicken from the freezer and slice it into thin strips, about ¼-inch thick. The partial freeze makes this much easier and more uniform.
- In a small bowl, combine 1 teaspoon salt, ½ teaspoon black pepper, garlic powder, paprika, and cayenne pepper. Sprinkle this seasoning mixture evenly over all the chicken slices, making sure each piece is well coated.
- Heat 2 tablespoons of butter and 1 tablespoon of olive oil in a large cast iron skillet or griddle over medium-high heat. Once the butter is foaming and the pan is hot, add the seasoned chicken slices in a single layer.
- Cook the chicken for 4-5 minutes without stirring, allowing it to develop a nice golden crust on the bottom. Then stir and break up the pieces, cooking for another 3-4 minutes until the chicken is cooked through and slightly browned. Transfer to a plate and set aside.
- Reduce the heat to medium and add the remaining 2 tablespoons of butter and 1 tablespoon of olive oil to the same skillet.
- Add the sliced bell peppers and onions to the skillet, sprinkle with the remaining 1 teaspoon of salt and ½ teaspoon of black pepper, and stir to combine.
- Cook the vegetables for 12-15 minutes, stirring occasionally, until they’re soft, caramelized, and golden brown. They should be sweet and tender with slightly charred edges. Don’t rush this step—it’s crucial for building flavor.
- While the vegetables are cooking, slice your hoagie rolls in half lengthwise and brush the cut sides lightly with a bit of butter.
- Toast the buttered hoagie rolls in a separate skillet or on the griddle over medium heat for 2-3 minutes until they’re golden brown and crispy. Be careful not to burn them. Set aside.
- When the vegetables are perfectly caramelized, return the cooked chicken to the skillet with the peppers and onions, stirring gently to combine everything together.
- Top the chicken and vegetable mixture with the provolone cheese slices, allowing them to melt from the residual heat. If needed, cover the skillet briefly with a lid to speed up the melting process.
- Once the cheese is melted and gooey, immediately divide the chicken, vegetable, and cheese mixture evenly among the four toasted hoagie rolls.
- Serve immediately while everything is hot and melty. Garnish with fresh parsley if desired, and serve alongside your favorite sides like crispy fries or a fresh salad.
Pro Tips
o Don’t skip the partial freezing step. It makes slicing infinitely easier and gives you more consistent results.
o The key to amazing peppers and onions is patience and low-to-medium heat. Rushing them on high heat will make them tough and bitter.
o For extra flavor, add minced garlic to the vegetables during the last minute of cooking.
o If you can’t find good quality provolone at your grocery store, ask the deli counter if they have any recommendations or if they can slice fresh provolone for you.
o You can customize this sandwich by adding sautéed mushrooms for an “Italian” style version, jalapeños for heat, or a spread of garlic aioli on the toasted rolls.
o For a lighter side option, serve with a fresh salad instead of fries.
o This recipe works wonderfully for meal prep. You can cook the chicken and vegetables ahead of time and store them separately in the refrigerator for up to 3 days. Simply reheat and assemble when ready to eat.
o Leftovers can be stored in an airtight container for up to 3 days. Reheat gently in a skillet to avoid drying out the chicken.
o For a crowd, this recipe doubles easily. Just use a larger skillet or griddle to accommodate everything.
o The chicken should be cooked through with an internal temperature of 165°F. Use a meat thermometer to verify doneness if you’re unsure.
o For extra crispy rolls, butter both the inside and outside of the hoagie rolls before toasting.
o Consider using a griddle instead of a skillet if you’re making multiple sandwiches at once, as it gives you more surface area to work with.