
Cincinnati chili is a beloved regional specialty that’s distinctly different from traditional Texas-style chili. This unique take features a blend of warm spices like cinnamon and cloves combined with ground beef and tomato sauce, creating a rich, aromatic sauce that’s traditionally served over spaghetti. What makes Cincinnati chili so special is its mysterious flavor profile—sweet, savory, and slightly spiced all at once. The magic comes from the careful layering of spices and a slow simmer that allows all the flavors to meld together beautifully.
This recipe is perfect for feeding a crowd, and it’s actually quite simple to make despite its complex flavor. The key is using quality ingredients and giving yourself enough time for everything to come together. Whether you’re a Cincinnati native or trying this iconic dish for the first time, you’ll understand why this chili has such a devoted following. Serve it the traditional way—over spaghetti with a generous topping of shredded cheddar cheese, or try it as a topping for hot dogs (known as Coneys) for an authentic experience.
The beauty of this recipe is its versatility. You can enjoy it as a hearty main course, serve it at parties, or even use it as a base for other dishes. Check out our Best Heavy Cream Alfredo Sauce Recipe if you want to explore other pasta toppings, or try our Easy Chicken Alfredo Recipe for another comforting pasta dish. For side dish inspiration, our Best Chickpea Salad Recipe and Best Shishito Peppers Recipe make excellent accompaniments. For more detailed guidance on regional chili variations, check out Serious Eats, and for professional cooking techniques, visit New York Times Cooking. You can also find more inspiration at Bon Appétit.
Ingredients
- 2 pounds ground beef
- 3 tablespoons olive oil
- 1 large yellow onion, finely diced
- 6 cloves garlic, minced
- 3 tablespoons chili powder
- 2 tablespoons ground cumin
- 1 tablespoon ground cinnamon
- 1 teaspoon ground cloves
- 1 teaspoon cayenne pepper
- 1 teaspoon dried oregano
- 1/2 teaspoon ground allspice
- 1/4 teaspoon ground nutmeg
- 2 tablespoons apple cider vinegar
- 2 tablespoons Worcestershire sauce
- 1 tablespoon soy sauce
- 2 cans (15 ounces each) tomato sauce
- 1 can (6 ounces) tomato paste
- 2 cups beef broth
- 1 teaspoon salt
- 1/2 teaspoon black pepper
- 1 pound spaghetti, cooked according to package directions
- 2 cups shredded sharp cheddar cheese
- 1/2 cup diced yellow onion, for garnish (optional)
- 1/4 cup oyster crackers, for serving (optional)
Instructions
- Heat olive oil in a large, heavy-bottomed pot or Dutch oven over medium-high heat. Once the oil is shimmering, add the diced yellow onion and cook for 5-7 minutes, stirring occasionally, until the onion becomes translucent and begins to soften.
- Add the minced garlic to the pot and cook for an additional 1-2 minutes, stirring constantly, until fragrant. Be careful not to burn the garlic as it can become bitter.
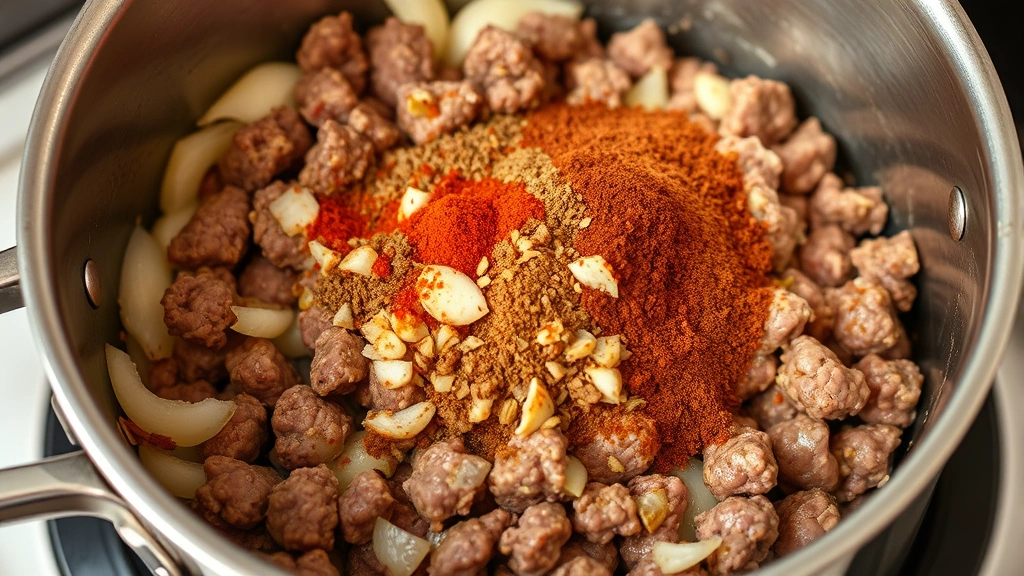
- Add the ground beef to the pot, breaking it up with a wooden spoon or spatula as it cooks. Continue cooking for 8-10 minutes, stirring frequently, until the beef is completely browned and no pink remains. Drain any excess fat if necessary, leaving about 2-3 tablespoons.
- In a small bowl, combine all the dry spices: chili powder, cumin, cinnamon, cloves, cayenne pepper, oregano, allspice, and nutmeg. Mix well to ensure the spices are evenly distributed.
- Add the spice mixture to the pot with the browned beef, stirring constantly for about 1 minute. This blooming technique helps release the essential oils in the spices and intensifies their flavors.
- Pour in the apple cider vinegar, Worcestershire sauce, and soy sauce, stirring to combine. These ingredients add depth and umami to the chili.
- Add the tomato sauce, tomato paste, and beef broth to the pot. Stir well to combine all ingredients, breaking up any clumps of tomato paste. The mixture should be well-incorporated and relatively smooth.
- Bring the chili to a gentle simmer, then reduce the heat to low. Add salt and black pepper to taste, remembering that you can always add more seasoning later but can’t take it out.
- Let the chili simmer uncovered for 1.5 to 2 hours, stirring occasionally (about every 15-20 minutes). The longer it simmers, the more the flavors will meld and intensify. The chili should reduce slightly and become thicker and darker in color.
- Taste the chili and adjust the seasonings as needed. Add more salt, pepper, or spices according to your preference. The chili should have a balance of sweet, spicy, and savory flavors.
- While the chili is simmering, cook the spaghetti according to the package directions. Drain well and set aside.
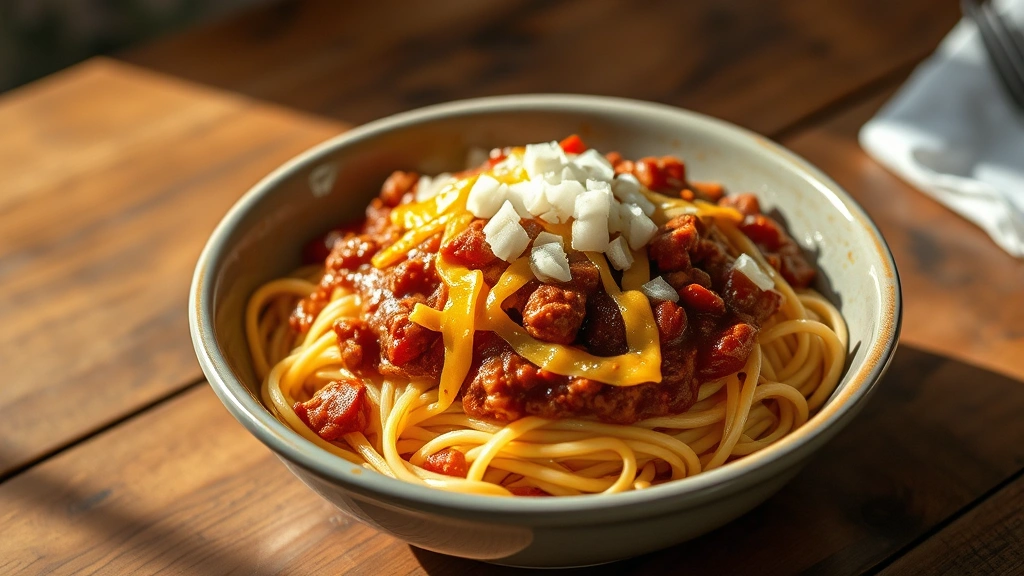
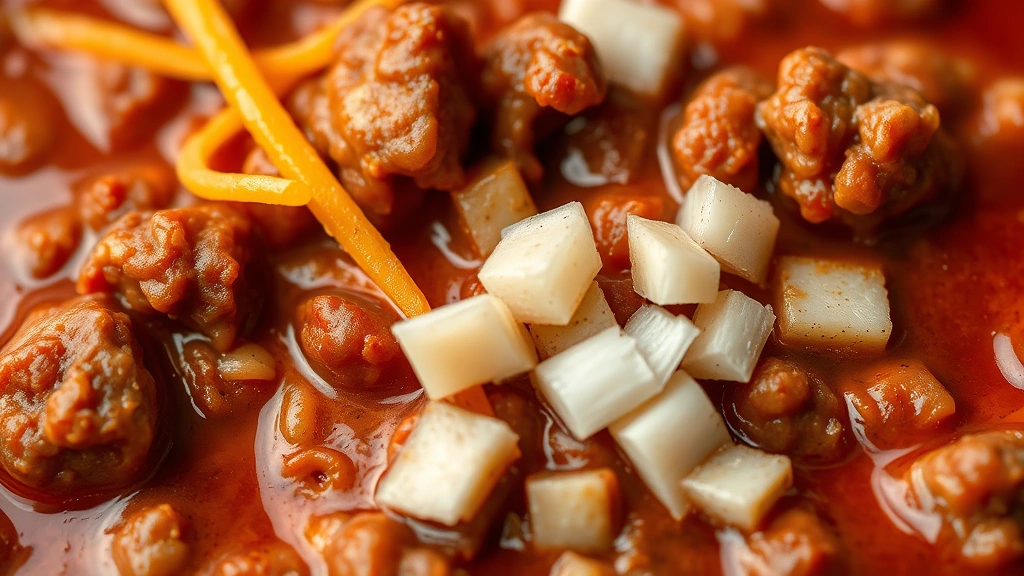
- To serve, place a portion of cooked spaghetti in a bowl, then ladle the Cincinnati chili over the top. Generously sprinkle shredded cheddar cheese over the chili.
- If desired, top with a small amount of finely diced yellow onion and serve with oyster crackers on the side for added texture and a traditional Cincinnati touch.
Pro Tips
Ground beef quality matters in this recipe. Use freshly ground beef or grind your own if possible, as pre-ground beef that’s been sitting can affect the final flavor and texture of your chili. The beef should be cooked until it’s very finely crumbled for the best texture.
The simmering time is not negotiable if you want the best results. While the chili can technically be eaten after 30 minutes, the flavors need at least 1.5 to 2 hours to properly develop and meld together. This is what transforms a simple meat sauce into a complex, sophisticated chili.
Cincinnati chili is traditionally served in several ways: served over spaghetti as a 2-Way (chili and spaghetti) or 3-Way (chili, spaghetti, and cheese), topped on hot dogs as a Coney, or as a 4-Way or 5-Way with additional toppings like onions and beans. Feel free to experiment with your favorite serving method.
Leftovers keep well in the refrigerator for up to 4 days in an airtight container, and the chili actually tastes better the next day as the flavors continue to develop. You can also freeze it for up to 3 months. To reheat, simply warm gently on the stovetop over medium-low heat, adding a splash of beef broth if it seems too thick.
For a vegetarian version, substitute the ground beef with finely chopped mushrooms or crumbled tofu, and use vegetable broth instead of beef broth. The spice blend remains the same and creates an equally delicious result.
If you prefer a thinner chili, add more beef broth during cooking. If you want it thicker, let it simmer longer to reduce further. The consistency should be thicker than a traditional chili but thinner than a sauce.
Don’t be intimidated by the long ingredient list. Most items are spices that you likely already have in your pantry. The actual cooking process is straightforward and requires minimal hands-on time.