

There’s nothing quite like crispy, golden country fried chicken fresh from the skillet—it’s pure comfort food magic! This recipe delivers restaurant-quality results with a perfectly seasoned, crunchy coating and juicy, tender meat inside. The secret lies in using buttermilk for marinating, a well-seasoned flour mixture, and the proper frying technique.
Country fried chicken is a beloved Southern classic that graces dinner tables across the nation. Unlike traditional fried chicken, this version gets its name from the cooking method—pan-frying in a skillet rather than deep-frying. The result is equally delicious and a bit more accessible for home cooking. The buttermilk marinade is absolutely crucial here; it tenderizes the chicken while adding subtle tang that enhances the overall flavor profile.
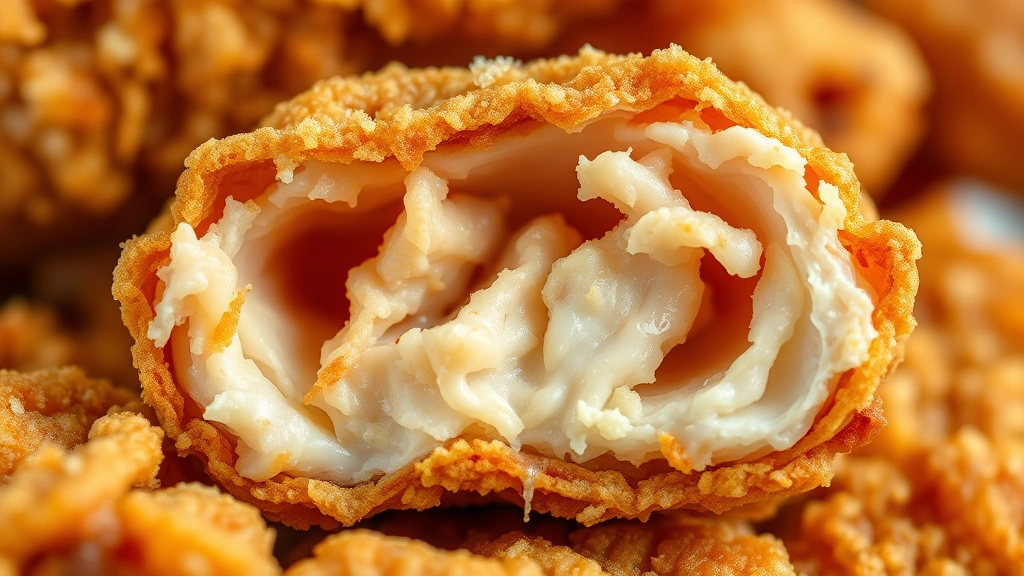
I’ve perfected this recipe over years of testing, and I’m thrilled to share it with you today. The key to achieving that coveted crispy exterior is using a combination of all-purpose flour and cornstarch, which creates an incredibly crunchy coating. The marinade should sit for at least four hours, though overnight is even better. This allows the buttermilk’s natural enzymes to break down the proteins, resulting in meat so tender it practically melts in your mouth.
Serve this alongside classic sides like creamy mashed potatoes or pickled red onions for brightness. For more inspiration on complementary dishes, check out this best chickpea salad recipe that works beautifully on the side.
The beauty of country fried chicken is its versatility. Serve it hot and crispy straight from the pan, or let it cool to room temperature for picnicking. It’s equally delicious cold the next day, making it perfect for meal prep. The coating stays crispy for several hours, which is remarkable for pan-fried chicken. This recipe has become a staple in my kitchen, and I guarantee it will become one in yours too.
For more detailed frying techniques, Serious Eats offers excellent resources on perfecting your method. You might also appreciate the variations and tips found on Bon Appétit for creative serving suggestions. For scientific insights into the cooking process, New York Times Cooking provides comprehensive guides.
Ingredients
- 2 pounds boneless, skinless chicken breasts or thighs, cut into 3-4 inch pieces
- 2 cups buttermilk
- 1 tablespoon kosher salt, divided
- 1 teaspoon black pepper, divided
- 1 teaspoon garlic powder
- 1 teaspoon onion powder
- 1 teaspoon paprika
- 1 cup all-purpose flour
- 1/2 cup cornstarch
- 1/2 teaspoon cayenne pepper
- 1/2 teaspoon dried thyme
- 1/4 teaspoon dried sage
- 1/4 cup vegetable oil or shortening for frying
- 2 tablespoons butter
- Fresh parsley for garnish, optional
Instructions
- In a large bowl, combine the buttermilk with 1/2 tablespoon of kosher salt, 1/2 teaspoon of black pepper, and the garlic powder. Whisk together until the salt is fully dissolved.
- Add the chicken pieces to the buttermilk mixture, ensuring each piece is fully submerged. If needed, add additional buttermilk to cover. Cover the bowl with plastic wrap and refrigerate for at least 4 hours, preferably overnight.
- When ready to cook, remove the chicken from the refrigerator and let it sit at room temperature for 15 minutes.
- In a shallow dish, combine the all-purpose flour, cornstarch, remaining 1/2 tablespoon kosher salt, remaining 1/2 teaspoon black pepper, cayenne pepper, paprika, dried thyme, and dried sage. Mix thoroughly with a fork to ensure even distribution of all seasonings.
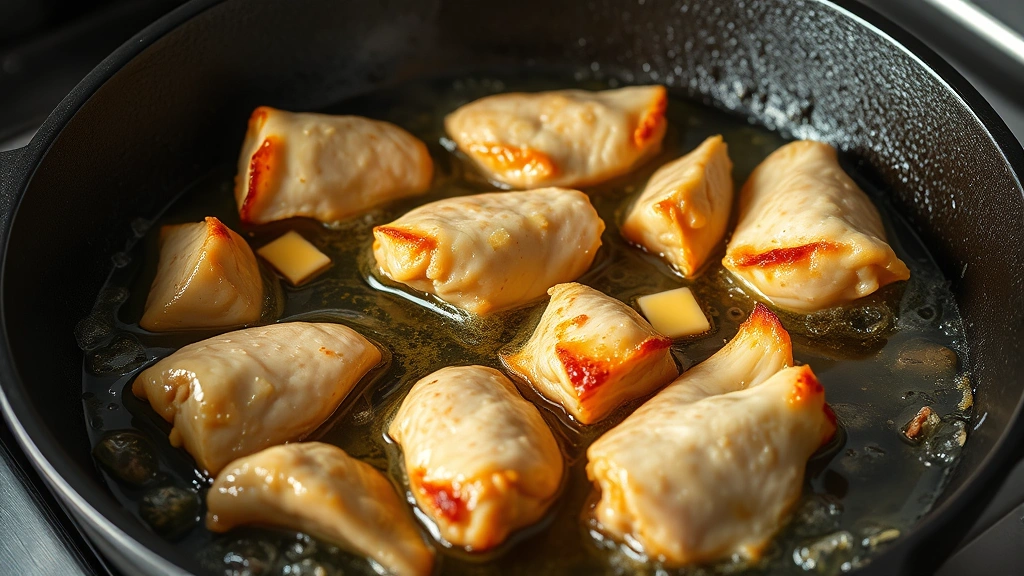
- Heat a large cast iron skillet or heavy-bottomed skillet over medium-high heat. Add the vegetable oil and butter, allowing them to heat together until the butter is melted and the oil is shimmering, about 2 minutes.
- While the oil heats, remove each piece of chicken from the buttermilk, allowing excess liquid to drip back into the bowl. Do not shake off all the buttermilk—a light coating helps the flour adhere better.
- Dredge each chicken piece in the seasoned flour mixture, using both hands to coat thoroughly and evenly. Make sure to coat all sides, pressing gently so the flour adheres. Place the coated pieces on a clean plate and let them rest for 5 minutes to allow the coating to set.
- Carefully place the chicken pieces into the hot oil, working in batches to avoid overcrowding the pan. You should hear a satisfying sizzle when the chicken hits the oil.
- Fry the chicken for 6-8 minutes on the first side without moving it, allowing a golden-brown crust to form. Resist the urge to flip or move the pieces around—patience is key to achieving that perfect crust.
- Flip each piece and fry for an additional 6-8 minutes on the second side until the coating is deep golden brown and an instant-read thermometer inserted into the thickest piece reads 165°F.
- Using tongs, transfer the cooked chicken to a paper towel-lined plate to drain excess oil. Sprinkle lightly with additional salt while still hot.
- Allow the chicken to rest for 5 minutes before serving. This resting period allows the juices to redistribute throughout the meat, ensuring maximum tenderness.
- Serve hot, garnished with fresh parsley if desired, alongside your favorite sides.
Pro Tips
Oil temperature is critical: Use a thermometer to maintain oil temperature between 325-350°F. Temperature too low produces greasy chicken; too high results in burnt coating and undercooked meat inside.
Do not skip the resting period after marinating: This allows the buttermilk to fully penetrate the meat fibers, creating unparalleled tenderness and flavor throughout.
Cornstarch is essential: The combination of flour and cornstarch creates superior crispness compared to flour alone. The cornstarch prevents gluten development, yielding a lighter, crunchier crust.
Cast iron is ideal: Cast iron skillets distribute heat evenly and maintain consistent temperature better than other cookware. If you don’t have cast iron, use a heavy-bottomed stainless steel skillet.
Buttermilk can be substituted: If buttermilk is unavailable, create a substitute by adding 1 tablespoon of lemon juice or vinegar to regular milk and letting it sit for 5 minutes.
Make ahead option: Prepare the buttermilk marinade and chicken up to 24 hours in advance. Dredge and fry just before serving for optimal crispness.
Freezer friendly: Cooked chicken can be frozen for up to 3 months. Reheat in a 350°F oven for 15-20 minutes to restore crispness.
Variation ideas: Add 1/2 teaspoon of smoked paprika for smokiness, or 1/4 teaspoon of cayenne pepper for additional heat. Fresh herbs like thyme and sage can be adjusted to personal preference.
Batch cooking: If preparing for a crowd, keep finished batches warm in a 200°F oven while cooking remaining chicken, placing them on a wire rack to prevent soggy bottoms.