
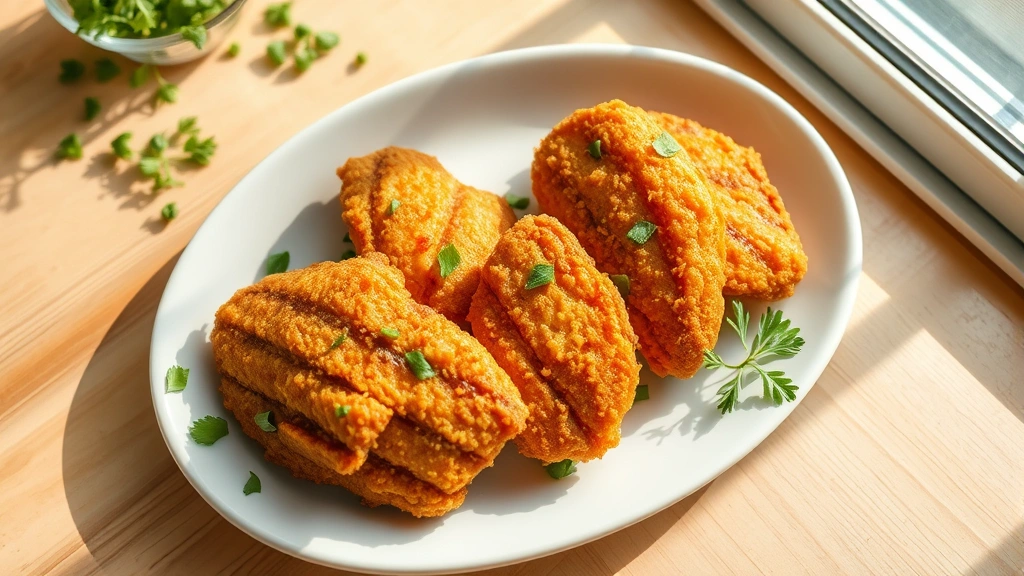
Lee’s Famous Recipe Chicken is a beloved fried chicken chain known for its perfectly seasoned, crispy exterior and juicy, tender meat inside. Making this iconic chicken at home is easier than you might think, and it tastes just as delicious as ordering through your favorite delivery app! This copycat recipe captures that signature flavor profile with a special blend of spices and a foolproof frying technique.
The secret to achieving Lee’s Famous Recipe Chicken at home lies in three key elements: the perfectly balanced seasoning blend, the ideal oil temperature, and the right cooking time. Many home cooks struggle with fried chicken because they either use oil that’s too cool (resulting in greasy chicken) or they don’t season boldly enough. This recipe solves both problems by providing exact measurements and temperatures.
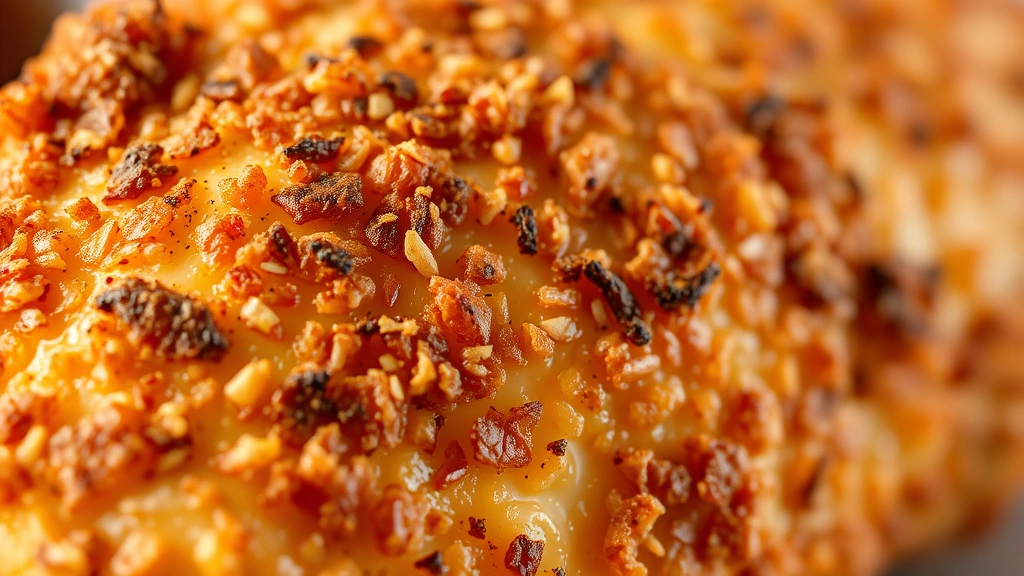
What makes Lee’s Famous Recipe Chicken stand out from other fried chicken chains is its unique spice blend. Unlike KFC’s secret recipe, Lee’s relies on a combination of paprika, cayenne pepper, garlic powder, and other seasonings that create a more balanced, less salty profile. The coating is crispy but not overly thick, allowing you to taste the quality of the chicken underneath.
This recipe is perfect for family dinners, meal prep, or impressing guests with restaurant-quality fried chicken. Serve it alongside classic sides like homemade coleslaw or creamy Catalina dressing for a complete meal. You can also pair it with fresh sides dressed in Dijon vinaigrette for a lighter option.
One of the best parts about making Lee’s Famous Recipe Chicken at home is that you can customize it to your preferences. Prefer extra spicy? Add more cayenne. Like it milder? Reduce the heat. You’re also in control of the oil quality and can ensure everything is cooked in a clean environment.
For more insight into perfecting your frying technique, check out this Serious Eats guide to fried chicken. If you want to learn about different brining methods to keep your chicken extra moist, Bon Appétit has excellent tips. For detailed temperature guidance, The New York Times offers comprehensive instructions. Additionally, learning about proper fermentation and breading techniques can enhance your understanding of coating methods. You might also enjoy exploring other breaded and fried recipes to expand your culinary repertoire.
Ingredients
- 2-3 pounds bone-in, skin-on chicken pieces (breasts, thighs, drumsticks, wings)
- 1 cup all-purpose flour
- 2 tablespoons paprika
- 1 tablespoon garlic powder
- 1 tablespoon onion powder
- 1 tablespoon cayenne pepper
- 2 teaspoons black pepper
- 1 tablespoon kosher salt
- 1 teaspoon dried thyme
- 1 teaspoon dried oregano
- 1/2 teaspoon ground ginger
- 1/4 teaspoon cayenne pepper (optional, for extra heat)
- 1 cup buttermilk
- 2 eggs
- Oil for frying (vegetable, canola, or peanut oil)
- Salt and pepper to taste
Instructions
- Pat the chicken pieces dry with paper towels. This step is crucial for achieving a crispy exterior, as moisture prevents proper browning. Make sure to remove all excess surface moisture.
- In a shallow bowl, whisk together the buttermilk and 2 eggs until well combined. This creates a flavorful coating that helps the seasoning stick to the chicken.
- In another shallow bowl, combine the all-purpose flour, paprika, garlic powder, onion powder, cayenne pepper, black pepper, kosher salt, dried thyme, dried oregano, and ground ginger. Mix thoroughly with a fork to distribute all spices evenly throughout the flour.
- Season each piece of chicken generously with salt and pepper on all sides. This base seasoning enhances the overall flavor profile of the final dish.
- Working with one piece at a time, dip the chicken into the buttermilk mixture, coating all sides thoroughly. Allow excess buttermilk to drip off back into the bowl.
- Place the buttermilk-coated chicken into the seasoned flour mixture. Press gently to ensure the coating adheres well to the chicken. Make sure all sides are thoroughly coated with the flour mixture.
- Set the coated chicken pieces on a wire rack and let them rest for 10 minutes. This allows the coating to set and creates a more substantial crust during frying.
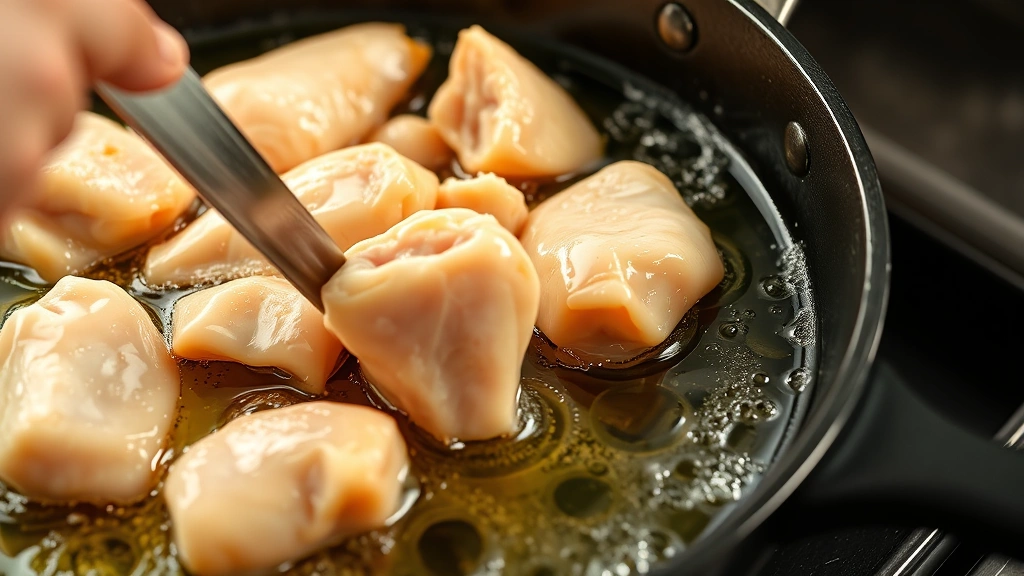
- Heat oil in a large, heavy-bottomed pot or deep skillet to 350°F (175°C). Use a thermometer to ensure accurate temperature, as this is critical for proper cooking.
- Carefully place the chicken pieces into the hot oil, skin-side down first. Do not overcrowd the pan; work in batches if necessary. The oil should come about halfway up the sides of the chicken.
- Fry for 12-15 minutes, depending on the size of the pieces. Chicken breasts may cook faster than thighs and drumsticks. Do not move the chicken around too much; let it cook undisturbed to develop a proper crust.
- Flip the chicken pieces carefully using tongs or a slotted spoon. The skin should be golden brown and crispy at this point.
- Continue frying for another 10-12 minutes until the internal temperature reaches 165°F (74°C) when measured with a meat thermometer in the thickest part of the meat, not touching bone.
- Remove the fried chicken from the oil using a slotted spoon or tongs and place on a paper towel-lined plate or wire rack to drain excess oil.
- Season the hot chicken immediately with additional salt and pepper to taste. This ensures the seasoning adheres properly to the warm surface.
- Let the chicken rest for 5 minutes before serving. This allows the juices to redistribute throughout the meat, ensuring moist, tender chicken.
Pro Tips
Choosing Your Oil: Use an oil with a high smoke point such as vegetable, canola, or peanut oil. Avoid olive oil or butter, as these have lower smoke points and will break down at frying temperatures. Peanut oil adds a subtle flavor that pairs beautifully with the seasoning blend.
Buttermilk Substitution: If you don’t have buttermilk on hand, you can make a substitute by adding 1 tablespoon of lemon juice or white vinegar to regular milk and letting it sit for 5 minutes before using.
Chicken Selection: Bone-in, skin-on chicken pieces work best for this recipe. The skin crisps up beautifully and the bones help keep the meat moist during frying. Boneless, skinless chicken will cook faster but won’t have the same authentic texture and flavor.
Batching Tips: If frying in batches, keep the finished pieces warm in a 200°F oven on a wire rack. This prevents them from becoming soggy while you finish cooking the remaining pieces.
Spice Adjustments: The recipe as written provides a moderate heat level. For milder chicken, reduce the cayenne pepper. For extra spicy chicken, increase the cayenne or add a pinch of white pepper for additional heat depth.
Leftover Storage: Store cooled fried chicken in an airtight container in the refrigerator for up to 4 days. Reheat in a 350°F oven for 10-15 minutes to restore crispiness. Do not microwave, as this will result in soggy chicken.
Serving Suggestions: Serve with classic sides like mac and cheese, mashed potatoes, biscuits, or coleslaw. The versatility of this chicken makes it perfect for casual family dinners or more formal entertaining.
Make-Ahead Option: You can prepare the seasoning flour mixture up to one week in advance and store it in an airtight container. This makes it quick and easy to fry chicken whenever you’re craving it.