
There’s something absolutely magical about pulling a perfectly golden, crispy-skinned roast chicken from a roaster oven. This isn’t just any chicken recipe—this is THE method for creating restaurant-quality poultry right in your own kitchen with minimal effort and maximum flavor. A roaster oven (also called a countertop convection oven) is the secret weapon that home cooks have been sleeping on, and once you master this technique, you’ll never go back to your regular oven again.
What makes roasting chicken in a roaster oven so exceptional is the combination of circulating heat and compact space. The convection setting ensures even cooking and that coveted golden-brown skin that shatters when you cut into it. Whether you’re cooking for a weeknight dinner or planning an elegant meal for guests, this method delivers consistent, stunning results every single time. The beauty of this approach is its simplicity—with just a few quality ingredients and proper technique, you’ll create a masterpiece.
I’ve been perfecting this recipe for years, testing different temperatures, seasonings, and techniques to bring you the absolute best method. The result is a chicken that’s juicy on the inside, impossibly crispy on the outside, and bursting with flavor. Pair it with roasted vegetables, creamy mashed potatoes, or even use the pan drippings to create an incredible sauce. This recipe works beautifully for entertaining, and it’s so foolproof that even novice cooks will achieve professional results.
One of my favorite things about this roaster oven method is how it frees up your regular oven for side dishes. You can roast vegetables in your kitchen oven while your chicken cooks in the roaster, making meal prep incredibly efficient. The chicken also stays warm longer in the roaster oven, which is perfect for entertaining. Once you try this technique, you’ll understand why so many cooking enthusiasts swear by roaster ovens for their everyday cooking needs. This is comfort food elevated to an art form, and it’s easier than you’d ever imagine.
For the best results, I recommend using a whole chicken that’s been properly dried and brought to room temperature. The seasoning is intentionally simple—quality salt, pepper, fresh herbs, and butter are all you need to let the chicken’s natural flavors shine through. If you’re looking to explore more delicious main courses, check out our Best Breakfast Sausage Seasoning Recipe for another crowd-pleasing protein option. You might also enjoy preparing Easy Ground Beef Breakfast Recipe for a hearty morning meal, or adding brightness to your table with Quick Pickle Red Onion Recipe as a tangy accompaniment.
Ingredients
- 1 whole chicken (5-6 pounds), patted dry
- 6 tablespoons unsalted butter, softened
- 3 cloves garlic, minced
- 2 tablespoons fresh rosemary, finely chopped
- 1 tablespoon fresh thyme, finely chopped
- 2 teaspoons kosher salt
- 1 teaspoon freshly ground black pepper
- 1 lemon, halved
- 1 small yellow onion, quartered
- 1/2 cup chicken broth or water
- 2 tablespoons olive oil
- 1 teaspoon paprika (optional, for extra color)
Instructions
- Remove your chicken from the refrigerator 30 minutes before cooking to bring it to room temperature. This ensures even cooking throughout the bird. Pat the chicken completely dry with paper towels, paying special attention to the skin and cavity—moisture is the enemy of crispy skin.
- While the chicken comes to room temperature, prepare your herb butter. In a small bowl, combine softened butter, minced garlic, fresh rosemary, fresh thyme, 1 teaspoon of salt, and 1/2 teaspoon of pepper. Mix until well combined and fragrant.
- Preheat your roaster oven to 425°F (220°C) and position the rack in the middle. Allow it to fully preheat for about 10 minutes. This high initial temperature is crucial for achieving that golden, crispy skin.
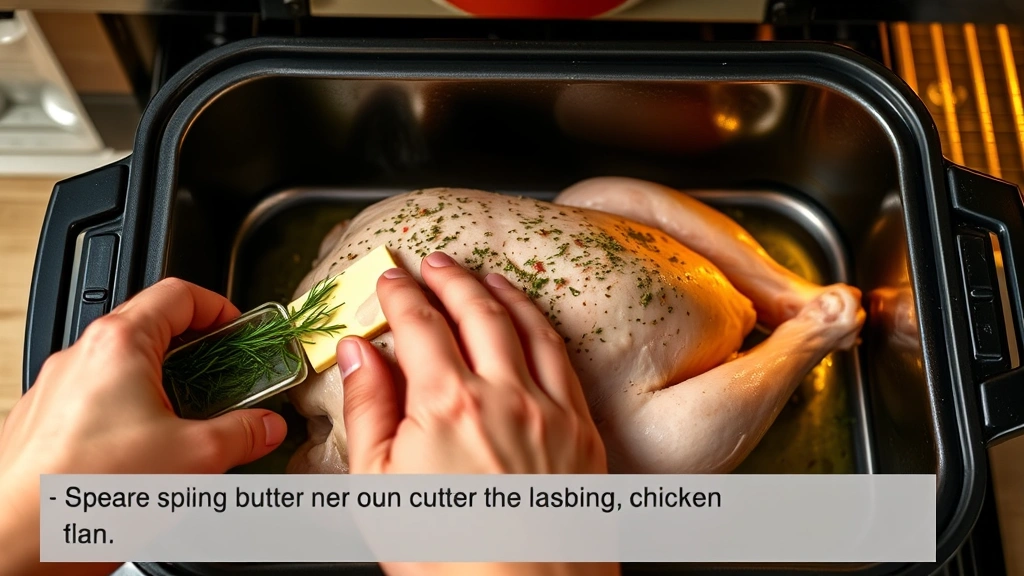
- Place the dried chicken in the roaster oven pan, breast-side up. Rub the entire exterior of the chicken with olive oil, then season with the remaining salt and pepper. Don’t be shy—proper seasoning is essential for maximum flavor.
- Carefully separate the skin from the chicken breast by gently sliding your fingers under the skin from the neck opening. Work your fingers under the skin on both sides of the breast, being careful not to tear it. This technique allows the herb butter to infuse directly into the meat.
- Spread the prepared herb butter under the chicken skin, distributing it evenly across the breasts and thighs. This creates incredible flavor and helps keep the meat moist during cooking. You can also spread some butter on top of the skin for extra richness.
- Stuff the cavity with the lemon halves and onion quarters. These aromatics will flavor the chicken from the inside while it cooks, and the lemon juice will keep the meat tender.
- Pour the chicken broth or water into the bottom of the roaster oven pan, being careful not to pour it directly on the chicken. This creates steam and helps prevent the drippings from burning, which you’ll need for sauce.
- Place the roaster oven pan in the preheated 425°F oven and roast for 15 minutes at this high temperature to begin the browning process.
- After 15 minutes, reduce the temperature to 375°F (190°C) and continue roasting for 50-60 minutes, depending on the exact size of your chicken. The chicken is done when the internal temperature reaches 165°F (74°C) in the thickest part of the thigh, not touching bone.
- Baste the chicken halfway through cooking (around the 35-40 minute mark) with the pan drippings. Use a turkey baster or spoon to carefully pour the drippings over the chicken, which promotes even browning and adds moisture.
- About 10 minutes before the chicken is done, if the skin isn’t as golden as you’d like, you can dust it with paprika or increase the temperature slightly for the final minutes.
- Once the chicken reaches the proper internal temperature, remove it from the roaster oven and transfer it to a cutting board. Tent loosely with foil and let it rest for 10 minutes—this resting period allows the juices to redistribute throughout the meat, ensuring moist, tender chicken.
- While the chicken rests, strain the pan drippings through a fine-mesh sieve into a saucepan. Skim off excess fat if desired, or keep it for richer flavor. Warm the drippings over medium heat and serve as a pan sauce alongside the chicken.
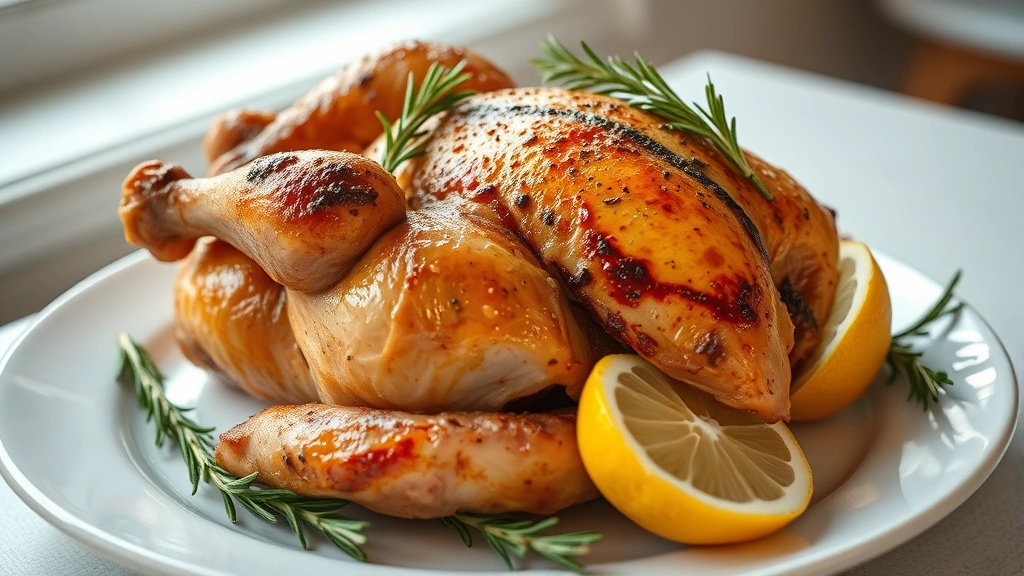
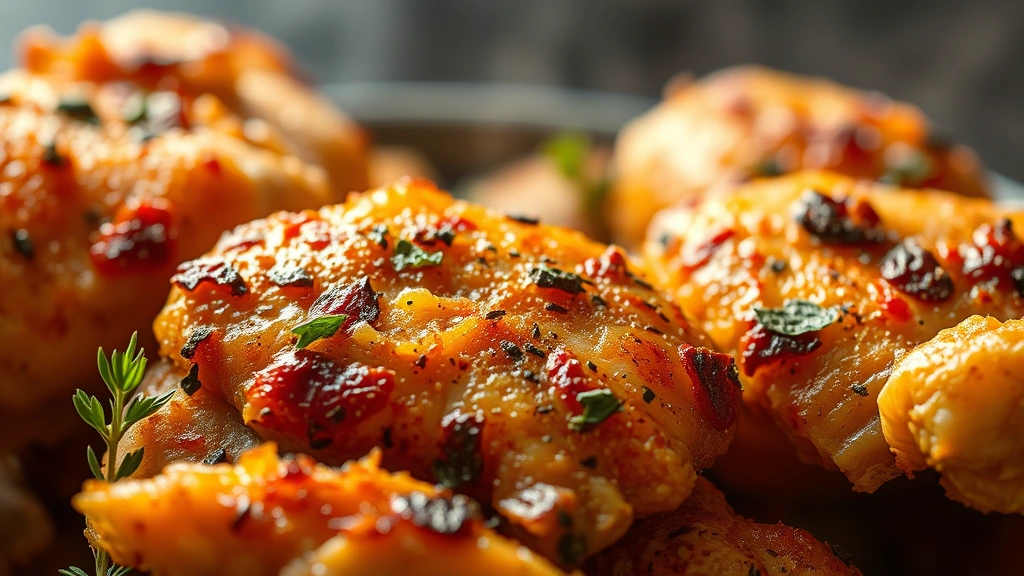
- Carve the rested chicken and serve immediately with the pan drippings, roasted vegetables, and your favorite sides. The skin should be crackling and golden, and the meat incredibly juicy and flavorful.
Pro Tips
o Drying Your Chicken: This step cannot be overstated. Wet skin will steam rather than roast, preventing that coveted crispy exterior. Pat the chicken inside and outside with paper towels at least 15 minutes before cooking.
o Room Temperature Matters: Bringing your chicken to room temperature ensures the thighs cook through at the same rate as the breasts. Cold chicken will have overcooked breasts before the thighs are done.
o Herb Variations: Feel free to customize the herbs based on your preferences. Tarragon, oregano, or Italian seasoning all work wonderfully. You can also add a touch of Dijon mustard to the butter for extra depth.
o Roaster Oven Advantages: Unlike traditional ovens, roaster ovens use convection heating, which circulates hot air around the chicken for even browning. They also cook faster and more efficiently, using less energy.
o Basting Benefits: While optional, basting helps develop beautiful color and prevents the skin from drying out. If you prefer not to baste, the chicken will still turn out wonderfully.
o Temperature Accuracy: Invest in a quality meat thermometer for consistent results. The internal temperature is the most reliable indicator of doneness, not time or color alone.
o Resting is Essential: Never skip the resting period. Those 10 minutes allow carryover cooking to finish and the juices to reabsorb into the meat fibers.
o Pan Drippings Magic: Don’t waste those flavorful drippings. They make an incredible pan sauce when combined with a splash of white wine, cream, or chicken broth. You can also freeze them for future cooking.
o Leftovers: Shred leftover chicken for sandwiches, salads, or grain bowls. Store in an airtight container for up to four days, or freeze for up to three months.