
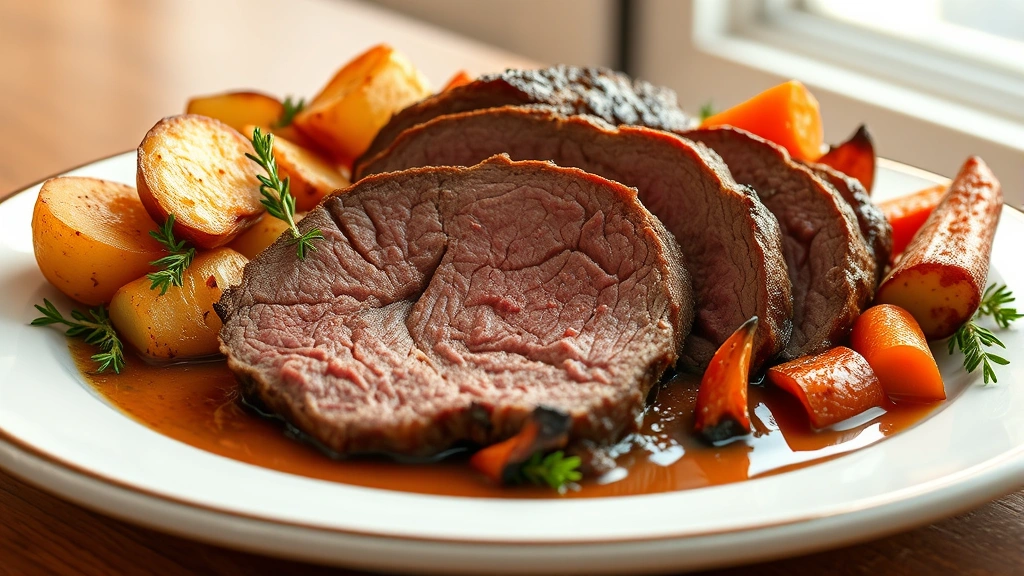
There’s something truly special about a perfectly roasted sirloin tip roast—it’s the kind of dish that transforms a simple dinner into an elegant occasion without requiring fancy techniques or hours of fussing in the kitchen. This sirloin tip roast recipe delivers tender, juicy meat with a beautifully caramelized crust that will have everyone asking for seconds.
Sirloin tip roast is an underrated cut of beef that deserves a permanent place in your weeknight rotation. It’s affordable, flavorful, and when prepared with the right method, absolutely delicious. The key to achieving the best results lies in understanding the meat itself and applying time-tested cooking techniques that bring out its natural richness.
This recipe combines a flavorful dry rub with a simple pan-searing and roasting method that creates incredible depth of flavor. The initial sear locks in the juices and creates that coveted brown crust, while low-and-slow roasting ensures the interior remains tender and moist. I’ve included vegetables that roast alongside the meat, absorbing all those wonderful pan drippings and creating a complete, restaurant-quality meal.
What makes this sirloin tip roast recipe truly special is its versatility. Serve it with creamy mashed potatoes, crispy roasted vegetables, or fresh salads. The leftovers make phenomenal sandwiches, and the pan drippings create an incredible gravy that elevates everything on the plate. Whether you’re cooking for a holiday gathering or a cozy family dinner, this recipe delivers consistent, impressive results every single time.
I love teaching home cooks how to master beef roasts because it’s one of those skills that immediately elevates your cooking confidence. Once you understand the fundamentals of temperature, seasoning, and resting, you’ll find yourself making this dish regularly. The techniques here apply to other roasts as well, making this knowledge incredibly valuable in your culinary toolkit.
The beauty of a sirloin tip roast lies in its perfect balance of affordability and flavor. Unlike more expensive cuts, this roast is budget-friendly, yet when properly prepared, it rivals premium cuts in taste and tenderness. The marbling in sirloin tip may not be as pronounced as in ribeye or prime rib, but that’s precisely what makes this recipe so impressive—we’re coaxing maximum flavor and tenderness from a lean, economical cut through technique and care.
Temperature control is absolutely crucial for this recipe. Using an instant-read meat thermometer removes all the guesswork and ensures perfect doneness every time. I always recommend investing in a quality thermometer if you haven’t already—it’s the single best tool for roasting confidence. For a sirloin tip roast, aim for 130-135°F for medium-rare, which is the sweet spot for tenderness and juiciness.
The resting period after cooking cannot be overstated. Those ten to fifteen minutes allow the residual heat to continue cooking the interior slightly while the juices redistribute throughout the meat. Cutting into the roast before it rests will cause all those beautiful juices to run onto the cutting board instead of staying in your meat. This step is free and takes no effort, yet it makes an enormous difference in the final result.
I’ve tested this recipe dozens of times, adjusting variables like roasting temperature, seasoning ratios, and vegetable choices. The version I’m sharing represents the absolute best combination for flavor, tenderness, and ease. It’s foolproof enough for beginners yet sophisticated enough to impress experienced cooks and discerning diners.
Check out my Best Cream Cheese Frosting Recipe for an elegant dessert to follow this main course. If you’re planning a complete menu, my Perfect Old Fashioned Pancake Recipe makes an excellent brunch option for the next morning using leftovers. For side dish inspiration, explore Best Banana Bread Recipe for a dinner party that includes carb options.
For additional roasting techniques and temperature guides, I recommend checking out Serious Eats and Bon Appétit for comprehensive beef cooking resources. The New York Times Cooking section also offers excellent articles on meat preparation and roasting methods that complement this recipe beautifully.
This sirloin tip roast recipe has become a staple in my home because it delivers restaurant-quality results with minimal stress. Once you master this technique, you’ll understand the principles that apply to all beef roasts, making you a more confident and capable cook. The compliments you’ll receive will be more than worth the modest effort required.
Ingredients
- One 3-4 pound sirloin tip roast, brought to room temperature
- 3 tablespoons kosher salt
- 2 tablespoons freshly cracked black pepper
- 2 tablespoons garlic powder
- 1 tablespoon onion powder
- 1 tablespoon smoked paprika
- 2 teaspoons dried thyme
- 2 teaspoons dried rosemary
- 3 tablespoons olive oil, divided
- 4 cups baby potatoes, halved
- 3 cups baby carrots
- 1 medium yellow onion, cut into wedges
- 1 cup beef broth
- ½ cup red wine (optional but recommended)
- 4 cloves fresh garlic, minced
- 2 tablespoons butter
- 1 tablespoon fresh thyme for garnish
- Sea salt and freshly ground pepper to taste
Instructions
- Remove your sirloin tip roast from the refrigerator 45 minutes before cooking to bring it to room temperature. Room temperature meat cooks more evenly and achieves better browning.
- Preheat your oven to 325°F. Position the oven rack in the center to ensure even heat circulation around the roast.
- In a small bowl, combine kosher salt, black pepper, garlic powder, onion powder, smoked paprika, dried thyme, and dried rosemary. Mix thoroughly to distribute all seasonings evenly.
- Pat the sirloin tip roast completely dry with paper towels. Moisture prevents browning, so this step is essential for achieving that beautiful crust.
- Rub the entire surface of the roast generously with the spice mixture, pressing it into the meat on all sides. Don’t be shy—this creates incredible flavor.
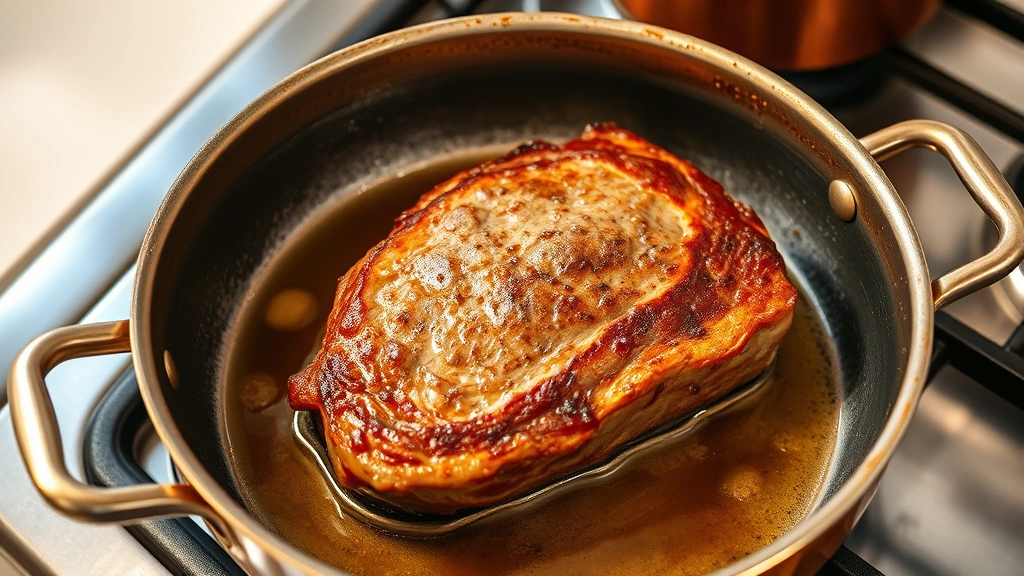
- Heat 2 tablespoons of olive oil in a large, heavy-bottomed roasting pan or Dutch oven over medium-high heat until the oil shimmers.
- Once the oil is hot, carefully place the roast in the pan. You should hear an immediate sizzle—this indicates the heat is sufficient for proper browning.
- Sear the roast for 3-4 minutes on each side without moving it excessively. You want a deep golden-brown crust to develop. Work carefully to sear all sides, including the ends.
- Remove the roast from the pan and set aside on a clean cutting board. Reduce the heat to medium.
- Add the remaining tablespoon of olive oil to the pan, then add the minced garlic and cook for 30 seconds until fragrant.
- Pour in the red wine and beef broth, using a wooden spoon to scrape up all the browned bits from the bottom of the pan. These bits contain concentrated flavor.
- Return the roast to the pan, nestling it among the liquid. Arrange the halved potatoes, baby carrots, and onion wedges around the roast in the pan.
- Cover the roasting pan with a tight-fitting lid or heavy-duty aluminum foil. This creates a moist environment that helps the meat cook evenly and stay tender.
- Transfer the pan to the preheated 325°F oven. Roast for approximately 1 hour to 1 hour 15 minutes, depending on the thickness of your roast.
- After 45 minutes of roasting, carefully remove the lid and use a meat thermometer inserted into the thickest part of the roast to check the internal temperature. Aim for 130-135°F for medium-rare.
- If the roast hasn’t reached temperature, cover it again and continue roasting, checking every 10 minutes until the desired temperature is reached.
- Once the roast reaches 130-135°F, carefully remove the pan from the oven using oven mitts. Transfer the roast to a cutting board and tent loosely with foil.
- Let the roast rest for 10-15 minutes. During this crucial time, residual heat continues cooking the interior while juices redistribute throughout the meat.
- While the roast rests, return the roasting pan with the vegetables to the stovetop over medium-high heat. Cook the vegetables for an additional 5 minutes if they need more tenderness.
- Stir in the butter and adjust seasoning with sea salt and freshly ground pepper to taste. The pan drippings will be rich and flavorful.
- Slice the roast against the grain into ½-inch to ¾-inch thick slices. Slicing against the grain ensures maximum tenderness.
- Arrange the sliced roast on a serving platter with the roasted vegetables. Drizzle with the pan drippings and garnish with fresh thyme.
- Serve immediately while the roast is still warm, with extra pan drippings on the side for spooning over meat and vegetables.

Pro Tips
Meat Thermometer Essential: A reliable instant-read meat thermometer is non-negotiable for roasting success. Insert it into the thickest part of the roast without touching bone, and avoid inserting it into fatty areas which give false readings.
Don’t Skip the Searing Step: Searing creates the Maillard reaction, which develops incredible flavor and creates that restaurant-quality crust everyone loves. This step takes just ten minutes but makes an enormous difference.
Vegetable Options: Feel free to substitute the vegetables based on your preferences and seasonal availability. Root vegetables like parsnips, turnips, or celery root work beautifully. Avoid quick-cooking vegetables like broccoli or asparagus that would overcook.
Wine Selection: While red wine is optional, it adds wonderful depth to the pan drippings. Any dry red wine works—you don’t need expensive wine, just something you’d drink.
Making Gravy: Strain the pan drippings into a saucepan. For every cup of liquid, mix 1 tablespoon cornstarch with 2 tablespoons cold water, then whisk into the simmering liquid until thickened. Simmer for 2-3 minutes, season to taste.
Leftover Storage: Slice and refrigerate leftovers in an airtight container for up to 4 days. Reheat gently in a 300°F oven with a bit of broth to prevent drying out.
Sandwich Potential: Thinly sliced roast makes incredible sandwiches the next day. Layer between crusty bread with horseradish cream or chimichurri sauce.
Cooking Time Variables: Cooking time depends on roast thickness and your specific oven. Thin roasts may be done in 45 minutes while thicker cuts need 1.5 hours. Always rely on temperature, never time alone.
Cutting Against the Grain: Locate the grain direction by looking at the muscle fibers, then slice perpendicular to these fibers. This breaks up the muscle fibers and creates more tender pieces.