
There’s nothing quite like the smoky, tender perfection of homemade smoked pulled pork! This show-stopping recipe delivers restaurant-quality results that will have your guests asking for seconds. The key to the BEST smoked pulled pork lies in selecting the right cut, applying a flavorful dry rub, and giving it plenty of low-and-slow smoking time.
I’ve been making smoked pulled pork for years, and I’m thrilled to share my foolproof method with you today. Whether you’re planning a backyard barbecue, feeding a crowd, or simply craving that authentic BBQ flavor, this recipe is your answer. The beauty of pulled pork is its incredible versatility—serve it on soft buns with coleslaw, pile it high on nachos, or enjoy it as a protein over rice or potatoes.
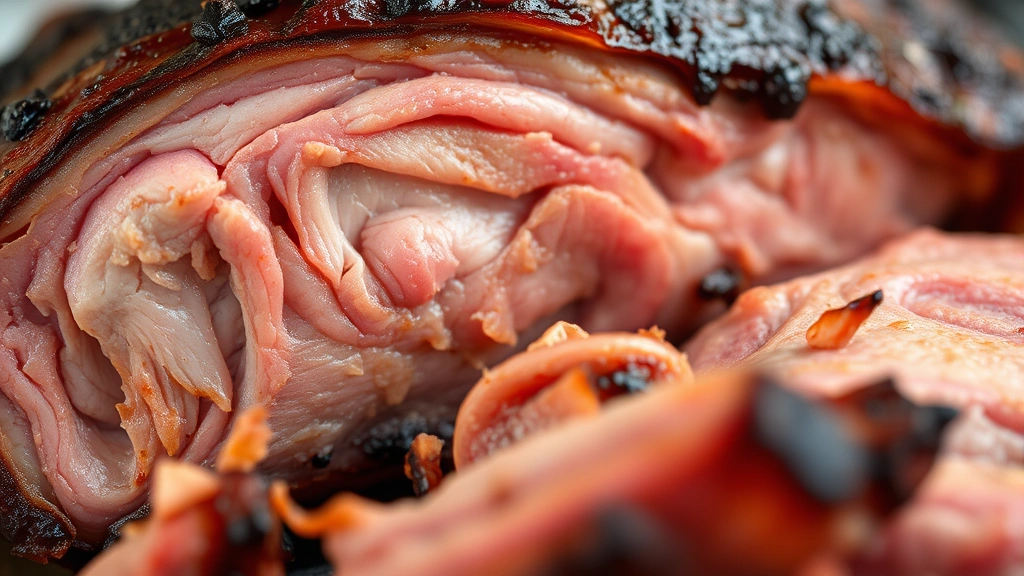
What makes this recipe stand out is the combination of a perfectly balanced dry rub, maintaining consistent smoking temperatures, and knowing exactly when your pork has reached that ideal tenderness. We’re talking about meat so tender it practically falls apart at the slightest touch. The smoke ring—that beautiful pink layer just beneath the surface—is a sign you’ve done everything right.
This isn’t a quick weeknight dinner; it’s a labor of love that requires patience and planning. Plan for approximately 12-16 hours total time, including preparation and smoking. But I promise you, the results are absolutely worth it. Your kitchen will smell incredible, and the accolades from family and friends will make every moment worthwhile.
If you’re new to smoking meats, don’t worry! I’ve included detailed instructions to guide you through each step. For more delicious Southern-inspired sides, check out our Perfect Hash Brown Casserole and Perfect Cream Peas recipes. These pair beautifully with pulled pork for a complete feast.
For inspiration on smoking techniques, I recommend checking out Serious Eats and Bon Appétit for their expert BBQ guides. You’ll also find fantastic tips on New York Times Cooking for perfecting your smoking process.
Let me walk you through creating smoked pulled pork that rivals any BBQ restaurant. This recipe serves a crowd beautifully and actually gets better when made a day ahead, as the flavors continue to develop. Ready to become a smoking master? Let’s dive in!
Ingredients
- 1 bone-in pork shoulder (10-12 pounds), skin removed
- 1/4 cup brown sugar
- 3 tablespoons smoked paprika
- 2 tablespoons garlic powder
- 2 tablespoons onion powder
- 2 tablespoons black pepper
- 1 tablespoon cayenne pepper
- 1 tablespoon kosher salt
- 1 tablespoon dry mustard
- 1 tablespoon chili powder
- 2 teaspoons dried thyme
- 1 teaspoon dried oregano
- Wood chips for smoking (hickory, oak, or apple wood)
- 1 cup apple juice or cider vinegar spray
- 2 cups BBQ sauce (your favorite brand or homemade)
- Soft hamburger buns for serving
- Coleslaw for topping (optional)
Instructions
- The night before smoking, prepare your pork shoulder by trimming any excess fat, leaving about 1/4 inch layer for moisture and flavor during the long cooking process.
- In a small bowl, combine brown sugar, smoked paprika, garlic powder, onion powder, black pepper, cayenne pepper, kosher salt, dry mustard, chili powder, thyme, and oregano to create your dry rub.
- Generously coat the entire pork shoulder with the dry rub, working it into all crevices and creating an even layer across the entire surface. Let the rubbed pork sit uncovered in your refrigerator for at least 4 hours, preferably overnight.
- Remove the pork from the refrigerator 2 hours before smoking to bring it closer to room temperature, which ensures more even cooking.
- Prepare your smoker by cleaning the grates thoroughly and filling the water pan with hot water. Preheat to 225-250°F using your choice of wood chips.
- Place the pork shoulder fat-side up on the smoker grates, positioning it away from direct heat for best results.
- Maintain smoker temperature between 225-250°F throughout the cooking process, adding wood chips as needed to maintain consistent smoke production every hour.
- After 4 hours of smoking, begin spritzing the pork with apple juice or cider vinegar every 45 minutes to 1 hour to keep it moist and develop flavor.
- At the 8-hour mark, check the internal temperature with a meat thermometer inserted into the thickest part of the shoulder without touching bone.
- Continue smoking until the internal temperature reaches 190-205°F, typically between 12-16 hours depending on the size of your pork shoulder and smoker consistency.
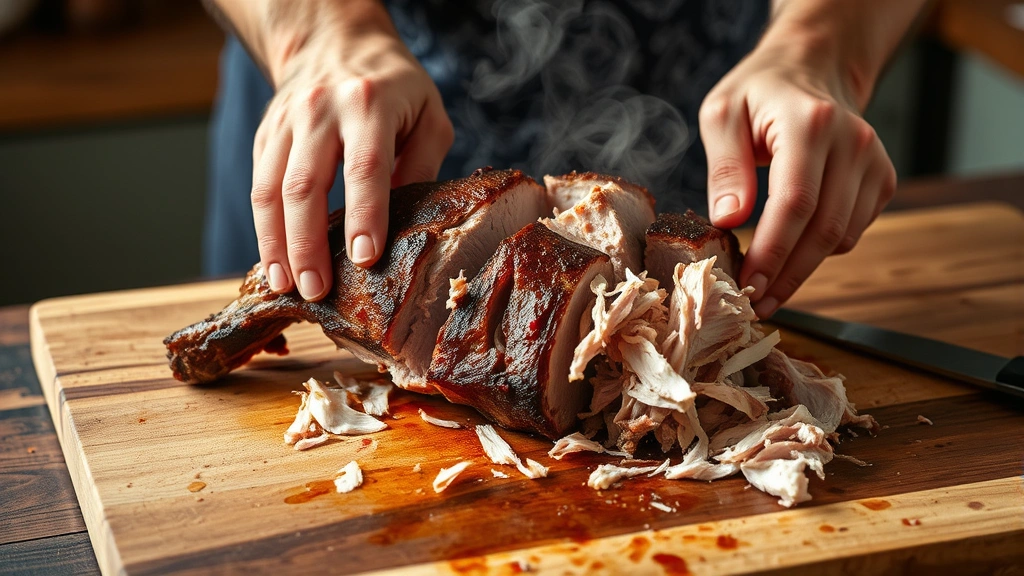
- Once the pork reaches the target temperature and a fork easily shreds a small test piece, carefully remove it from the smoker using heavy-duty tongs or a large platter.
- Tent the smoked pork loosely with aluminum foil and let it rest for 30 minutes; this allows the juices to redistribute throughout the meat.
- Using heavy-duty gloves or heat-resistant tongs, begin pulling the pork apart, shredding it into bite-sized pieces and removing any excess fat as you go.
- Discard the bone and any tough connective tissue, then transfer all shredded pork to a large serving vessel or slow cooker.
- Pour your favorite BBQ sauce over the shredded pork and gently toss to combine, adding more sauce to taste if desired.
- If making ahead, store the pulled pork in an airtight container in the refrigerator for up to 4 days, or freeze for up to 3 months.
- To serve, warm the pulled pork in a slow cooker on low heat for 1-2 hours or reheat gently in a large skillet over medium-low heat, stirring occasionally.
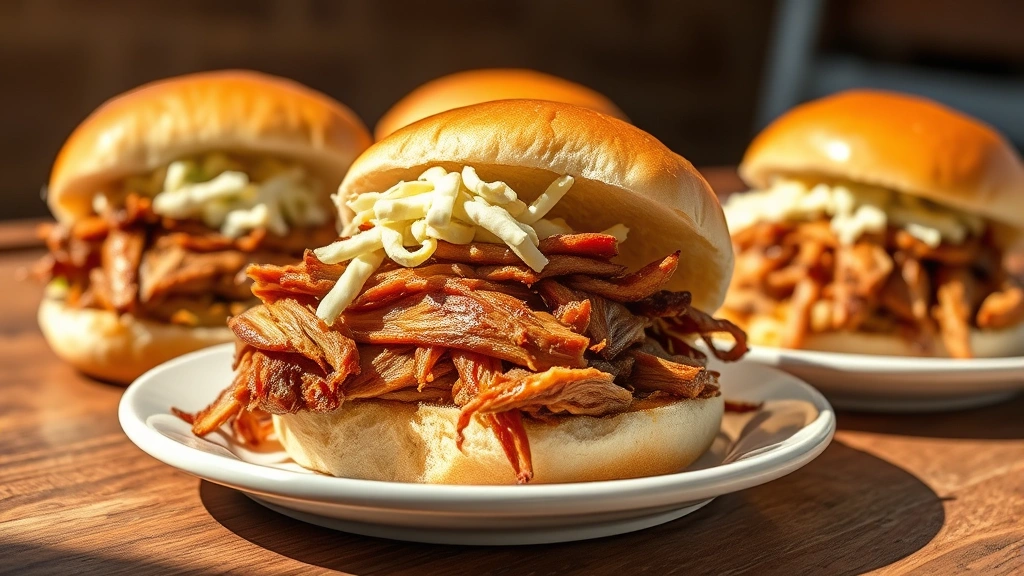
- Serve on soft hamburger buns topped with coleslaw, additional BBQ sauce, or your favorite accompaniments.
Pro Tips
- Selecting the right cut is crucial for pulled pork success; a bone-in pork shoulder (also called pork butt despite being from the shoulder) provides the perfect fat content and connective tissue that breaks down beautifully during smoking.
- The dry rub is essential and worth taking time to apply thoroughly; don’t be shy with it as much of it will fall off during smoking and cooking, but enough will remain to flavor the meat.
- Temperature control is the most important factor in smoking; invest in a reliable meat thermometer with a probe for accurate readings throughout the cooking process.
- Using the spritz method with apple juice or vinegar keeps the meat moist and helps develop a beautiful bark on the exterior while preventing it from drying out.
- The stall—when temperature plateaus around 150-165°F—is completely normal; patience is key during this phase, and the temperature will eventually climb to your target.
- Different smokers cook differently; gas, electric, charcoal, and offset models all have their quirks, so adjust timing and temperature maintenance accordingly.
- Smoking in cooler weather takes longer than in warm weather, so plan extra time during fall and winter months.
- You can wrap the pork in foil during the last few hours of smoking to speed up the process if needed, though this reduces smoke ring development.
- The pork will pull apart much easier if it reaches the higher end of the temperature range (200-205°F) rather than the lower end.
- Leftover pulled pork is incredibly versatile; use it for nachos, sandwiches, grain bowls, tacos, pizza toppings, or breakfast hash.
- Making pulled pork a day ahead is actually beneficial as flavors continue to develop and deepen overnight.
- Quality BBQ sauce makes a difference; if time allows, try making your own for a customized flavor profile.