
There’s something absolutely magical about a perfectly made tuna sandwich. It’s the kind of lunch that feels both comforting and sophisticated, whether you’re enjoying it at a sunny picnic or tucking into one at your desk on a busy Tuesday. The beauty of a great tuna sandwich lies in its simplicity and the quality of its ingredients. When done right, it’s far more than just canned tuna slapped between two slices of bread—it’s a carefully balanced combination of flavors and textures that come together to create something truly special.
I’ve been making tuna sandwiches for years, and I’ve learned that the secret to achieving the BEST version starts with understanding what makes each component work. The tuna itself is just the beginning. How you prepare it, what you mix it with, and how you build your sandwich all play crucial roles in the final result. After countless iterations and taste tests, I’m thrilled to share my foolproof method that will elevate your tuna sandwich game to restaurant-quality levels.
What I love most about this recipe is its versatility. Whether you prefer a classic approach or want to get a little creative with your additions, this base recipe gives you the foundation to create something absolutely delicious. Some days I keep it simple and pure, while other times I’m inspired to add fresh herbs, crispy vegetables, or even a touch of spicy mayo. The possibilities are endless, and that’s what makes this recipe so reliable and beloved.
Let me walk you through every step of creating the BEST tuna sandwich recipe. From selecting your ingredients to the final assembly, I’ll share all my pro tips and tricks that I’ve gathered from years of sandwich-making experience. This is the recipe you’ll come back to again and again, the one you’ll make for your family and friends, and honestly, the one that will make you wonder why you ever settled for ordinary tuna sandwiches before.
For more delicious sandwich inspiration, check out this guide to flavor building. You might also enjoy exploring complementary sides like fresh fruit accompaniments. And don’t miss this excellent resource on ingredient quality to understand how premium components elevate any recipe. For expert insights on sandwich construction techniques, Bon Appétit’s sandwich collection offers wonderful inspiration. Additionally, Serious Eats provides detailed sandwich science that explains why certain combinations work beautifully together.
Ingredients
- 2 cans (5 oz each) albacore tuna in water, drained thoroughly
- 1/3 cup mayonnaise, preferably high-quality
- 2 tablespoons fresh lemon juice
- 1 tablespoon finely minced red onion
- 2 tablespoons finely diced celery
- 1 tablespoon fresh dill, chopped (or 1/2 teaspoon dried dill)
- 1/2 teaspoon Dijon mustard
- 1/4 teaspoon sea salt
- 1/8 teaspoon freshly ground black pepper
- 1/4 teaspoon garlic powder
- 4 slices high-quality bread (sourdough, whole grain, or white)
- 2 leaves crisp lettuce (romaine or butter lettuce)
- 4 slices ripe tomato
- 1/4 cup thinly sliced cucumber (optional)
- 2 tablespoons salted butter, softened (for toasting)
Instructions
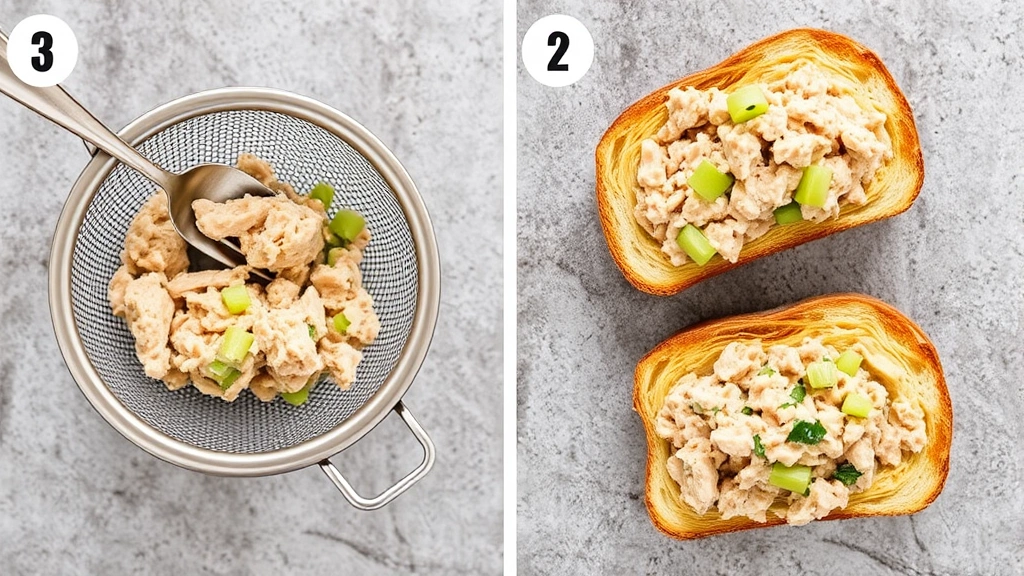
- Begin by draining your canned tuna very thoroughly. Open both cans and place the tuna in a fine-mesh strainer. Press down gently with a fork or spoon to release excess liquid and water. This step is absolutely critical—excess moisture is the enemy of a great tuna sandwich, as it will make your bread soggy and dilute the flavors. Let it drain for at least 2-3 minutes, pressing occasionally.
- Transfer the well-drained tuna to a medium mixing bowl. Using a fork, break up any large chunks and gently flake the tuna until it reaches your desired texture. Some prefer it more chunky, while others like it more finely flaked—this is entirely your preference.
- Add the mayonnaise to the tuna and stir to combine gently but thoroughly. The mayonnaise is what brings everything together and creates that creamy, luxurious base for your sandwich.
- Squeeze the fresh lemon juice over the mixture and stir well. The acidity from the lemon brightens the flavor and prevents the tuna from tasting flat or fishy.
- Add the minced red onion and diced celery to the bowl. These vegetables provide essential crunch and fresh, crisp flavors that balance the richness of the mayo.
- Stir in the fresh dill, Dijon mustard, sea salt, black pepper, and garlic powder. Mix everything together until well combined and uniform. Taste the mixture and adjust seasonings as needed. You want a well-seasoned, flavorful filling that’s balanced and not overpowering.
- Let the tuna mixture sit in the refrigerator for at least 5 minutes while you prepare your bread and vegetables. This resting period allows the flavors to meld together beautifully.
- Pat your lettuce leaves dry with paper towels to remove any excess moisture. Slice your tomatoes into even rounds of about 1/4-inch thickness. If using cucumber, slice it thinly and pat dry as well.
- Take your bread slices and lightly butter both sides of each slice with the softened butter.
- Heat a large skillet or griddle over medium heat. Once hot, place the buttered bread slices on the skillet and toast until golden brown and crispy on both sides, about 2-3 minutes per side. This toasting step creates a protective barrier that prevents the bread from absorbing moisture from the tuna filling.
- Remove the toasted bread from the skillet and place on a clean work surface. Allow it to cool for just 1-2 minutes so it’s still warm but not too hot to handle.
- Take one slice of toasted bread and spread half of your tuna mixture evenly across it, leaving a small border around the edges.
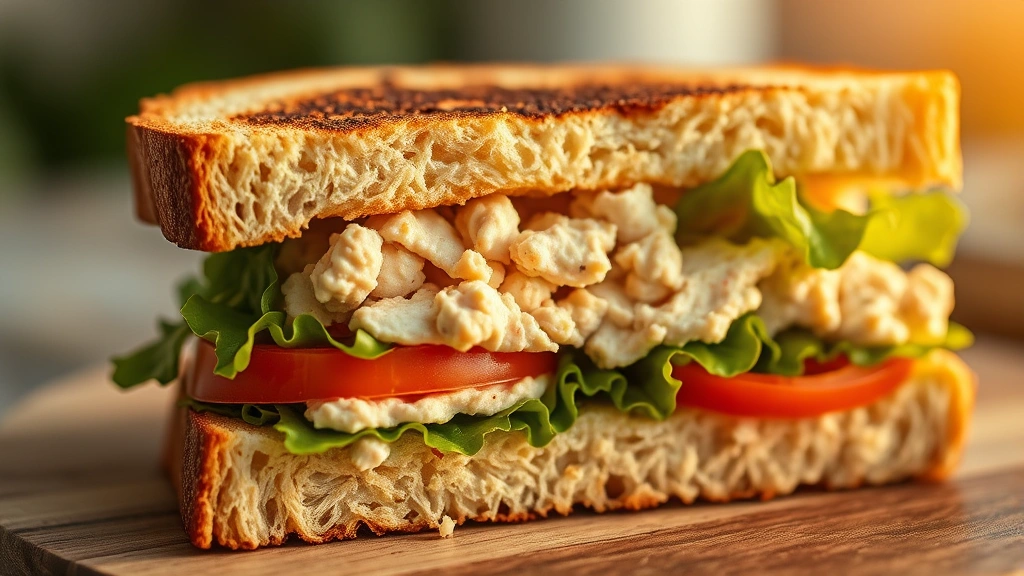
- Layer a crisp lettuce leaf on top of the tuna mixture. This creates another moisture barrier and adds fresh texture.
- Arrange tomato slices on top of the lettuce, slightly overlapping them. Add cucumber slices if desired.
- Top with the second slice of toasted bread, pressing down gently so everything holds together nicely.
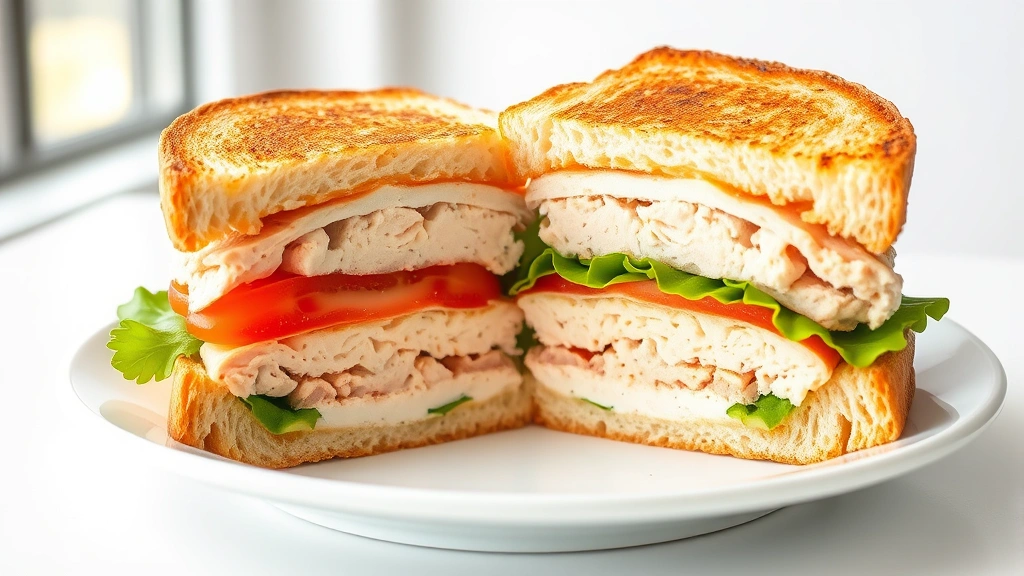
- Using a sharp serrated knife, cut the sandwich diagonally, creating two perfect triangular halves. Diagonal cuts not only look more elegant but also make the sandwich easier to hold and eat.
- Serve immediately while the bread is still warm and crispy. Your tuna sandwich is now ready to enjoy!
Pro Tips
- The quality of your tuna matters significantly. Albacore tuna in water is preferable to chunk light tuna, as it has a better texture and milder flavor. If you’re budget-conscious, quality matters even more to make the most of what you’re using.
- Mayo selection is crucial. Splurge on a good-quality mayonnaise—Duke’s, Hellmann’s, or homemade mayo will all produce superior results compared to budget brands.
- Don’t skip the thorough draining step. Excess liquid is the primary culprit behind soggy, disappointing tuna sandwiches. Take your time with this step.
- Fresh dill makes a noticeable difference over dried dill, but dried works in a pinch. Use about one-third the amount of dried herbs compared to fresh.
- The toasting step is non-negotiable for the best results. It creates a crispy exterior that protects the bread from moisture absorption and adds wonderful flavor.
- You can prepare the tuna filling up to 24 hours in advance. Store it covered in the refrigerator. This actually allows flavors to develop more fully. Just assemble your sandwich right before serving.
- For variations, consider adding crispy bacon, capers, sliced avocado, or a spread of pesto on the bread. A tiny bit of hot sauce mixed into the mayo creates a spicy version.
- If you prefer untoasted bread, that’s perfectly fine, but use bread that’s sturdy enough to hold the filling without falling apart. Artisanal sourdough or quality whole grain breads work well.
- Lettuce and tomato placement is important. The lettuce acts as a barrier between the tuna and bread, while the tomato sits on top, providing juicy flavor without direct contact with the bread.
- This recipe makes 2 generous sandwiches, but it doubles easily if you’re feeding a crowd. The tuna mixture keeps well for up to 3 days when stored in an airtight container in the refrigerator.
- For a lunch box friendly version, pack the tuna mixture separately and assemble the sandwich just before eating to maintain bread crispness.
- If you enjoy your tuna sandwich cold, skip the toasting step. However, room-temperature or slightly warm bread is superior to cold bread in most cases.