
There’s something absolutely magical about a perfectly made brisket sandwich—it’s the kind of meal that brings people together and leaves them asking for seconds. This classic American favorite deserves the respect and care that comes with slow-cooking a beautiful brisket until it’s tender enough to melt in your mouth. Whether you’re smoking it low and slow or braising it in the oven, the key to success is patience, proper seasoning, and quality ingredients.
I’ve been making brisket sandwiches for years, and I’ve learned that the magic isn’t just in the meat itself, but in how you build the entire sandwich experience. The right bread, the perfect sauce, and those essential pickled vegetables all come together to create something truly special. Think of it like building a flavor symphony—each component plays an important role.
This recipe will walk you through everything you need to know to create restaurant-quality brisket sandwiches in your own kitchen. We’ll cover the preparation, cooking methods, and all those finishing touches that transform good brisket into an unforgettable sandwich. You’ll learn my foolproof techniques for keeping the meat moist, how to slice it properly for maximum texture, and how to build a sandwich that’s absolutely bursting with flavor. Perfect coleslaw is an ideal topping, and I’ll show you exactly how to incorporate it.
What I love most about this recipe is that it’s incredibly forgiving. Whether you’re a seasoned pit master or a home cook just starting to explore the world of brisket, you can absolutely nail this. The process teaches you valuable cooking skills that will serve you well in the kitchen for years to come. I promise that once you master this recipe, you’ll be making these sandwiches again and again.
The beauty of brisket is that it’s an affordable cut of meat that transforms into something luxurious through proper cooking. It’s perfect for feeding a crowd, meal prepping for the week, or simply impressing your family with your newfound culinary skills. Let’s dive into creating some truly spectacular brisket sandwiches that you’ll be proud to serve.
Ingredients
- 1 whole brisket, 12-14 pounds (with fat cap)
- 3 tablespoons kosher salt
- 2 tablespoons black pepper, freshly ground
- 1 tablespoon garlic powder
- 1 tablespoon onion powder
- 1 tablespoon smoked paprika
- 1 tablespoon brown sugar
- 1 teaspoon cayenne pepper
- 1 teaspoon dry mustard powder
- 2 cups beef broth or stock
- 1 cup apple cider vinegar
- 1/2 cup Worcestershire sauce
- 1/4 cup brown sugar for braising liquid
- 3 tablespoons butter
- 2 cups beef barbecue sauce (your favorite brand or homemade)
- 8-10 brioche buns or kaiser rolls
- 1 batch creamy coleslaw
- Dill pickle chips or spears
- 1/4 cup fresh cilantro, optional
- 2 jalapeños, sliced thin, optional
- White onion slices for serving
Instructions
- Remove your brisket from the refrigerator at least 2 hours before cooking to bring it to room temperature. This ensures even cooking throughout the meat. Pat it completely dry with paper towels—this is crucial for developing a proper crust.
- In a small bowl, combine the kosher salt, black pepper, garlic powder, onion powder, smoked paprika, brown sugar, cayenne pepper, and dry mustard powder. Mix thoroughly until well combined. This is your dry rub, and it’s going to create an incredible flavor foundation.
- Generously apply the dry rub all over the brisket, making sure to coat both the fat side and the meat side evenly. Don’t be shy—this is where most of your flavor comes from. Press the spices gently into the meat so they adhere properly.
- If smoking: Place the brisket fat-side up on your smoker set to 225-250 degrees Fahrenheit. Smoke with your wood of choice (oak, hickory, or mesquite all work beautifully) for 6-8 hours until the internal temperature reaches 165 degrees Fahrenheit. Then wrap in foil and continue cooking for another 3-4 hours until the thickest part of the meat reaches 203 degrees Fahrenheit.
- If braising in the oven: Preheat your oven to 275 degrees Fahrenheit. Heat a large Dutch oven or roasting pan over medium-high heat and add a little oil. Sear the brisket fat-side down for 3-4 minutes until deeply browned, then flip and sear the meat side for another 3-4 minutes.
- Remove the brisket from the pan and set aside. Add the beef broth, apple cider vinegar, Worcestershire sauce, and brown sugar to the same pan, scraping up all the browned bits from the bottom. This creates an incredible braising liquid.
- Return the brisket to the pan fat-side up, cover tightly with foil or a lid, and place in the preheated oven. Braise for 8-10 hours, or until the meat is fork-tender and pulls apart easily. Check it after 6 hours—the liquid should be gently simmering, not boiling.
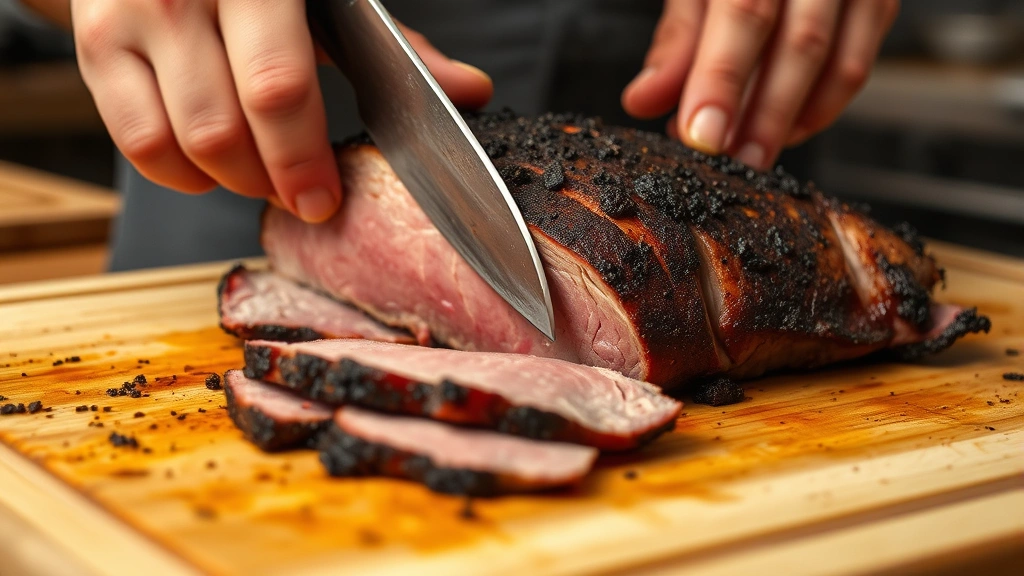
- Remove the brisket from the braising liquid and let it rest for 15-20 minutes on a cutting board. This resting period allows the juices to redistribute throughout the meat, ensuring moist, tender slices.
- Strain the braising liquid through a fine-mesh strainer into a saucepan. Skim off any excess fat from the top. You should have about 1-2 cups of liquid remaining. If you have more, simmer it down until reduced. This becomes your incredible jus.
- Slice the brisket against the grain into 1/4-inch thick slices. To find the grain, look at the texture of the meat—you want to cut perpendicular to the lines you see. This is absolutely essential for tender, melt-in-your-mouth bites.
- Place the sliced brisket back into the warm braising liquid or jus, and stir in the barbecue sauce. Let this sit on the stovetop over low heat for 5-10 minutes, allowing the meat to absorb all those delicious flavors. Add the butter and stir until it melts and coats the meat beautifully.
- Toast your brioche buns or kaiser rolls lightly on a griddle or cast iron skillet until they’re golden brown and slightly crispy on the inside. This prevents them from getting soggy and adds wonderful texture.
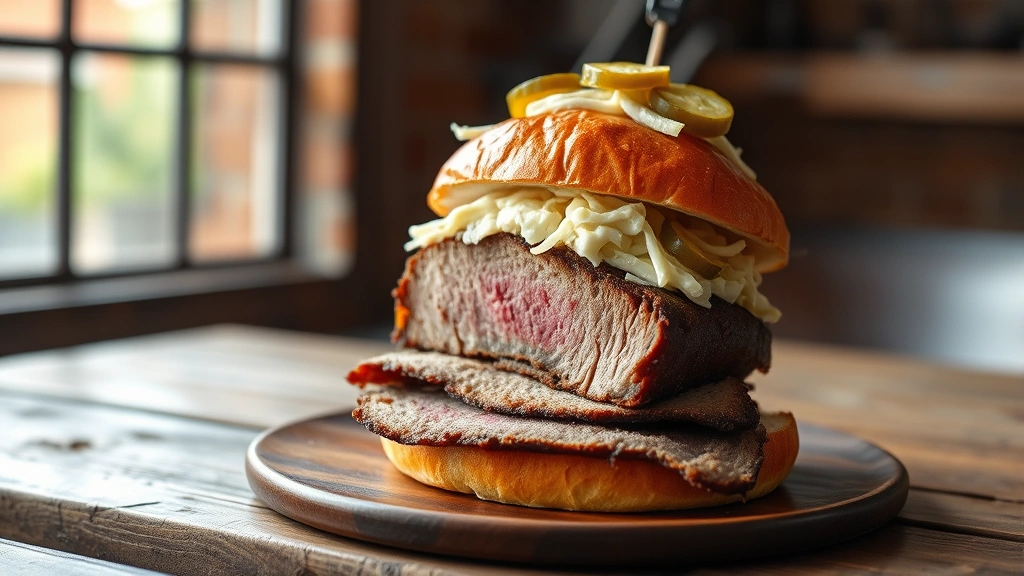
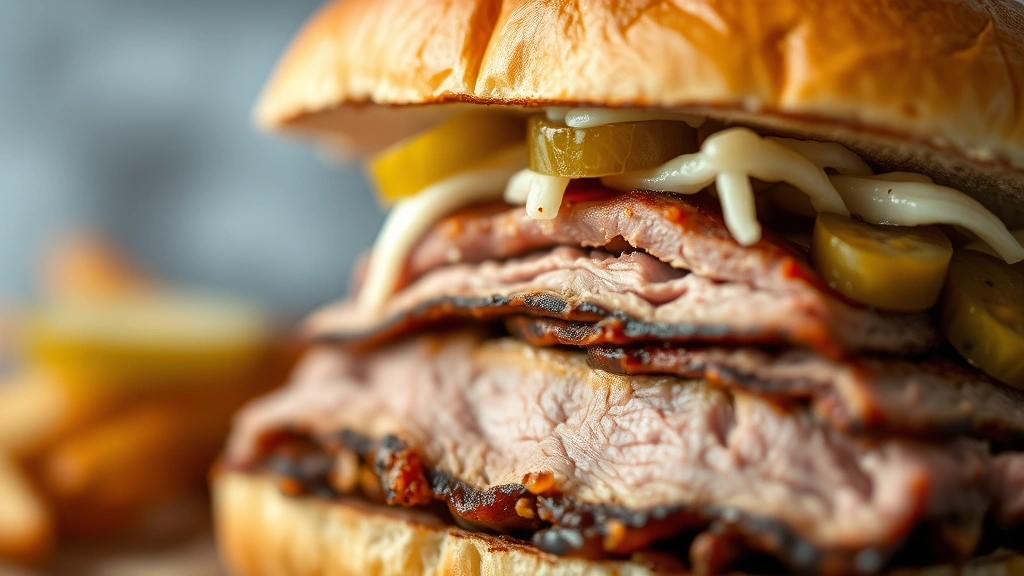
- For each sandwich, place a generous handful of the warm, saucy brisket on the bottom bun. Try to get some of that incredible jus on there—don’t be stingy with the sauce.
- Top the brisket with a small handful of creamy coleslaw, which provides a cool, crunchy contrast to the warm meat. Add a few pickles, some fresh white onion slices, and if you’re feeling adventurous, some jalapeño slices.
- Place the top bun on the sandwich and press down gently. Serve immediately while everything is still warm. These sandwiches are best enjoyed fresh, though you can refrigerate leftovers and reheat them gently the next day.
Pro Tips
The bark, or the flavorful crust that forms on the outside of the brisket, is absolutely worth celebrating. Some people wrap their brisket during cooking to speed up the process, but if you want maximum bark development, try the Texas Crutch method—only wrap it during the final stages when the internal temperature gets very high.
Temperature is everything with brisket. Use a reliable meat thermometer and check the thickest part of the flat (not touching bone). You’re looking for that magical 203-degree mark where the collagen has broken down and the meat is perfectly tender.
Don’t skip the resting period. This allows the muscle fibers to relax and reabsorb moisture, which makes a huge difference in the final texture. It’s the difference between juicy, tender slices and dry, stringy ones.
The braising liquid is liquid gold—don’t throw it away. It becomes your sauce and keeps the meat moist. If you end up with too much liquid, reduce it on the stovetop to concentrate the flavors. You can also save it for making beef soups or stews throughout the week.
For the coleslaw topping, consider making a creamy mayo-based dressing for that classic deli feel, or try a vinegar-based slaw for something lighter. Both work beautifully.
Pickling your own vegetables is easier than you think and adds a professional touch. Quick-pickle onions, jalapeños, or cucumbers in a mixture of vinegar, sugar, and spices for just a few hours before serving.
Make-ahead tip: You can cook the brisket a day or two in advance and store it in the refrigerator in its braising liquid. This actually helps the flavors meld and makes slicing easier when the meat is cold. Simply reheat gently before serving.
For a crowd, set up a brisket sandwich bar where guests can build their own with different toppings and sauces. This is always a hit and lets people customize exactly how they like their sandwich.
Leftover brisket is wonderful for breakfast hash, tacos, or grain bowls throughout the week. Store it in the refrigerator for up to five days in an airtight container.