
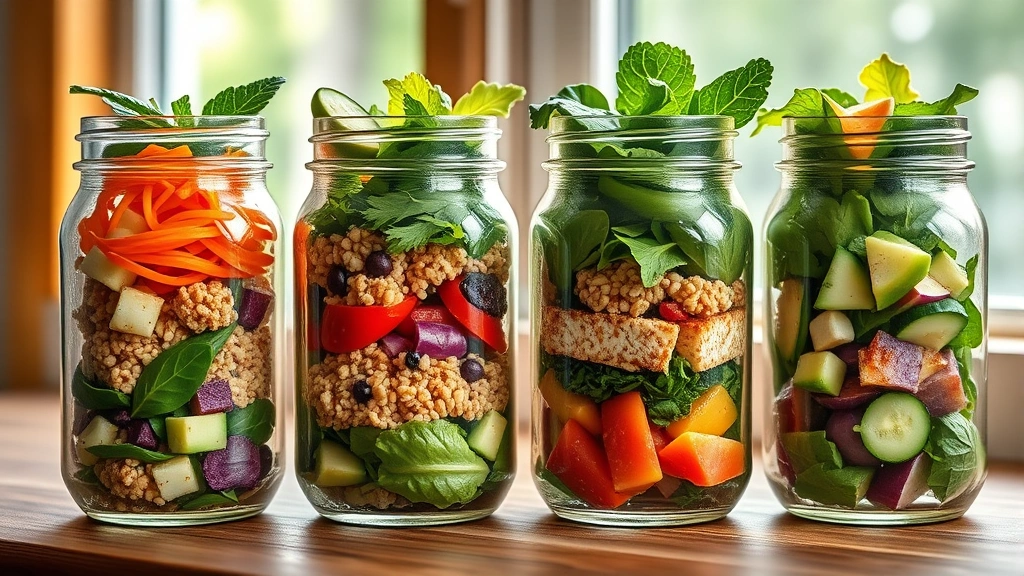
There’s something absolutely delightful about preparing a salad in a jar – it’s like creating an edible work of art that’s both beautiful and practical! This method of layering your salad ingredients not only looks stunning when you open that jar, but it also keeps your greens crisp and fresh for days. The key to a perfect salad in a jar is understanding the layering technique, which prevents your delicate lettuce from getting soggy while allowing all those wonderful flavors to meld together beautifully.
Salad in a jar recipes have become increasingly popular for meal preppers and busy professionals who want to enjoy fresh, homemade salads throughout the week without the hassle of wilted greens by Wednesday. The beauty of this approach is that you’re essentially creating a self-contained meal that travels beautifully, whether you’re heading to the office, packing a picnic, or simply wanting to grab something nutritious from your refrigerator. I absolutely love this method because it combines convenience with elegance – something I’m always striving for in my kitchen.
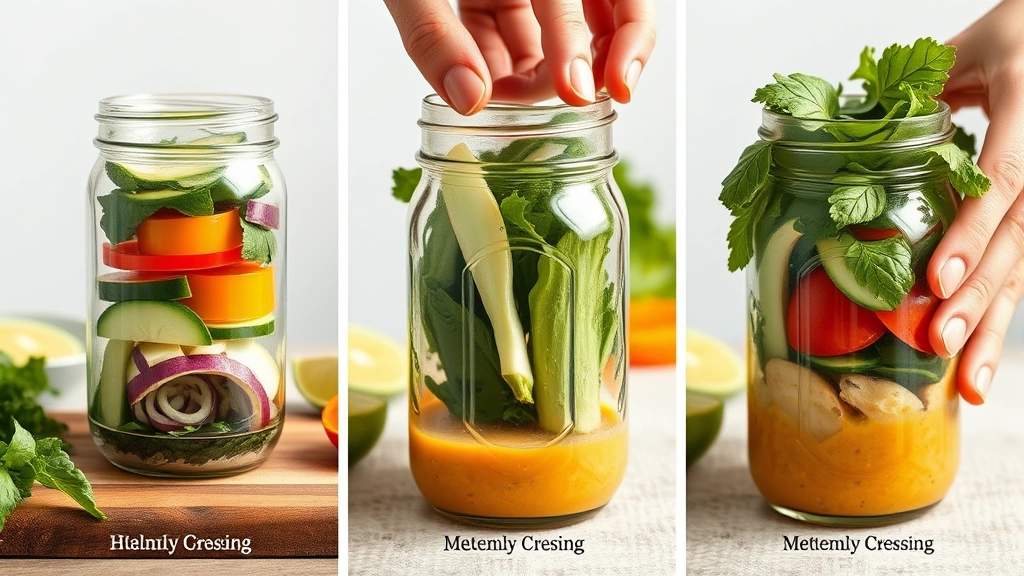
The layering technique is crucial to success. You’ll start with your dressing at the bottom of the jar, which creates a protective barrier between your wet ingredients and your greens. Then comes the heavier vegetables like cucumbers, bell peppers, and radishes, followed by proteins, grains, and finally your delicate greens at the top. This arrangement ensures that when you shake the jar and pour out your salad, everything combines perfectly without any ingredient getting lost or forgotten at the bottom.
What I love most about this recipe is its versatility. You can easily customize it based on what’s in your pantry, what’s in season at your local farmer’s market, or what dietary preferences you’re following. Try pairing it with Best Champagne Vinaigrette Recipe for a light, elegant option, or create Quick Bulgur Wheat Salad Recipe style layers for something more substantial. The possibilities are truly endless, and that’s what makes this method so exciting.
For those looking to expand their dessert repertoire, you might also enjoy exploring Best Pear Tart Recipe, Perfect Cherry Fruit Tart Recipe, and Best Meyer Lemon Tart Recipe when you’re ready to impress with something sweet.
The beauty of mason jars is that they’re not just functional – they’re also visually appealing. When you layer your salad thoughtfully, creating bands of color with different vegetables, proteins, and greens, you end up with something that looks like it belongs in a trendy restaurant. Your family and friends will be genuinely impressed when you pull out a gorgeous jar salad, and they’ll be even more amazed when they taste how fresh and flavorful it is.
I recommend preparing several jars at once on your meal prep day. This way, you’ll have healthy, delicious lunches ready to grab throughout the week. The dressing keeps everything perfectly balanced, and the jars can be stored in the refrigerator for up to five days. This is perfect for busy weekdays when you don’t have time to assemble a salad from scratch.
For external inspiration and additional techniques, check out Serious Eats for science-backed cooking methods, Bon Appétit for trendy recipe ideas, and New York Times Cooking for classic techniques. These resources will enhance your understanding of salad preparation and inspire you to create variations.
The jar method also makes transporting salads easier than ever. Unlike traditional salads that wilt and become unappetizing during transport, jar salads maintain their integrity. The sealed jar keeps everything fresh, and there’s no messy dressing leaking into your bag. Simply shake when you’re ready to eat, and pour into a bowl or enjoy directly from the jar if you’re feeling particularly playful.
I encourage you to experiment with different combinations of vegetables, proteins, and dressings. Perhaps try adding roasted chickpeas for crunch, crispy bacon for savory depth, or crumbled goat cheese for tangy richness. The fundamental layering technique remains the same, but your flavor profiles can vary dramatically based on your preferences and what’s available to you.
Ingredients
- 1 cup of your favorite salad dressing (vinaigrette, ranch, or creamy dressing)
- 1 cup diced cucumber
- 1 cup diced bell peppers (red, yellow, or orange for color)
- ½ cup shredded carrots
- ½ cup thinly sliced radishes
- 1 cup cherry tomatoes, halved
- 1 cup cooked grains (quinoa, farro, or brown rice)
- 1 cup cooked protein (chicken, chickpeas, or tofu)
- ½ cup crumbled cheese (feta, goat cheese, or cheddar)
- 4 cups fresh salad greens (mixed greens, spinach, or kale)
- ¼ cup toasted nuts or seeds (almonds, walnuts, or sunflower seeds)
- Salt and pepper to taste
- Four 32-ounce mason jars with tight-fitting lids
Instructions
- Start with your four clean mason jars and place them on your work surface, making sure they’re completely dry before beginning the layering process.
- Pour ¼ cup of your chosen dressing into the bottom of each jar – this creates the protective base that keeps everything fresh and prevents wilting.
- Add the diced cucumber to each jar next, dividing evenly among the four jars and creating the first layer of vegetables.
- Layer the diced bell peppers on top of the cucumber, ensuring they’re distributed evenly across all four jars for consistency.
- Add the shredded carrots as the next layer, pressing down gently to create a compact arrangement that maximizes space.
- Distribute the thinly sliced radishes evenly among the jars, allowing them to sit on top of the carrot layer.
- Add the halved cherry tomatoes carefully, as they can release liquid – try to avoid excess juice pooling at the bottom.
- Layer the cooked grains (quinoa, farro, or brown rice) next, dividing equally among all four jars for balanced meals.
- Add your chosen protein on top of the grains, whether that’s shredded chicken, roasted chickpeas, or crumbled tofu – approximately ¼ cup per jar.
- Sprinkle the crumbled cheese over the protein layer, distributing it evenly so each jar has an equal amount.
- Place the fresh salad greens into each jar next, packing them in gently but firmly – this is your second-to-last layer.
- Top each jar with the toasted nuts or seeds, which will add crucial crunch and flavor to your finished salad.
- Season the top layer with a pinch of salt and pepper according to your taste preferences and dietary needs.
- Screw the lids onto the jars tightly, ensuring they’re completely sealed to maintain freshness throughout the week.
- Gently shake each jar to distribute the seasoning and allow flavors to begin melding together.
- Store all four jars in the refrigerator upright on a shelf where they won’t tip over, keeping them fresh for up to five days.
- When you’re ready to eat, simply shake the jar vigorously for about fifteen seconds until everything is well combined.
- Pour the entire contents of the jar into a bowl or eat directly from the jar if you prefer – both methods work beautifully.

Pro Tips
LAYERING IMPORTANCE: The layering technique is essential to success. Always place dressing first as a protective barrier, followed by sturdy vegetables, then proteins and grains, and finally delicate greens. This prevents wilting and ensures optimal freshness.
DRESSING OPTIONS: Use approximately ¼ cup dressing per jar. Vinaigrettes work beautifully, but creamy dressings also work well. You can prepare your dressing ahead of time or even make it fresh the morning you assemble your jars.
VEGETABLE VARIATIONS: Feel free to swap vegetables based on seasonality and preference. Root vegetables like beets and parsnips work wonderfully, as do blanched broccoli and cauliflower. Avoid overly watery vegetables or cut them smaller to minimize excess liquid.
PROTEIN CHOICES: This recipe accommodates various protein preferences. Try rotisserie chicken, grilled shrimp, hard-boiled eggs, black beans, lentils, or seasoned tofu. Choose proteins you enjoy and that pair well with your selected dressing.
GRAIN ALTERNATIVES: Substitute the suggested grains with farro, barley, couscous, wild rice, or even pasta. Cooked grains add substance and nutrition while helping to balance your meal.
FRESHNESS TIMELINE: These jars stay fresh for up to five days when properly sealed and refrigerated. The dressing acts as a preservative, keeping vegetables crisp longer than traditional salads.
TRANSPORT TIPS: These jars are perfect for lunches on the go. Pack them upright in a lunch bag or cooler, and they won’t leak or spill even if jostled around.
CUSTOMIZATION IDEAS: Create different flavor profiles throughout the week. Try Italian, Asian-inspired, Mediterranean, or Mexican-style combinations using different dressings and ingredient selections.
STORAGE GUIDELINES: Always store jars upright in the refrigerator to prevent dressing from seeping into the greens prematurely. Ensure lids are sealed tightly for optimal preservation.
EQUIPMENT NEEDED: Besides mason jars, you’ll need cutting boards, sharp knives, measuring cups, and a way to cook grains or proteins if starting from scratch. Having a food processor helps speed up vegetable prep.
BATCH PREPARATION: Prepare all four jars simultaneously to save time and ensure consistency. Wash and dry all vegetables first, then assemble jars in an assembly-line fashion.
Pingback: Alabama Slammer Recipe: Ultimate 5-Minute Party Shot - Simple Recipe Finder
Pingback: Blackberry Mojito Recipe: Ultimate Fresh & Easy Cocktail - Simple Recipe Finder
Pingback: Blueberry Delight Recipe: Easy No-Bake Dessert in 15 Minutes - Simple Recipe Finder