
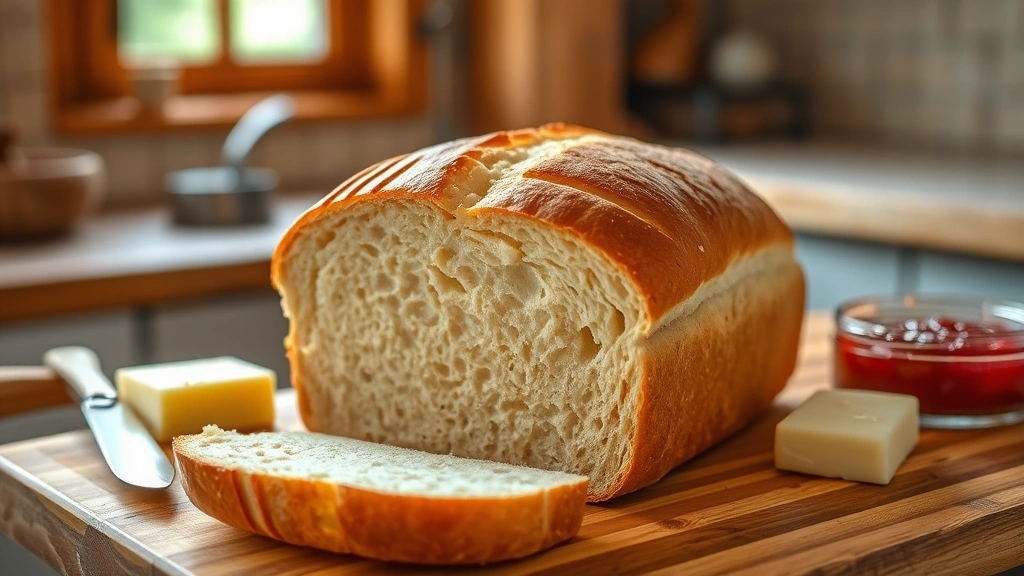
There’s something truly magical about pulling a warm, crusty loaf of sourdough sandwich bread from your oven – the kind that’s perfectly suited for hearty sandwiches, toast, or simply enjoying with butter and jam. This sourdough sandwich bread recipe combines the tanginess and complexity of traditional sourdough with a softer crumb structure that makes it ideal for everyday sandwich-making. Unlike its more artisanal cousins, this loaf strikes the perfect balance between chewy crust and pillowy interior, making it the ultimate bread for everything from classic deli sandwiches to gourmet creations.
What makes this recipe special is that it uses an active sourdough starter to develop deep, complex flavors while maintaining a tender, sliceable crumb. The long, cool fermentation process allows the gluten network to develop naturally, creating a bread with excellent structure and flavor. You won’t need any commercial yeast here – just your trusty sourdough starter, flour, water, and salt. This is the kind of bread that transforms ordinary ingredients into something extraordinary, and once you master this technique, you’ll never want to buy sandwich bread from the store again.
The beauty of sourdough sandwich bread is that it’s more forgiving than you might think. While it does require some planning ahead due to the fermentation time, the actual hands-on work is minimal. Whether you’re a seasoned bread baker or picking up a sourdough starter for the first time, this recipe will guide you through each step to create bakery-quality loaves at home. Learn more about building your baking skills, and discover how the fundamentals of fermentation apply across all your favorite baked goods.
I’ve perfected this recipe over countless bakes, and I’m thrilled to share it with you. The result is a sandwich bread that’s sturdy enough to hold up to wet fillings, beautiful enough to serve on your best bread board, and delicious enough to eat plain. Your kitchen will smell absolutely incredible as this bread bakes, and your family will be begging for sandwiches made with your homemade sourdough. This is the bread that will have your friends asking for your recipe – trust me on this one.
Ingredients
- 500g bread flour or all-purpose flour
- 350ml room temperature water
- 100g active, fed sourdough starter (100% hydration)
- 10g fine sea salt
- Extra flour for dusting and shaping
Instructions
- In a large mixing bowl, combine 350ml of room temperature water with 100g of your active sourdough starter. Stir until the starter is mostly dissolved into the water, creating a cloudy liquid. This mixture is called the “autolyse” base.
- Add 500g of bread flour to the water and starter mixture. Mix with your hands or a wooden spoon until all the flour is hydrated and you have a shaggy dough. There should be no dry flour remaining in the bowl. Cover the bowl with a clean kitchen towel and let it rest for 30 minutes to 1 hour. This rest period, called the autolyse, allows the flour to fully absorb the water and begins gluten development.
- After the autolyse rest, sprinkle 10g of fine sea salt over the dough. Using wet hands, pinch and fold the salt into the dough using a gentle folding motion. Fold the dough over itself repeatedly, rotating the bowl as you work, until the salt is fully incorporated. This should take about 3-5 minutes. The dough will feel slightly sticky and shaggy at this stage.
- Begin the bulk fermentation phase. Every 30 minutes for the first 2 hours, perform a series of “stretch and folds.” Wet your hand, grab one side of the dough, stretch it up and fold it over itself, then rotate the bowl and repeat 4-6 times. These stretch and folds build strength without traditional kneading. After 2 hours of stretch and folds, stop and let the dough rest.
- Continue bulk fermentation for a total of 8-12 hours at room temperature (68-72°F is ideal). The dough should increase in volume by about 50-75%, show visible bubbles on the surface, and pass the “poke test” – when you gently poke the dough, it should slowly spring back but leave a slight indent. The exact timing depends on your kitchen temperature and starter strength.
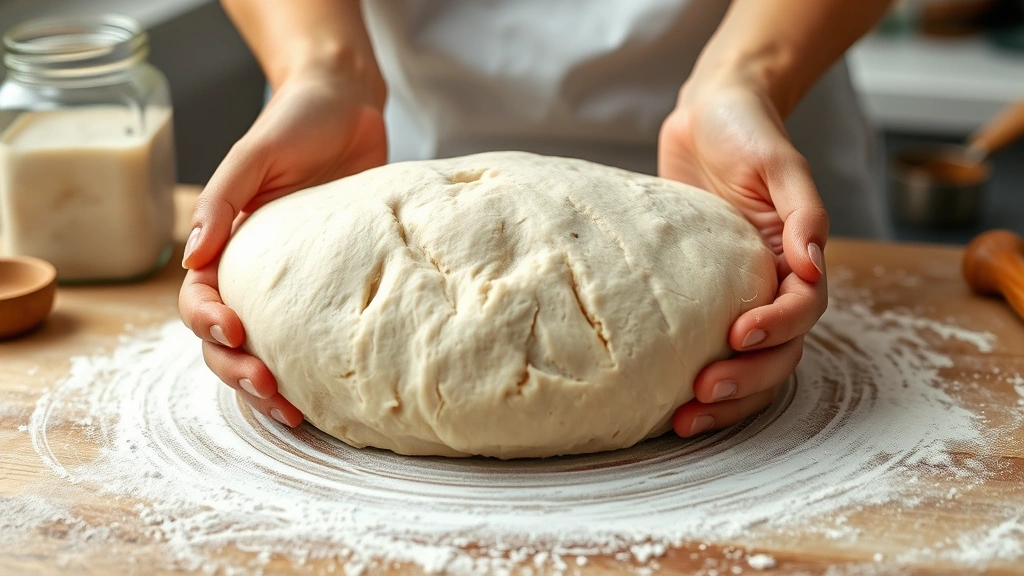
- Once bulk fermentation is complete, turn the dough out onto a lightly floured work surface. Gently pre-shape the dough into a loose round by folding the edges toward the center. Let this pre-shaped dough rest for 20-30 minutes on the counter. This bench rest allows the gluten to relax slightly before the final shape.
- Shape the dough into a sandwich-style loaf. Working on a lightly floured surface, gently flatten the pre-shaped dough into a rough rectangle. Fold the top third down and press gently to seal. Fold the bottom third up and seal. Then fold the dough in half lengthwise and seal the seam by rolling it toward you. You should have a taut, elongated loaf that fits into a standard loaf pan.
- Place the shaped dough seam-side up into a banneton proofing basket lined with parchment paper, or seam-side down into an oiled 9×5 inch loaf pan. Cover tightly with plastic wrap or place in a large plastic bag. Transfer to the refrigerator and let it cold proof overnight for 12-16 hours. This cold fermentation develops flavor and makes scoring easier. If you can’t wait overnight, you can do a 4-6 hour room temperature final proof, but the flavor will be less complex.
- About 30-45 minutes before baking, preheat your oven to 475°F (245°C). If using a Dutch oven or baking stone, place it in the oven during preheating to get it very hot. This helps create a crispy, golden crust.
- Remove the dough from the refrigerator. If it’s in a banneton, gently turn it out seam-side down onto parchment paper. If it’s in a loaf pan, you can score and bake it directly in the pan for a more sandwich-loaf shape. Using a sharp bread knife or bread lame, score the top with a single slash down the center, about ¼-inch deep at a 45-degree angle. This allows the bread to expand properly during baking.
- If using a Dutch oven, carefully place the parchment with the dough inside the preheated Dutch oven. Cover with the lid and bake for 20 minutes. This traps steam and helps develop a beautiful crust.
- After 20 minutes, remove the Dutch oven lid and reduce the oven temperature to 450°F (232°C). Continue baking for 15-20 minutes until the loaf is deeply golden brown and sounds hollow when tapped on the bottom.
- If baking in a loaf pan, place the pan directly on the middle oven rack. Bake for 35-40 minutes at 475°F until the top is golden brown and an instant-read thermometer inserted into the center reads 205-210°F (96-99°C).
- Remove the bread from the oven and transfer to a wire cooling rack. Let it cool completely before slicing – at least 1-2 hours. This cooling time allows the crumb structure to set properly. Slicing warm bread can result in a gummy texture.
- Once cooled, slice with a serrated bread knife using a gentle sawing motion. Store leftover bread in a paper bag at room temperature for up to 3 days, or freeze slices for up to 3 months. Toast frozen slices directly in your toaster for best results.

Pro Tips
Hydration and Flour Types: This recipe uses a moderate hydration level of about 70%, which makes it easier to handle than higher-hydration sourdoughs. If using whole wheat flour or other specialty flours, you may need to increase hydration slightly as they absorb more water.
Temperature Matters: Fermentation speed is heavily dependent on kitchen temperature. In warmer kitchens (75°F+), your bulk fermentation may be complete in 6-8 hours. In cooler kitchens, it may take 12+ hours. Always go by visual cues (dough rise and poke test) rather than strict timing.
The Poke Test: To check if bulk fermentation is complete, flour your finger and gently poke the dough about ½-inch deep. If the indent slowly springs back halfway, you’re at about 75% fermentation. If it springs back completely, ferment longer. If it doesn’t spring back at all, you may have overfermented.
Scoring for Success: A good score not only looks beautiful but also allows the bread to expand properly during oven spring. The dough will expand most aggressively along the score line, creating an open crumb structure.
Cold Proofing Benefits: The overnight cold fermentation is not just convenient – it’s actually beneficial for flavor development and makes the dough easier to score. The cold dough holds its shape better and develops a more complex sour flavor.
Slicing Tips: Use a serrated bread knife and let the weight of the knife do the work. Sawing motions with minimal downward pressure produce the cleanest slices. A bread slicer guide can help you get even, uniform slices.
Troubleshooting: If your bread is too dense, you may have underfermented the dough or your starter wasn’t active enough. If it’s too open and gummy, the dough was likely overfermented or not fully cooled before slicing.
Making Multiple Loaves: This recipe doubles easily. If making two loaves, divide the dough after bulk fermentation and shape each half separately. Baking time remains the same since each loaf still bakes in the same conditions.
Pingback: Almond Flour Bread Recipe: Easy, Low-Carb & Fluffy - Simple Recipe Finder
Pingback: Bierocks Recipe: Best Authentic German Runza Guide - Simple Recipe Finder
Pingback: Dutch Oven Bread Recipes: 10 Easy Artisan Loaves - Simple Recipe Finder