
There’s something absolutely magical about a steaming bowl of udon noodles, whether you’re enjoying them in a rich broth or tossed in a savory sauce. This recipe will teach you how to make restaurant-quality udon noodles right in your own kitchen, and trust me, once you master this technique, you’ll be making them again and again.
Udon noodles are thick, chewy Japanese noodles that are wonderfully versatile. They can be served hot in a comforting broth, chilled during summer months, or tossed with various toppings and sauces. The beauty of this recipe is that it works for virtually any udon preparation you can imagine. Whether you’re craving a simple, minimalist bowl or something more elaborate with proteins and vegetables, this foundation will set you up for success.
I absolutely love making udon noodles from scratch because there’s something so satisfying about kneading the dough and watching it transform into those gorgeous, chewy noodles. The process is easier than you might think, and the results are so much better than boxed versions. Plus, your kitchen will smell absolutely divine while they’re cooking.
The key to perfect udon noodles is all in the technique. You want to develop enough gluten to create that characteristic chewiness, but you don’t want to overwork the dough. The resting periods are crucial—they allow the gluten to relax and the flour to fully hydrate, resulting in noodles that have the perfect texture. I always tell people that patience is the secret ingredient in any great noodle recipe.
This recipe yields enough noodles to serve four people generously, though you can easily double it if you’re feeding a crowd. I recommend pairing your udon with complementary proteins, or you could serve them alongside fresh, crispy vegetables for added texture and nutrition.
For the broth, I’ve included a simple but deeply flavorful dashi-based recipe that comes together quickly. If you’re short on time, you can absolutely use store-bought dashi or even a good quality chicken or vegetable broth. The beauty of this recipe is its flexibility—adapt it to what you have on hand and what you’re in the mood for. Check out Serious Eats’ comprehensive guide for additional broth variations and topping ideas.
One of my favorite things about making udon at home is the ability to customize every single element. Want thicker noodles? You can adjust the thickness. Prefer a lighter broth? Use less miso. Love spice? Add chili oil and sriracha. This recipe is truly a blank canvas for your culinary creativity. I often make a big batch of noodles and freeze them, so I always have them on hand for quick weeknight dinners.
The toppings are where you can really have fun and make this recipe your own. I’ve suggested some classic options, but don’t be afraid to experiment with different flavor profiles. Soft-boiled eggs, tender pork belly, fresh scallions, crispy tempura vegetables, and aromatic sesame oil all make excellent additions. For more inspiration on toppings and variations, check out this New York Times recipe guide.
I also want to mention that this recipe is quite forgiving, especially if you’re new to noodle-making. If your dough seems a bit dry, add water a tablespoon at a time. If it’s too wet, dust with a bit more flour. The dough should come together into a shaggy mass that eventually becomes smooth and elastic. Don’t stress if your first batch isn’t perfect—even homemade udon that’s slightly irregular in thickness tastes infinitely better than store-bought, and you’ll improve with practice.
Once you’ve made this recipe a few times, you’ll develop an intuition for the dough and the process will become second nature. You might even find yourself making udon noodles on a regular basis, creating different broths and toppings combinations. It’s a wonderful skill to have in your cooking arsenal, and it’s sure to impress family and friends. Bon Appétit also offers great tips for perfecting your technique and creating restaurant-quality results at home.
Ingredients
- 3 cups all-purpose flour, plus extra for dusting
- 1 teaspoon salt
- 1 tablespoon baking soda
- 1 cup water, divided
- 6 cups dashi or vegetable broth
- 3 tablespoons soy sauce
- 2 tablespoons mirin
- 1 tablespoon sugar
- 2 teaspoons sesame oil
- 4 large eggs
- 4 green onions, sliced
- 2 sheets nori seaweed, cut into strips
- 1 teaspoon ichimi togarashi (optional, for heat)
- Fresh ginger, grated, for garnish
- Bonito flakes, for garnish (optional)
Instructions
- In a large mixing bowl, combine 3 cups all-purpose flour, 1 teaspoon salt, and 1 tablespoon baking soda, whisking together until well combined and no lumps remain.
- Create a well in the center of the dry ingredients and slowly pour in ¾ cup of water while mixing with chopsticks or a fork, gradually incorporating the flour from the sides.
- Once the mixture becomes shaggy and most of the flour is incorporated, add the remaining water a little at a time until you have a rough, slightly sticky dough.
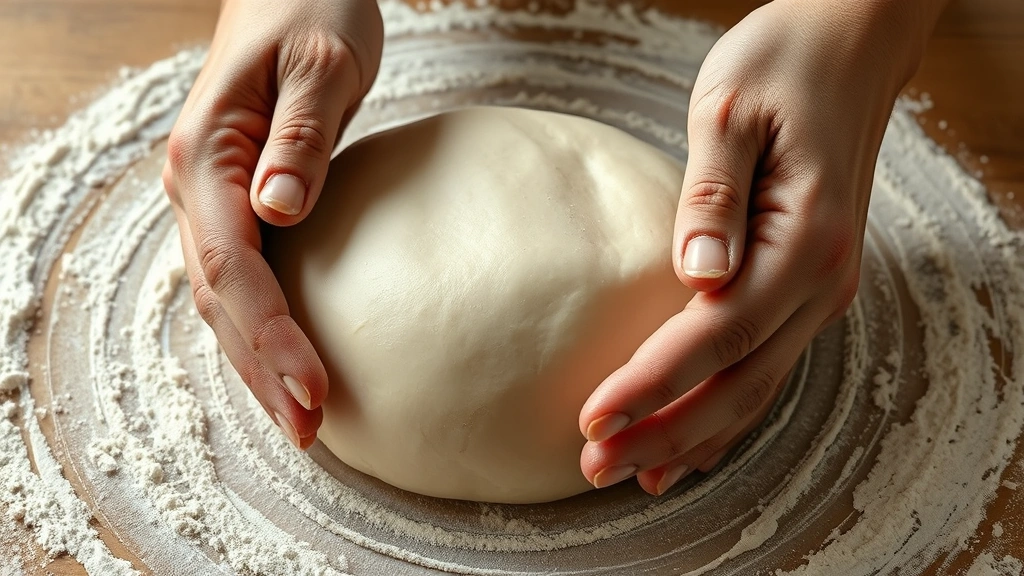
- Turn the dough out onto a lightly floured surface and knead for about 10 minutes until it becomes smooth, elastic, and slightly springy to the touch.
- Wrap the dough tightly in plastic wrap and let it rest at room temperature for 30 minutes, which allows the gluten to relax and the flour to fully hydrate.
- After the first rest, unwrap the dough and knead it again for 2-3 minutes, then wrap it back up and refrigerate for at least 2 hours or up to overnight, which develops flavor and makes the dough easier to work with.
- Remove the dough from the refrigerator 15 minutes before you plan to cook to allow it to come to room temperature slightly.
- On a well-floured surface, roll out the dough to about ¼-inch thickness, then fold it in half and roll again, repeating this process 3-4 times to develop more gluten and create the characteristic chewiness.
- Final roll should be about ⅛-inch thick, and you can use a pasta machine if you have one—set it to the thinnest setting and pass the dough through several times.
- Once rolled thin, dust generously with flour and fold the dough loosely into thirds lengthwise, creating a rectangle.
- Using a sharp knife, cut the folded dough into ¼-inch wide strips, which will create long noodles when unfolded.
- Gently unfold the noodles and dust them thoroughly with more flour to prevent sticking, then set aside on a parchment-lined baking sheet.
- Bring a large pot of water (about 8 quarts) to a rolling boil, then carefully add the udon noodles, stirring gently to separate them.
- Cook the noodles for 8-10 minutes, stirring occasionally, until they float to the surface and are tender but still slightly chewy.
- While the noodles cook, prepare the broth by combining 6 cups dashi or vegetable broth, 3 tablespoons soy sauce, 2 tablespoons mirin, 1 tablespoon sugar, and 2 teaspoons sesame oil in a separate pot over medium heat.
- Bring the broth to a gentle simmer and let it warm through for about 5 minutes, tasting and adjusting seasonings as needed.
- While the noodles and broth cook, bring a small pot of water to boil and carefully add the eggs, cooking for 6-7 minutes for soft-boiled eggs with slightly runny yolks.
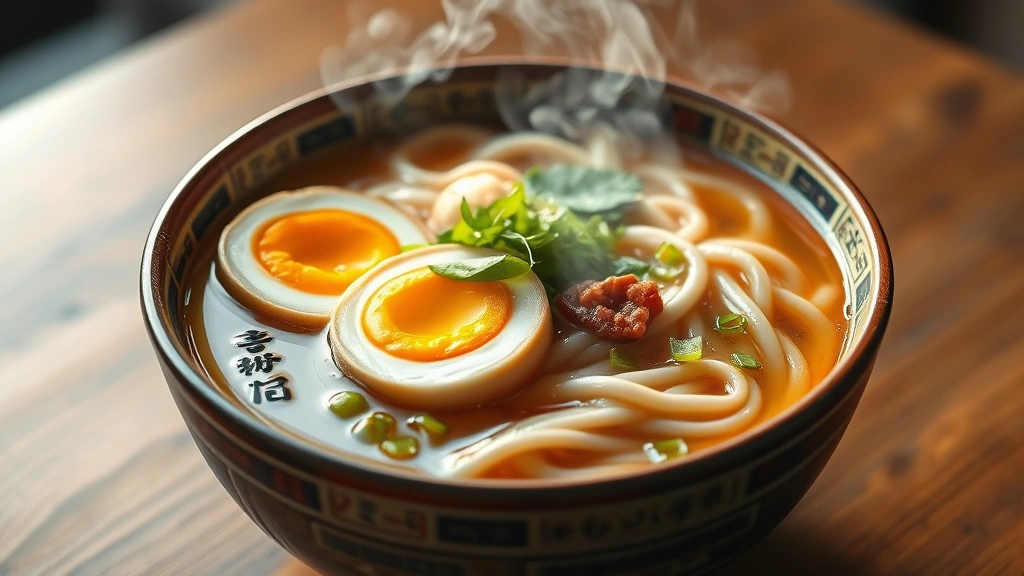
- When the eggs are done, transfer them to an ice bath to stop the cooking, then peel and slice them in half.
- Drain the cooked udon noodles in a colander and rinse gently with cold water to remove excess starch and stop the cooking process.
- Divide the drained noodles among four serving bowls and ladle the hot broth over them.
- Top each bowl with a soft-boiled egg half, sliced green onions, nori seaweed strips, grated fresh ginger, and a sprinkle of ichimi togarashi if desired.
- Serve immediately while the broth is piping hot, and enjoy with chopsticks and a spoon for sipping the broth.

Pro Tips
The baking soda in this recipe is important as it creates the slightly alkaline environment that gives udon noodles their characteristic chewy texture and slightly golden color. Don’t skip it or substitute it with baking powder. If you can’t find baking soda, you can purchase “kansui” online, which is a traditional alkali solution used in authentic udon making.
Resting times are non-negotiable if you want the best results. The initial 30-minute rest allows the flour to fully hydrate and the gluten to begin developing. The longer cold rest in the refrigerator develops flavor through fermentation and makes the dough much easier to roll out. If you’re short on time, you can skip the cold rest and proceed after the room temperature rest, though the flavor and texture won’t be quite as exceptional.
For the noodle thickness, aim for about ¼-inch wide strips when cutting. Thicker noodles will take longer to cook and will be chewier, while thinner noodles will be more delicate. Consistency in thickness matters for even cooking, so take your time with this step.
The broth recipe provided is a basic miso-free version that lets the delicate flavor of dashi shine through. If you prefer a richer broth, you can add 2-3 tablespoons of white miso paste to the simmering broth, whisking it in until fully dissolved. You can also create a darker broth by using more soy sauce or adding a tablespoon of mirin.
Don’t skip rinsing the cooked noodles with cold water. This removes the excess starch that would otherwise make the broth cloudy and the noodles gummy. Use cold water, not hot, so you stop the cooking process completely.
If you want to make udon ahead of time, you can freeze the uncooked noodles on a baking sheet until solid, then transfer them to freezer bags and store for up to three months. Cook frozen noodles directly without thawing—they’ll take about 2-3 minutes longer than fresh noodles.
Topping combinations are endlessly variable. Classic options include tempura shrimp, sliced pork belly, mushrooms, bok choy, corn, carrot slices, bamboo shoots, and crispy fried onions. You can also add a drizzle of chili oil or a spoonful of sriracha for heat. Fresh herbs like cilantro and mint add brightness, while sesame seeds add nuttiness.
Pingback: Air Fried Tofu Recipe: Crispy & Perfect Every Time - Simple Recipe Finder
Pingback: Chow Fun Recipe: Best Authentic Restaurant-Style Guide - Simple Recipe Finder