
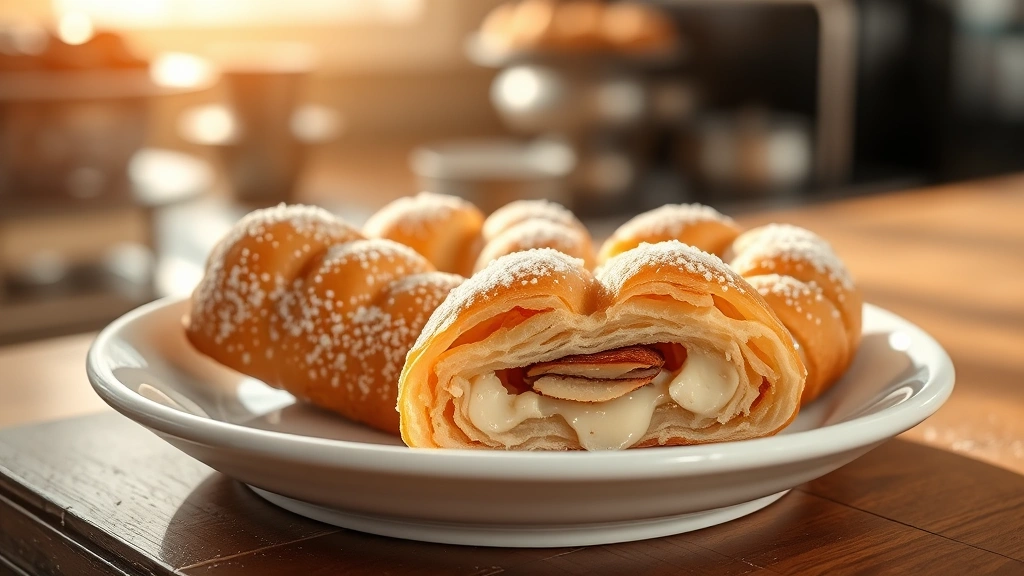
A bear claw recipe is one of those bakery treasures that seems impossibly complicated until you realize how straightforward it actually is. These magnificent pastries—with their signature claw shape, flaky layers, and sweet almond filling—are absolutely achievable in your own kitchen, and honestly, homemade versions blow the bakery ones out of the water.
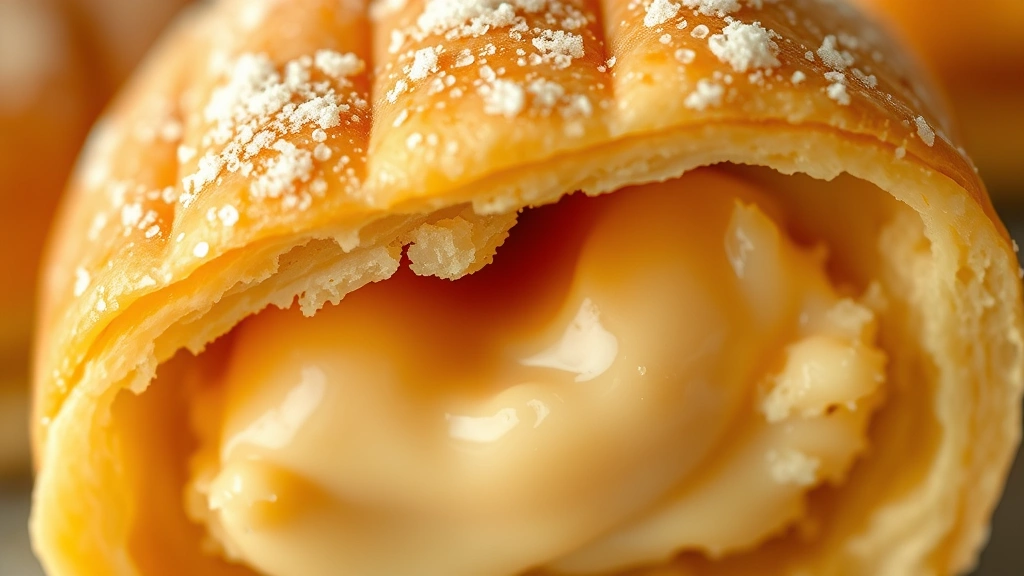
What makes bear claws so special? It’s the contrast of textures. You’ve got those paper-thin, butter-laminated layers that shatter when you bite into them, paired with a creamy almond paste center that’s rich without being heavy. Meanwhile, the pearl sugar on top adds just the right amount of crunch and sparkle. The whole thing comes together in about 30 minutes of active work, which is genuinely impressive for a pastry this elegant.
Jump To Section
I first fell in love with bear claws at a tiny Scandinavian bakery in Minneapolis years ago. I’d grab one with my morning coffee, and it became this little moment of joy before heading to work. After years of trying to recreate that magic at home, I finally cracked the code—and it turns out the secret isn’t some fancy technique, it’s just good butter, proper lamination, and a little patience.
Why This Recipe Works
This bear claw recipe uses puff pastry as your base, which sounds like cheating until you realize even professional bakers often do the same thing. Why? Because homemade puff pastry requires hours of resting and folding, whereas store-bought gives you those incredible flaky layers without the fuss. The result is absolutely indistinguishable from a bakery version.
The almond filling is the real star here. It’s simple—just almond paste, butter, sugar, and a touch of vanilla—but when you taste it, it feels gourmet. Additionally, because the filling is thick and creamy, it creates a beautiful contrast with the crispy pastry exterior. The egg wash ensures those layers brown to a gorgeous golden color, while the pearl sugar adds visual appeal and texture.
The beauty of this approach is flexibility. You can prepare bear claws in the morning and bake them fresh for an afternoon treat, or assemble them the night before and pop them in the oven when you wake up. For instance, many bakers keep a batch in the freezer for unexpected guests or weekend indulgences.
Ingredient Tips & Substitutions
Puff pastry is your foundation here, and quality matters. Look for all-butter versions rather than the shortening-based ones—they’ll taste noticeably better and have superior flake structure. If you can’t find all-butter puff pastry, frozen is totally acceptable; just thaw it in the refrigerator overnight.
Almond paste is non-negotiable for authentic flavor, but here’s a helpful tip: make sure you’re buying true almond paste, not marzipan (which contains powdered sugar and is sweeter). You’ll find it in the baking aisle near the extracts. However, if you’re in a pinch, you can make a substitute by grinding blanched almonds with powdered sugar and a touch of almond extract.
Pearl sugar is that coarse, irregular sugar you see on top of Belgian waffles and Danish pastries. It’s worth seeking out online or at specialty stores because it doesn’t melt like regular sugar and creates that signature crunch. Meanwhile, if you absolutely cannot find it, coarse sanding sugar works in a pinch, though the texture won’t be quite as special.
For the egg wash, one large egg beaten with a splash of water is perfect. This creates that beautiful glossy-brown finish that makes bear claws look professionally made. Additionally, don’t skip this step—it’s what takes these from homemade-looking to bakery-quality.
How to Shape Bear Claws Perfectly
The iconic claw shape is easier than you’d think. Start with your puff pastry rectangle and spread the almond filling down the center, leaving about ½ inch on all sides. Then, using a sharp knife or pastry cutter, make diagonal slits on both sides of the filling—about five to six on each side, angled toward the center.
Here’s the magic part: fold the pastry strips over the filling in an alternating pattern, left and right, creating that interlocking claw effect. It sounds fussy, but once you do it once, you’ve got it. The pastry is forgiving, and even if your folds aren’t perfectly symmetrical, they’ll still look beautiful when baked.
Transfer your shaped bear claws to a parchment-lined baking sheet, brush generously with egg wash, and sprinkle that pearl sugar on top. At this point, you can bake immediately or cover and refrigerate for up to 8 hours.
Serving Suggestions
Bear claws are absolutely divine on their own, but they shine alongside strong coffee or tea. The richness of the almond filling pairs beautifully with a dark roast or an Earl Grey. Serve them warm if possible—there’s something about fresh-from-the-oven pastry that elevates the entire experience.
For a more substantial breakfast or brunch, pair bear claws with a simple green salad like our Quick and Tasty Olive Garden Salad Recipe, which provides a nice contrast to the sweetness. You might also consider serving them alongside fresh fruit—berries, pears, or sliced oranges cut through the richness nicely.
These pastries are also excellent for entertaining because they look impressive without requiring last-minute fussing. Make them ahead, store them in an airtight container, and reheat gently before serving.
Storage & Reheating
Freshly baked bear claws taste best within a few hours, but they keep well for up to three days in an airtight container at room temperature. The pastry may soften slightly, but the flavor remains delicious. For longer storage, freeze baked bear claws for up to two months in a freezer bag—they thaw beautifully at room temperature in about 30 minutes.
To reheat, warm them in a 325°F oven for about 8-10 minutes until warmed through. This restores some of the crispness you had fresh from the oven. Avoid the microwave, which will make the pastry tough and chewy.
Alternatively, you can freeze shaped, unbaked bear claws for up to one month. Bake them directly from frozen, adding just 2-3 extra minutes to the bake time and checking that the filling is heated through.
If you’re planning a batch for the week, consider these complementary recipes: our Best Velveeta Cheese Mac and Cheese Recipe for a hearty dinner, or Perfect Pesto Pasta Recipe in 15 Minutes for a quick lunch.
This bear claw recipe truly is a game-changer for anyone who loves pastries. The combination of technique, quality ingredients, and a bit of planning transforms puff pastry into something that tastes like you spent hours in a French patisserie. You haven’t—you’ve just spent 30 minutes, and that’s the real beauty here. Bake these this weekend, and prepare for the absolute delight on everyone’s faces when they bite into one.
Ingredients
- 1 pound all-butter puff pastry (thawed if frozen)
- ¾ cup almond paste
- 3 tablespoons unsalted butter, softened
- 2 tablespoons granulated sugar
- ½ teaspoon vanilla extract
- ¼ teaspoon salt
- 1 large egg, beaten (for egg wash)
- 1 tablespoon water
- 3 tablespoons pearl sugar for topping

Instructions
- Preheat your oven to 400°F and line a baking sheet with parchment paper.
- In a small bowl, combine the softened almond paste, butter, sugar, vanilla extract, and salt. Mix until smooth and creamy, about 1-2 minutes. You want the consistency of a thick frosting.
- Roll out your thawed puff pastry on a lightly floured surface into a rectangle approximately 16 inches long and 8 inches wide. If it’s resisting, let it rest for 5 minutes.
- Divide the almond filling into 4 equal portions. Spread one portion down the center of the pastry in a strip about 1½ inches wide, leaving ½ inch margins on all sides.
- Using a sharp knife, make diagonal cuts on both sides of the filling—about 5-6 cuts on each side, angling the knife at about 45 degrees toward the center filling.
- Fold the pastry strips over the filling in an alternating pattern (left, right, left, right) creating an interlocking braid effect that resembles a claw.
- Transfer the shaped bear claw to your prepared baking sheet. Repeat with remaining pastry and filling to make 4 bear claws total.
- In a small bowl, whisk together the beaten egg and water to make an egg wash. Brush generously over each bear claw.
- Sprinkle pearl sugar evenly over the top of each pastry, pressing gently so it adheres.
- Bake for 18-22 minutes until deep golden brown. The pastry should be puffed and crispy.
- Remove from the oven and cool on the baking sheet for 5 minutes, then transfer to a wire rack. Serve warm or at room temperature.
Pro Tips
The key to flaky pastry is keeping everything cold. If your puff pastry starts to get warm and sticky while working, pop it back in the refrigerator for 10 minutes. Cold dough maintains those beautiful butter layers that create the flake.
Almond paste can vary in texture depending on the brand. If yours is very stiff, you can warm it slightly or add an extra tablespoon of softened butter to make it more spreadable. However, avoid making it too thin, or it’ll leak out during baking.
Don’t skip the egg wash—this is what gives bear claws that gorgeous bakery appearance. Make sure to brush into the crevices and folds so every part gets that glossy golden finish.
For a special variation, add a tablespoon of almond liqueur or a few drops of almond extract to your filling for extra depth. Additionally, some bakers like to add a tablespoon of jam (apricot is beautiful) to the center of the filling for a fruity element.
If you find your bear claws browning too quickly, tent them loosely with foil for the last 5 minutes of baking. Every oven runs differently, so start checking at 18 minutes rather than waiting the full 22.
Make-ahead tip: You can shape your bear claws in the morning, cover them with plastic wrap, and refrigerate until evening. This actually improves them—the cold resting helps the layers develop. Simply add a minute or two to the bake time if baking from chilled.
For gifting, baked bear claws keep beautifully in an airtight container for three days. Wrap them individually in parchment paper for a beautiful presentation. Alternatively, consider pairing them with our Best Spaghetti Casserole Recipe for a full meal gift, or with our Best Pistachio Salad Recipe for a sweet and savory combination.