
This cinnamon roll recipe no yeast is an absolute game-changer for anyone craving fresh, warm cinnamon rolls without the hours of waiting for dough to rise. I discovered this method years ago when I desperately wanted homemade cinnamon rolls on a lazy Sunday morning, and honestly, it’s become my go-to whenever the craving strikes. The magic happens with baking powder and baking soda instead of yeast, which means you can go from mixing to eating in just 30 minutes flat.
The beauty of this no-yeast approach is that you don’t sacrifice flavor or texture one bit. Your kitchen will still smell absolutely incredible—that cinnamon-sugar aroma that makes everyone come running. Plus, there’s something deeply satisfying about pulling a batch of golden, gooey cinnamon rolls out of the oven without any of the usual advance planning.
Jump To Section
Why This Recipe Works
Traditional yeast-based cinnamon rolls require rising time, sometimes overnight, which doesn’t always fit into our modern schedules. This recipe uses a combination of baking powder and baking soda to create lift and structure, giving you that pillowy texture you’re after without the fermentation process. The result? Fluffy, tender rolls that bake up in just 12-15 minutes.
The dough comes together quickly with simple pantry ingredients you probably already have on hand. Buttermilk is the secret ingredient here—its acidity reacts beautifully with the baking soda, creating those subtle layers of flavor that make these rolls taste genuinely homemade. Additionally, the quick baking means the cinnamon-sugar filling stays moist and luscious rather than drying out during a long rise.
What really sells me on this method is how forgiving it is. Even if you’re not a seasoned baker, you’ll have success here. The dough handles beautifully, and there’s no need to worry about over-proofing or temperature-sensitive environments.
Ingredient Tips & Substitutions
For the flour, I recommend using all-purpose flour for the best texture, though you can swap in cake flour if you want them even more tender. If you don’t have buttermilk on hand, you can create a substitute by adding a tablespoon of lemon juice or white vinegar to regular milk and letting it sit for five minutes.
Brown sugar is absolutely essential in the filling—it adds moisture and depth compared to white sugar. However, if brown sugar is all you have, that works perfectly fine. The cinnamon quality matters more than you’d think; splurge on fresh cinnamon if possible, as older spices lose their punch.
For the cream cheese frosting, make sure your cream cheese is softened to room temperature. Cold cream cheese won’t blend smoothly and you’ll end up with lumps. Similarly, softened butter incorporates more easily. Meanwhile, you can use dairy-free cream cheese and butter if you’re avoiding dairy—the results are genuinely delicious.
Step-by-Step Baking Success
The dough mixing process takes about five minutes total, so don’t overthink it. Mix your dry ingredients first, then add the wet components, stirring until everything just comes together. You want a slightly sticky dough—this isn’t bread dough you’re aiming for, but rather something closer to biscuit dough.
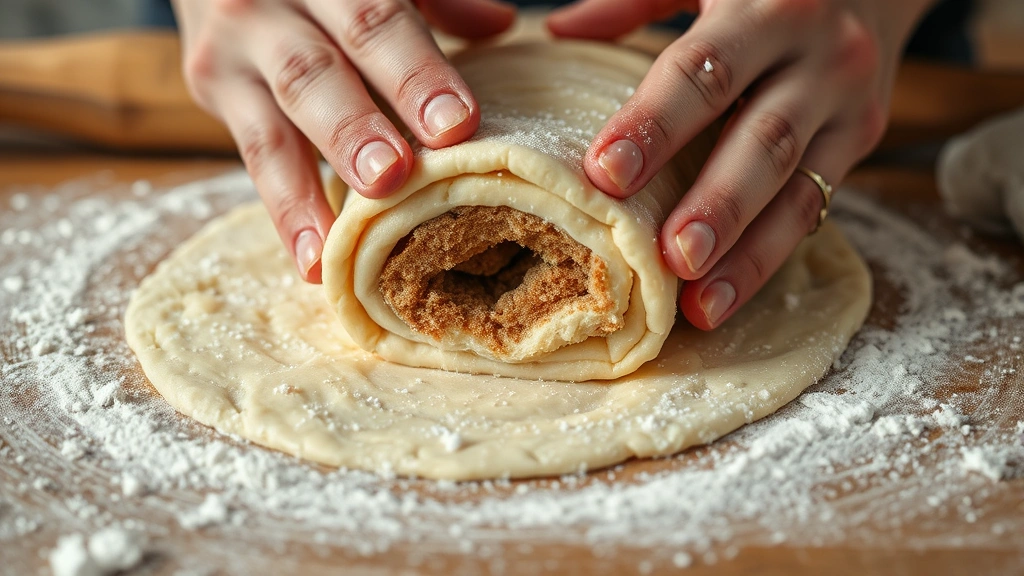
When you roll out the dough, use parchment paper or a lightly floured surface to prevent sticking. Roll it into roughly a 12×8 inch rectangle. The thickness doesn’t have to be perfect; just aim for consistency so they bake evenly. For instance, if one end is much thicker than the other, they’ll finish cooking at different rates.
Spreading that cinnamon-sugar mixture is where the real joy happens. Don’t be shy—use all of it. This is what makes the rolls taste incredible, so go generous with the filling. Roll it up starting from the long side, then slice into eight equal pieces using a sharp knife or dental floss (yes, really—it cuts through perfectly without squishing).
Serving Suggestions
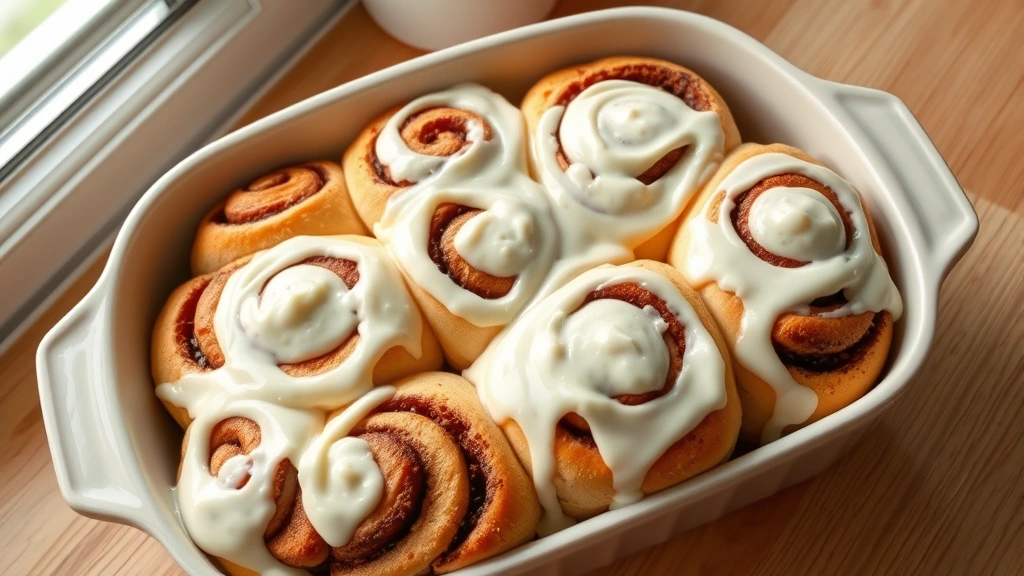
These rolls are absolutely best served warm, right out of the oven, with the cream cheese frosting drizzled or spread on top while they’re still steaming. The warmth helps the frosting melt into all those delicious nooks and crannies. For a special brunch, pair these with homemade tea sandwiches for an elegant spread.
You could also serve them alongside a big batch of spring salad if you’re hosting brunch and want some balance. Strong coffee or hot chocolate pairs beautifully with these. The richness of the rolls really shines when you have a hot beverage to enjoy them with.
If you’re feeling fancy, add a sprinkle of fleur de sel on top of the frosting for a sweet-salty contrast. Or drizzle with a simple glaze made from powdered sugar and milk for extra sweetness.
Storage & Reheating
These rolls keep beautifully in an airtight container at room temperature for up to two days. However, I find they’re genuinely best eaten the day they’re made—there’s something irreplaceable about fresh cinnamon rolls. If you want to make them ahead, you can prepare the dough and filling the night before, roll them up, and refrigerate overnight (though they’ll need a bit longer to bake from cold).
For reheating, wrap them loosely in foil and warm in a 350°F oven for about five minutes. You can also microwave individual rolls for 20-30 seconds, though the oven method preserves texture better. Alternatively, skip the frosting when you bake them, then add it fresh after reheating—it’ll taste like you just made them.
You can even freeze unbaked rolls for up to three months. Place them on a baking sheet, freeze until solid, then transfer to a freezer bag. Bake from frozen, adding just a few extra minutes to the baking time. Additionally, many bakers love making a double batch and freezing half for those mornings when you want fresh rolls but didn’t plan ahead.
This no-yeast method has genuinely transformed my weekend mornings. According to Bon Appétit, quick-rising baked goods have become increasingly popular for busy home cooks. What I love most is that you get that authentic cinnamon roll experience—the warmth, the aroma, the pure comfort—without any of the usual time commitment.
For more inspiration on quick baking projects, Serious Eats has excellent resources on no-rise and quick-rise baking methods. The science behind how baking soda and baking powder create lift is genuinely fascinating, and understanding it helps you adapt this recipe to your needs.
I’ve made these rolls for everything from casual family breakfasts to impressive brunch gatherings, and they always deliver. The first time someone bites into one, there’s always surprise that these are no-yeast—they taste like traditional cinnamon rolls, just faster. That’s the real magic here: combining convenience with genuine, from-scratch deliciousness.
Whether you’re a seasoned baker looking for a time-saving shortcut or a beginner wanting to build confidence in the kitchen, this cinnamon roll recipe no yeast is your answer. Thirty minutes from start to finish, and you’ll have warm, gooey cinnamon rolls that taste like you’ve been baking all morning. Now that’s something worth getting out of bed for.
Ingredients
- 2 cups all-purpose flour
- 1/4 cup granulated sugar
- 2 teaspoons baking powder
- 1/2 teaspoon baking soda
- 1/2 teaspoon salt
- 4 tablespoons unsalted butter, melted
- 3/4 cup buttermilk, room temperature
- 1 large egg
- 1 teaspoon vanilla extract
- 1/2 cup packed brown sugar
- 2 1/2 tablespoons ground cinnamon
- 2 tablespoons unsalted butter, softened (for filling)
- 4 ounces cream cheese, softened
- 2 tablespoons unsalted butter, softened
- 1 cup powdered sugar
- 1/2 teaspoon vanilla extract
Instructions
- Preheat your oven to 375°F and line a 9-inch round cake pan or 8×8 baking dish with parchment paper or lightly grease it with cooking spray.
- In a large mixing bowl, whisk together the flour, granulated sugar, baking powder, baking soda, and salt until well combined and no lumps remain.
- In a separate bowl, whisk together the melted butter, buttermilk, egg, and vanilla extract until smooth and well blended.
- Pour the wet ingredients into the dry ingredients and stir gently until just combined—the dough should be slightly sticky but cohesive. Don’t overmix, as this can make the rolls tough.
- Turn the dough out onto a lightly floured surface and roll it into a roughly 12×8 inch rectangle, about 1/4 inch thick.
- In a small bowl, mix together the brown sugar and cinnamon until well combined with no lumps.
- Spread the softened butter evenly over the entire surface of the dough using a butter knife or the back of a spoon.
- Sprinkle the cinnamon-sugar mixture generously and evenly over the buttered dough, using all of it for maximum flavor.
- Starting from the long side, roll the dough tightly into a log, sealing the seam as you go by pinching it closed.
- Using a sharp knife or dental floss, cut the roll into 8 equal pieces, wiping the knife between each cut to prevent dragging.
- Arrange the rolls cut-side up in your prepared baking pan, leaving just a tiny bit of space between each one—they should be close but not touching.
- Bake for 12-15 minutes, until the rolls are golden brown on top and a toothpick inserted into the center comes out clean.
- While the rolls bake, prepare the frosting by beating together the softened cream cheese and butter until light and fluffy, about 1-2 minutes.
- Add the powdered sugar and vanilla extract to the cream cheese mixture and beat until smooth and spreadable, about another minute.
- Remove the rolls from the oven and let cool for just 2-3 minutes, then generously spread or drizzle the frosting over the warm rolls.
- Serve immediately while still warm, or let cool slightly and serve at room temperature.
Pro Tips
The key to success with this recipe is not overmixing the dough. Mix until just combined—you want a tender crumb, not a tough, dense texture. If your dough seems too dry, add a teaspoon of buttermilk at a time until it comes together.
For the cinnamon-sugar filling, you can customize the cinnamon level to your preference. I use 2 1/2 tablespoons because I love bold cinnamon flavor, but if you prefer something more subtle, use 2 tablespoons instead. Similarly, you can add a pinch of nutmeg or cardamom to the filling for extra depth.
Buttermilk is really important here because its acidity reacts with the baking soda to create lift and a subtle tangy flavor. However, if you don’t have buttermilk, you can substitute by adding 1 tablespoon of lemon juice or white vinegar to 3/4 cup of regular milk and letting it sit for five minutes before using.
The rolls can be rolled up and refrigerated for up to 24 hours before baking. Simply cover them tightly with plastic wrap and refrigerate. When you’re ready to bake, add an extra 3-5 minutes to the baking time since they’ll be cold. Additionally, you can freeze unbaked rolls for up to three months—freeze them on a baking sheet first, then transfer to a freezer bag, and bake from frozen with 4-5 extra minutes of baking time.
Room temperature buttermilk and eggs mix into the dough much more easily than cold ingredients. Meanwhile, if your cream cheese or butter for the frosting is too cold, it will be lumpy and difficult to spread. Let these ingredients sit at room temperature for about 30 minutes before making the frosting.
For a lighter frosting, you can make a simple glaze instead by whisking together powdered sugar with 2-3 tablespoons of milk until you reach your desired consistency. This works beautifully if you want to reduce the richness or if you don’t have cream cheese on hand. For instance, vanilla glaze is just as delicious and sets up nicely as it cools.
These rolls are best enjoyed fresh and warm, ideally within a few hours of baking. Store any leftovers in an airtight container at room temperature for up to two days, though they’re genuinely best eaten the same day. To reheat, wrap loosely in foil and warm in a 350°F oven for about five minutes, or microwave for 20-30 seconds—the oven method preserves the texture better.