

There’s something absolutely magical about homemade peanut butter balls—they’re the kind of candy that instantly transports you back to childhood memories of holiday treats and special occasions. These little spheres of peanut butter bliss, enrobed in rich chocolate, are surprisingly simple to make at home, and they taste infinitely better than any store-bought version. What I love most about this recipe is that it requires just a handful of pantry staples: creamy peanut butter, powdered sugar, butter, and chocolate. No fancy equipment needed, no complicated techniques—just straightforward, foolproof steps that yield professional-looking results every single time.
The beauty of homemade peanut butter balls is that they’re the perfect make-ahead dessert. You can prepare them days in advance, store them in an airtight container, and they’ll actually taste even better as the flavors meld together. They’re ideal for gift-giving, holiday parties, potlucks, or simply satisfying that irresistible peanut butter and chocolate craving at 3 p.m. on a random Tuesday. I’ve served these at countless gatherings, and without fail, people ask for the recipe. The combination of smooth, creamy peanut butter filling with the snap of tempered chocolate is absolutely irresistible, and honestly, once you start eating them, it’s nearly impossible to stop at just one.
One of my favorite things about this recipe is how versatile it is. You can customize the filling with different nut butters, adjust the sweetness level, or even experiment with different types of chocolate—dark chocolate for a more sophisticated flavor, milk chocolate for classic sweetness, or white chocolate for something completely different. Some people like to add a pinch of sea salt to the chocolate coating for a sweet-salty contrast that’s simply divine. The possibilities are truly endless, and I encourage you to make this recipe your own.
Making peanut butter balls also teaches you valuable candy-making skills, particularly about working with chocolate and creating smooth, uniform shapes. It’s a wonderful project to tackle with kids in the kitchen, as they’ll love helping mix the filling, rolling the balls, and watching the magic happen when you dip them in chocolate. The whole process is actually quite meditative—there’s something soothing about the repetitive motions of rolling and dipping.
I’m thrilled to share this homemade candy recipe with you, along with all my tips and tricks for achieving perfectly balanced, beautifully dipped peanut butter balls. Whether you’re a seasoned candy maker or a complete beginner, this recipe is foolproof and absolutely delicious. For more inspiration on chocolate-based desserts, check out our chocolate desserts collection and our guide to candy making basics. You might also enjoy our no-bake treats section for other simple recipes, and don’t miss our gift-worthy desserts for more ideas to impress your loved ones. For additional expertise, check out Serious Eats’ guide to peanut butter candies, Bon Appétit’s peanut butter chocolate bites, and New York Times’ classic peanut butter balls recipe.
Ingredients
- 1 cup creamy peanut butter, room temperature
- 2 cups powdered sugar, sifted
- 4 tablespoons unsalted butter, softened
- 1 teaspoon vanilla extract
- ¼ teaspoon fine sea salt
- 12 ounces semi-sweet or dark chocolate chips
- 2 tablespoons coconut oil or vegetable shortening
Instructions
- In a large mixing bowl, combine the room temperature peanut butter, softened butter, and vanilla extract. Using an electric mixer on medium speed, beat until the mixture is light and fluffy, approximately 2-3 minutes. This step is crucial as it incorporates air into the mixture, creating a lighter texture.
- Gradually add the sifted powdered sugar to the peanut butter mixture, one cup at a time, mixing on low speed until fully incorporated. Continue mixing until you have a stiff but workable dough. If the mixture seems too soft, add a bit more powdered sugar; if too stiff, add a teaspoon of peanut butter.
- Stir in the fine sea salt until evenly distributed throughout the peanut butter mixture. The salt enhances the peanut butter flavor and creates a beautiful contrast with the chocolate.
- Line a large baking sheet with parchment paper. Using a cookie scoop or small spoon, measure out portions of the peanut butter mixture and roll into smooth, uniform balls approximately ¾-inch in diameter. Place each ball on the prepared baking sheet, spacing them about an inch apart.
- Once all balls are rolled, place the baking sheet in the freezer for at least 1 hour, or up to 4 hours. Frozen balls are much easier to dip and will hold their shape better. You can also refrigerate overnight if preferred.
- About 30 minutes before you’re ready to dip, remove the peanut butter balls from the freezer and let them sit at room temperature. They should still be cold but slightly softened for easier handling.
- Place the chocolate chips and coconut oil in a microwave-safe bowl. Microwave in 30-second intervals, stirring between each interval, until the chocolate is completely melted and smooth. This gentle method prevents the chocolate from scorching. Alternatively, use a double boiler over barely simmering water, stirring frequently.
- Pour the melted chocolate into a small, deep bowl that’s just large enough to fit your peanut butter balls. This shallow bowl makes dipping much easier than using a large mixing bowl.
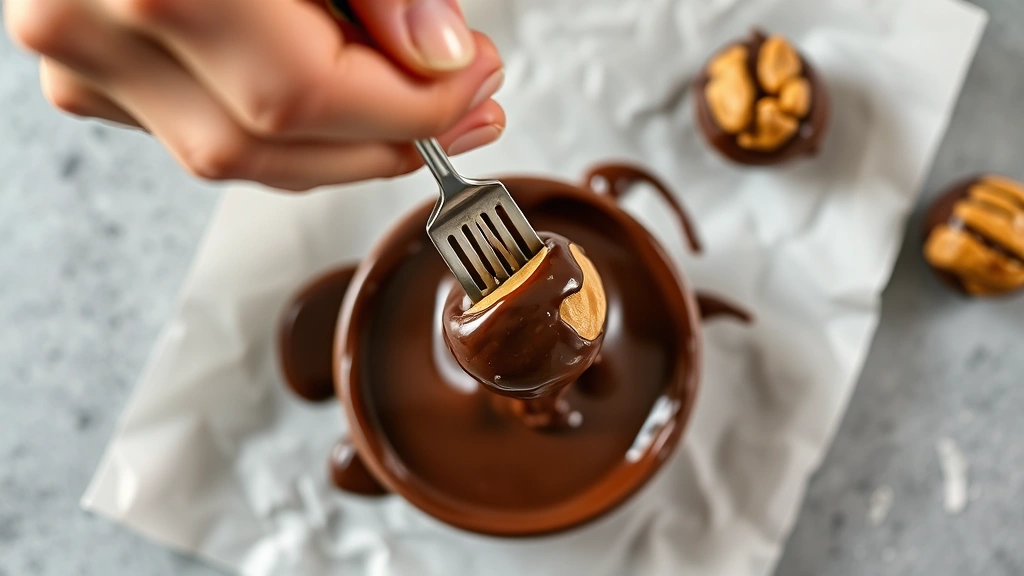
- Working with one peanut butter ball at a time, use a fork or dipping tool to submerge the ball in the melted chocolate, coating it completely on all sides. Let the excess chocolate drip back into the bowl for a few seconds.
- Carefully transfer each chocolate-coated ball to a parchment paper-lined baking sheet. If you’re creating a fork mark on top (optional), gently press the fork against the ball’s surface before the chocolate sets.
- Once all balls are dipped and arranged on the baking sheet, place them in the freezer for 15-20 minutes to allow the chocolate coating to set firmly.
- Transfer the finished peanut butter balls to an airtight container and store at room temperature for up to 2 weeks, or refrigerate for up to 4 weeks. They can also be frozen for up to 3 months.
Pro Tips
- The temperature of your peanut butter matters significantly—room temperature peanut butter mixes much more smoothly and creates a lighter filling than cold peanut butter straight from the refrigerator.
- Sifting the powdered sugar removes lumps and creates a smoother, more refined filling texture. This small step makes a noticeable difference in the final product.
- Don’t skip the freezing step for the peanut butter balls. Cold balls are much easier to dip and won’t fall off the fork into the chocolate. They also maintain their shape better during the dipping process.
- Coconut oil or vegetable shortening is added to the chocolate to thin it slightly without affecting the chocolate’s quality. This creates a thinner, more elegant coating that snaps beautifully when you bite into it.
- If your chocolate begins to thicken while dipping, simply reheat it in 10-second microwave bursts. You want it warm enough to flow smoothly but not so hot that it causes the peanut butter filling to melt.
- For a professional finish, dip each ball twice. After the first chocolate coating sets, dip again for a thicker, more luxurious chocolate shell.
- Experiment with different chocolate varieties: dark chocolate creates a more sophisticated, less sweet candy; white chocolate offers a creamy, sweet option; and milk chocolate provides classic sweetness. You can even use a combination of different chocolates.
- Add a small pinch of cayenne pepper or sea salt to the chocolate coating for an unexpected flavor twist that elevates these simple treats.
- If you prefer a smoother peanut butter filling, use natural peanut butter that’s been well-stirred. If you prefer a slightly textured filling, use peanut butter with visible peanut pieces.
- These candies make excellent gifts when packaged in pretty boxes or wrapped in cellophane with a ribbon. Include a handwritten card with storage instructions.
- You can customize the filling by adding 1 teaspoon of espresso powder for a chocolate-peanut flavor, or ½ teaspoon of almond extract for a subtle twist.
- Room temperature storage is ideal for serving these at parties or for snacking, as the chocolate coating is crisper and snaps more satisfyingly than when served cold from the refrigerator.