

There’s something truly magical about a homemade cocoa mix that transforms a simple cup of hot milk into a luxurious hot chocolate experience. Unlike store-bought versions laden with additives and artificial flavors, this best-ever tasty cocoa mix recipe combines premium cocoa powder, silky smooth powdered sugar, and a carefully curated blend of ingredients that elevate your everyday hot chocolate to café-quality perfection.
This recipe has been perfected through countless batches and taste tests, drawing inspiration from classic European hot chocolate traditions while keeping preparation beautifully simple. The secret lies in the quality of your cocoa powder and the precise ratios that ensure every spoonful dissolves seamlessly into warm milk, creating a velvety, rich chocolate experience that rivals any specialty coffee shop beverage.
Whether you’re seeking homemade hot chocolate recipes for cozy winter mornings, edible gifts for chocolate lovers, or simply the perfect comfort drink for any season, this versatile cocoa mix delivers exceptional results every single time. The beauty of making your own cocoa mix is the complete control over sweetness levels, cocoa intensity, and the ability to customize with creative flavor additions like cinnamon, vanilla, or espresso powder.
This recipe yields enough cocoa mix for multiple servings, making it perfect for meal prep or as a thoughtful homemade gift presented in a beautiful glass jar with a handwritten label. The mix stores beautifully in an airtight container for up to three months, though honestly, it rarely lasts that long in most households. I’ve included detailed instructions for both traditional preparation and quick-mix methods, along with suggestions for elevating your hot chocolate with luxurious toppings and garnishes.
The combination of unsweetened cocoa powder, which provides authentic chocolate flavor without excessive sugar, pairs beautifully with powdered sugar’s fine texture that dissolves instantly. A touch of cornstarch creates an incredibly smooth consistency, while a pinch of sea salt heightens the chocolate notes and balances sweetness perfectly. Many home cooks overlook this crucial ingredient, but salt is the secret weapon that transforms ordinary cocoa mix into something genuinely extraordinary.
For those seeking deeper chocolate intensity, Bon Appétit’s hot chocolate guide offers additional inspiration. Those interested in scientific precision may appreciate Serious Eats’ detailed hot chocolate methodology. For comprehensive beverage techniques, New York Times Cooking’s hot chocolate recipe provides classic techniques, while Bon Appétit’s collection of hot chocolate variations and Serious Eats’ beverage collection offer endless inspiration for customization.
Ingredients
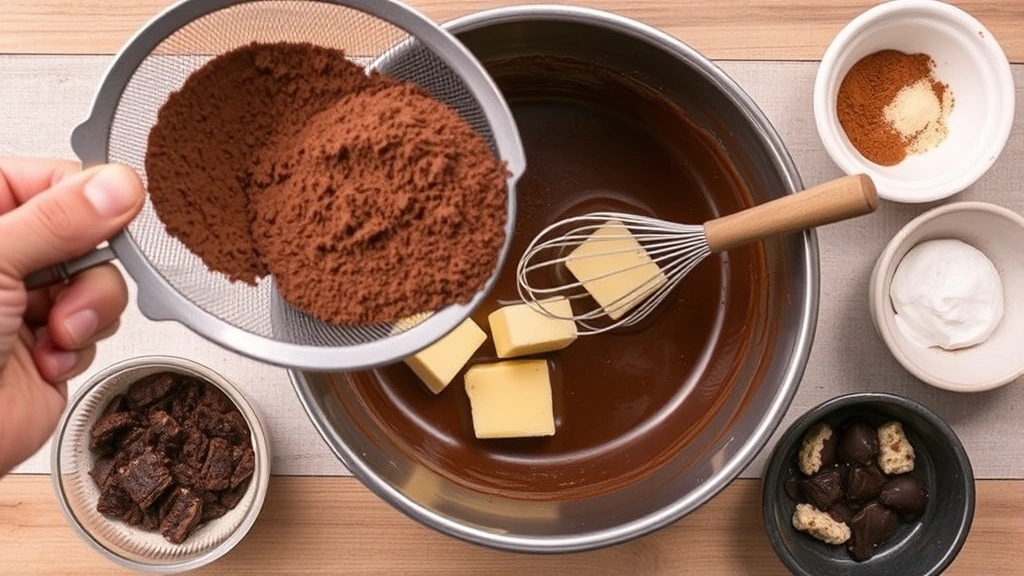
- 1 cup unsweetened cocoa powder, sifted (Dutch-process or natural)
- 1 1/2 cups powdered sugar, sifted
- 1/4 cup cornstarch
- 1/4 teaspoon fine sea salt
- 1 teaspoon vanilla extract (pure vanilla, not imitation)
- 2 tablespoons instant espresso powder (optional but highly recommended)
- 1/2 teaspoon ground cinnamon (optional)
- 1/4 teaspoon cayenne pepper (optional, for subtle heat)
- 3 tablespoons unsalted butter, melted
- 2 tablespoons whole milk powder (optional, for creamier texture)
Instructions
- Sift the unsweetened cocoa powder through a fine-mesh sieve into a large mixing bowl, breaking up any clumps. Sifting is crucial for eliminating lumps and ensuring a smooth final texture when mixed with milk.
- Add the sifted powdered sugar to the cocoa powder bowl, then sift both ingredients together again into a clean bowl. This double-sifting technique ensures uniform distribution and prevents clumping.
- Sift the cornstarch into the cocoa mixture, stirring gently with a whisk to combine. The cornstarch prevents settling and creates a silkier mouthfeel.
- Add the fine sea salt and stir thoroughly with a whisk, making sure to break up any remaining cocoa clumps against the side of the bowl.
- If using espresso powder for deeper chocolate intensity, sift it into the mixture and whisk until evenly distributed throughout.
- Add ground cinnamon and cayenne pepper if desired, whisking until the spices are completely incorporated and the mixture appears uniform in color.
- Drizzle the melted unsalted butter slowly over the cocoa mixture while whisking constantly. The butter coats the cocoa particles and enhances richness and flavor development.
- Add the pure vanilla extract, whisking vigorously until completely incorporated. You should not see any streaks of vanilla in the mixture.
- If using milk powder for added creaminess, sift it into the mixture and whisk until no white streaks remain.
- Transfer the cocoa mix to a fine-mesh sieve and sift everything together one final time into your storage container. This final sifting ensures the most luxurious, lump-free texture.
- Break up any remaining small clumps with the back of a spoon, pressing gently against the container sides.
- Store in an airtight container away from heat and sunlight. Label with the date and contents.
- To prepare a single serving: measure 3-4 tablespoons of cocoa mix into a mug.
Add 2 tablespoons hot water and whisk vigorously until a smooth paste forms, ensuring no lumps remain.
Gradually add 6-8 ounces of hot milk (whole milk creates the richest result) while whisking constantly.
Continue whisking until frothy and completely combined.
- For a creamier version, use half milk and half heavy cream instead of all milk.
- For an iced cocoa drink, prepare the paste as directed, then pour into a glass filled with ice and cold milk, stirring well to combine.
- For a Mexican-style hot chocolate, add a pinch of cinnamon to your prepared mug and whisk until frothy.
- For mocha-style hot chocolate, add 1 teaspoon instant espresso powder to your cocoa paste before adding milk.
- For adults, add a splash of rum, whiskey, or liqueur to prepared hot chocolate for an indulgent evening drink.
- Top with whipped cream, marshmallows, chocolate shavings, cinnamon sticks, or biscotti for serving.

Pro Tips
- Dutch-process cocoa powder creates a darker, slightly smoother chocolate flavor, while natural cocoa powder offers more intense, acidic chocolate notes. Either works beautifully; choose based on your preference.
- Sifting is non-negotiable for achieving the silky texture that distinguishes homemade cocoa mix from grainy store-bought versions. While it requires extra effort, the results justify the time investment completely.
- The espresso powder is optional but genuinely transformative—it deepens chocolate flavor perception without making the cocoa taste like coffee. Even coffee-averse individuals appreciate the enhanced richness.
- Cornstarch prevents the cocoa mix from separating during storage, keeping ingredients uniformly distributed. Without it, cocoa powder gradually settles to the bottom.
- Sea salt is absolutely crucial; it heightens chocolate notes and balances sweetness. Table salt works in a pinch, but sea salt’s cleaner profile is preferable.
- Pure vanilla extract makes a noticeable difference compared to imitation vanilla. The investment is worthwhile for this recipe.
- This cocoa mix can be customized endlessly: add instant coffee powder for mocha flavor, peppermint extract for peppermint hot chocolate, or coconut extract for tropical variations.
- Whole milk powder adds richness and creaminess without requiring cream. It’s particularly valuable if you typically prepare hot chocolate with lower-fat milk.
- Store in airtight glass jars away from heat, light, and humidity. Proper storage maintains freshness for up to three months, though flavor peaks within the first month.
- This recipe makes an exceptional homemade gift: layer the ingredients in a clear glass jar, attach a hand-written tag with preparation instructions, and include a wooden spoon or whisk.
- For thicker, more indulgent hot chocolate, use 3-4 tablespoons of cocoa mix per 6 ounces of milk. For lighter versions, use 2-3 tablespoons per 8 ounces.
- Whisking is essential during preparation—it creates tiny air bubbles that contribute to authentic café-quality hot chocolate texture. Use a balloon whisk rather than a spoon.
- The melted butter step isn’t strictly necessary but significantly improves texture and flavor delivery. It creates a silkier mouthfeel and helps flavors bloom more completely.