

Protein balls are the ultimate grab-and-go snack that combines delicious flavors with serious nutritional benefits. These no-bake bites are perfect for meal prep, lunchboxes, or whenever you need an energy boost without the guilt. What I love most about protein balls is their versatility—you can customize them with your favorite nuts, seeds, and add-ins to create endless flavor combinations.
I first started making protein balls years ago when I was looking for a healthier alternative to store-bought energy bars. Those commercial options always seemed to have mystery ingredients and added sugars I couldn’t pronounce. Making them at home is not only easier than you’d think, but it also lets you control exactly what goes into your body. Plus, there’s something so satisfying about creating a batch of these little powerhouses in just 20 minutes.
The beauty of this no-bake protein ball recipe is that it requires minimal equipment and even less skill. You don’t need any special tools or baking expertise—just a mixing bowl and your hands. The base recipe is incredibly forgiving, which means you can experiment freely. Whether you’re a peanut butter devotee or a chocolate fanatic, there’s a version of these balls that will become your new favorite snack.
These protein balls are perfect for so many occasions. Pack them for hikes, keep them in your desk drawer at work, or serve them at parties as a sophisticated-looking treat that happens to be good for you. They’re also excellent for athletes and fitness enthusiasts who need quick protein sources throughout the day. Energy snacks like these have become essential in my kitchen rotation.
What makes this recipe truly special is how customizable it is. The basic formula is simple: protein powder, a binding ingredient like nut butter, and a sweetener. From there, you can add chocolate chips, coconut, dried fruits, or nuts. I’ve included several flavor variations below so you can find your perfect match. No-bake treats are ideal for summer months when you don’t want to heat up your kitchen.
The texture should be slightly sticky but moldable—not too wet and not too dry. This usually takes a bit of trial and error depending on your specific protein powder brand, but I’ll guide you through the process. Once you master the basic technique, you’ll find yourself making these constantly. Your family will request them, your coworkers will ask for the recipe, and you’ll wonder how you ever survived without them.
One of the best parts about making protein balls is the storage. They keep beautifully in the refrigerator for up to two weeks, or you can freeze them for up to three months. This makes them perfect for meal prep—spend 30 minutes on a Sunday making a double batch, and you’ll have snacks ready to grab all week long. Meal prep snacks are a game-changer for staying on track with your health goals.
For those watching their sugar intake, these are naturally sweetened with just a touch of honey or maple syrup, though you can reduce that even further if you prefer. The protein powder does most of the heavy lifting in terms of taste, so choosing a flavor you love is important. Vanilla, chocolate, and peanut butter are my go-to options, but don’t be afraid to try vanilla chai, cookies and cream, or salted caramel if your local store carries them.
I also want to mention that these protein balls make fantastic gifts. Pack them in a cute container with a ribbon, include a label with the ingredients (for anyone with allergies), and you’ve got a thoughtful, homemade present that shows real care. They’re especially perfect for gifting to friends who are into fitness or healthy eating.
Let me share some pro tips I’ve learned from making literally hundreds of these: First, don’t skip the refrigeration time—it makes them much easier to roll and prevents them from falling apart. Second, invest in a small cookie scoop if you don’t already have one; it makes portioning incredibly easy and ensures uniform sizing. Third, lightly wet your hands before rolling to prevent the mixture from sticking to your palms. Finally, experiment with different mix-ins until you find combinations you absolutely love.
According to Bon Appétit’s protein snack guide, homemade protein balls are an excellent way to control nutritional content compared to store-bought alternatives. The Serious Eats team also endorses making your own energy bites for better ingredient quality. The New York Times Cooking section frequently features similar no-bake recipes as healthy snacking solutions.
I truly believe that once you try these homemade protein balls, you’ll never go back to store-bought versions. They’re healthier, more delicious, and honestly cheaper too. The investment of 20 minutes of your time will pay dividends throughout the week as you enjoy these satisfying, nutritious snacks. Whether you’re new to healthy eating or already a wellness warrior, protein balls deserve a permanent spot in your snack rotation.
Ingredients
- 1 cup natural peanut butter (or almond butter)
- 1 cup quick oats
- ½ cup protein powder (vanilla or chocolate)
- ⅓ cup honey or maple syrup
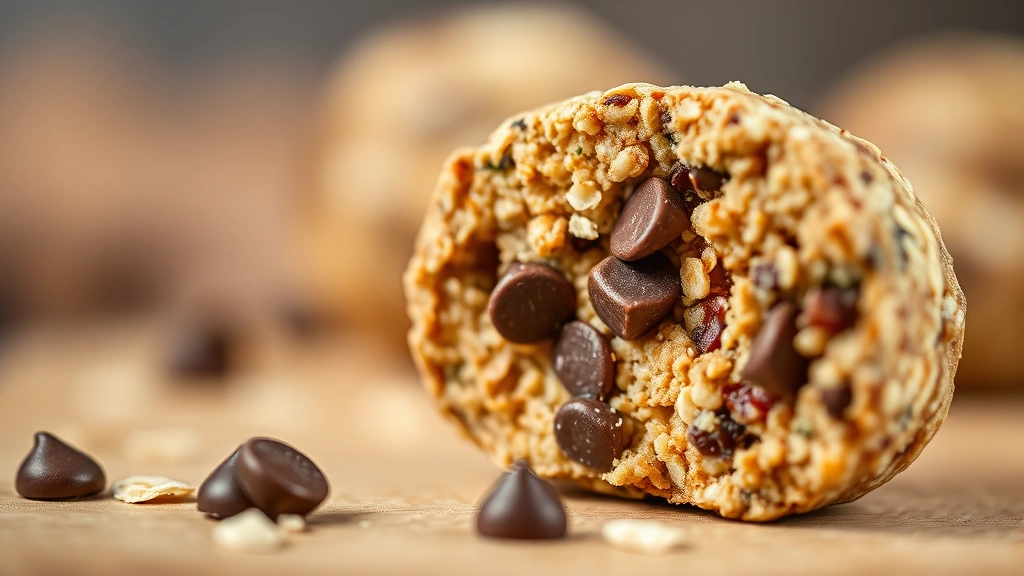
- ⅓ cup mini chocolate chips
- ¼ cup unsweetened cocoa powder
- 1 teaspoon vanilla extract
- ¼ teaspoon sea salt
- Optional mix-ins: coconut flakes, chopped nuts, dried fruit, or extra chocolate chips
Instructions
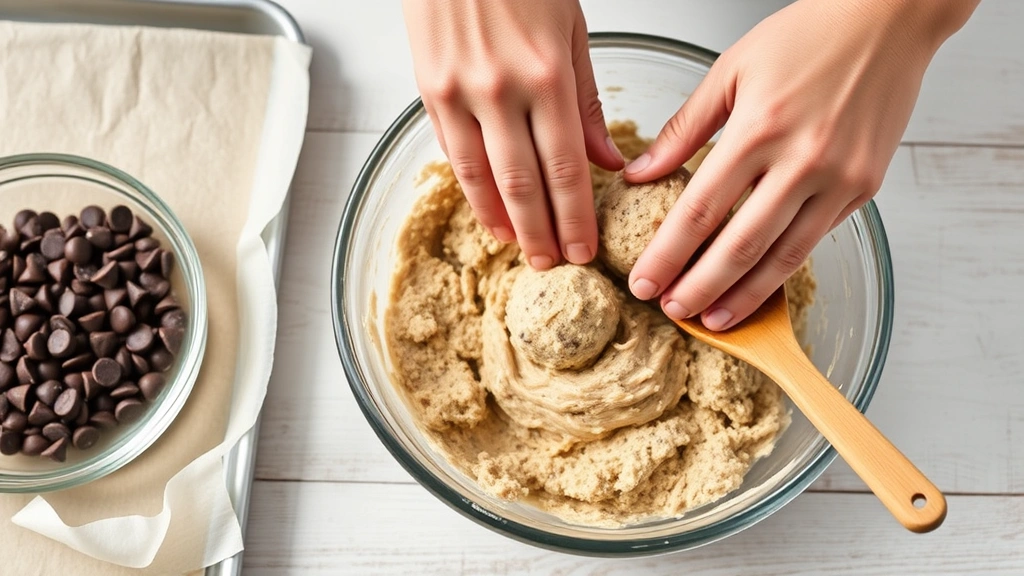
- In a large mixing bowl, combine the peanut butter, honey, and vanilla extract, stirring until well combined.
- Add the protein powder, oats, cocoa powder, and sea salt to the wet ingredients and mix thoroughly until you have a sticky but moldable dough.
- Fold in the mini chocolate chips and any optional mix-ins you’re using, stirring until evenly distributed throughout the mixture.
- Cover the bowl with plastic wrap and refrigerate for 30 minutes to make the mixture easier to handle and shape.
- Line a baking sheet or plate with parchment paper for easy storage and transfer.
- Using a small cookie scoop or tablespoon, portion out the mixture into equal pieces.
Roll each portion between your palms into a smooth ball, wetting your hands slightly if the mixture sticks.
Place each finished ball on the prepared parchment paper.
- Once all balls are rolled, transfer them to an airtight container with a piece of parchment paper between layers to prevent sticking.
- Store in the refrigerator for up to 14 days or freeze for up to 3 months for longer storage.
- When ready to enjoy, remove from the refrigerator 5 minutes before eating to allow them to soften slightly for best texture.
Pro Tips
- **Protein Powder Variations**: The type of protein powder you choose dramatically affects both flavor and texture. Vanilla works beautifully with chocolate chips and coconut, while chocolate protein powder is perfect for a double-chocolate situation. Experiment with flavors like cookies and cream, peanut butter, or birthday cake for fun variations.
- **Texture Tips**: Your mixture should be slightly sticky but still hold together when squeezed. If it’s too dry and crumbly, add another tablespoon of peanut butter or honey. If it’s too wet and doesn’t hold its shape, add more oats or protein powder by the tablespoon until you reach the right consistency.
- **Nut Butter Options**: While I used peanut butter, any nut or seed butter works beautifully. Try almond butter for a more delicate flavor, cashew butter for richness, or tahini for a completely different profile. You can also mix and match—half peanut butter and half almond butter creates a unique taste.
- **Make-Ahead Magic**: These are perfect for meal prep because they keep so well. Make a double batch on Sunday and you’ll have snacks ready for the entire week. The texture actually improves after a day or two in the refrigerator as the flavors meld together.
- **Flavor Combinations**: Create your signature blend by trying these combinations: Peanut Butter Cup (add chocolate chips and cocoa), Coconut Almond (use almond butter and add shredded coconut), S’mores Style (add crushed graham crackers and chocolate chips), or Tropical (add dried pineapple and coconut).
- **Freezer Friendly**: These freeze beautifully for up to three months. Freeze them on a baking sheet first, then transfer to freezer bags to save space. They thaw to the perfect texture in about 10 minutes, making them ideal for grab-and-go snacks.
- **Customization for Dietary Needs**: For keto-friendly versions, use a keto-friendly sweetener instead of honey and ensure your protein powder has minimal carbs. For vegan diets, use maple syrup instead of honey. For nut allergies, substitute seed butters and ensure your protein powder doesn’t contain nuts.
- **Storage Solutions**: Keep them in the coldest part of your refrigerator (usually the back of the middle shelf) for longest freshness. If you notice them getting too soft, move them to the freezer. Let frozen balls thaw for about 10 minutes before eating for the best texture.
- **Serving Suggestions**: Enjoy these with a cup of coffee for a morning pick-me-up, pack them in lunchboxes, serve them at parties, or enjoy them post-workout for protein recovery. They pair beautifully with fruit, herbal tea, or simply eaten straight from the container.
- **Nutrition Benefits**: Each ball contains approximately 8-10g of protein, making them excellent for muscle recovery and satiety. They’re also packed with healthy fats from the nut butter and oats, which provide sustained energy without blood sugar spikes.