
There’s something truly magical about the aroma of fresh homemade bread baking in your kitchen, and a bread machine makes achieving that bakery-quality loaf easier than ever. This foolproof white bread machine recipe has been perfected over countless batches to deliver a beautiful, fluffy loaf with a golden crust every single time. Whether you’re a seasoned bread baker or picking up a bread machine for the first time, this recipe is your ticket to homemade bread success.
The key to the perfect white bread machine loaf lies in understanding the ratio of ingredients and respecting the machine’s cycles. Unlike traditional bread baking, which requires extensive kneading and rising time, your bread machine does all the heavy lifting for you. I’ve tested this recipe with various bread machine brands and sizes, and it consistently produces a tender crumb with excellent flavor. The beauty of this approach is that you can have fresh, warm bread ready in just a few hours, with minimal hands-on time.
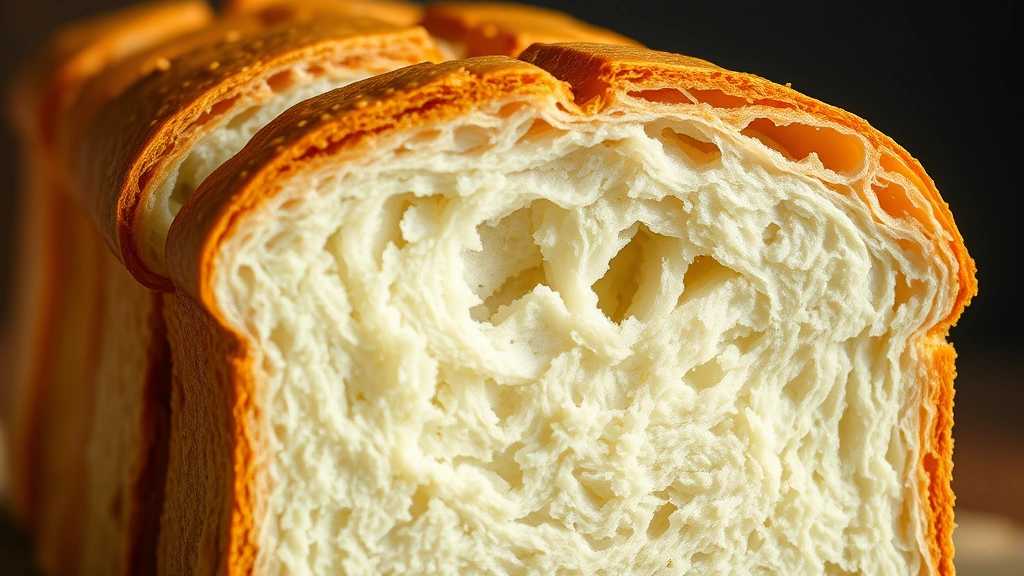
What makes this recipe special is the combination of bread flour and all-purpose flour, which creates the perfect texture—not too dense, not too airy, but just right. The addition of a small amount of sugar feeds the yeast and promotes browning, while butter adds richness and helps keep the crumb moist for days. This isn’t just any white bread; this is the kind of bread that makes your home smell like a professional bakery and tastes even better than store-bought alternatives.
I recommend using these essential bread baking tips to troubleshoot any issues you might encounter. If you’re interested in expanding your bread machine repertoire, check out our whole wheat bread machine recipe and honey oat bread machine recipe. For more detailed information on bread machine settings, visit Serious Eats’ bread machine guide and Bon Appétit’s bread machine article. You can also explore our guide to different yeast types to understand which works best for your machine, and don’t miss our comprehensive bread machine troubleshooting guide for solutions to common problems.
Once you master this basic recipe, you’ll discover endless possibilities for customization. Add herbs, cheese, or seeds for variation, or simply enjoy it plain with butter and jam. The versatility of this bread makes it perfect for everything from morning toast to sandwich bread to dinner rolls.
Ingredients
- 1 cup warm water (110°F, not hot)
- 2 tablespoons granulated sugar
- 1½ teaspoons salt
- 2 tablespoons unsalted butter, room temperature
- 2½ cups bread flour
- ½ cup all-purpose flour
- 2¼ teaspoons active dry yeast (one packet)
Instructions
- Measure 1 cup of warm water and pour it into your bread machine pan. The water should feel warm to the touch but not hot—this is crucial for activating the yeast properly without killing it.
- Add 2 tablespoons of granulated sugar to the warm water. The sugar will dissolve slightly and help activate the yeast while also promoting a beautiful golden crust.
- Sprinkle 1½ teaspoons of salt into the water and sugar mixture. Salt enhances the flavor and helps control yeast fermentation.
- Add 2 tablespoons of room temperature butter. Cut the butter into small pieces if it’s still firm, as this helps it distribute more evenly throughout the dough.
- In a separate bowl, whisk together 2½ cups of bread flour and ½ cup of all-purpose flour. The combination of bread flour and all-purpose flour creates the ideal texture—the bread flour provides strength and structure while the all-purpose flour keeps the crumb tender.
- Pour the flour mixture into the bread machine pan with the wet ingredients. Make sure the flour covers all the liquid—this prevents the yeast from activating prematurely.
- Create a small indent in the center of the flour mound using your finger or the back of a spoon.
- Sprinkle 2¼ teaspoons of active dry yeast into the indent you created. Keeping the yeast separate from the salt and liquid is essential, as salt can inhibit yeast activation.
- Insert the pan securely into your bread machine unit, making sure it clicks into place properly.
- Close the lid and select the Basic White Bread or Standard cycle. Most bread machines offer cycles ranging from 2½ to 4 hours depending on the model.
- Press start and allow the machine to begin its automatic cycle. The machine will mix the ingredients for several minutes, then begin the first rise.
- Resist the urge to open the lid during the mixing and kneading phase. The machine needs to work without interruption to develop the gluten properly.
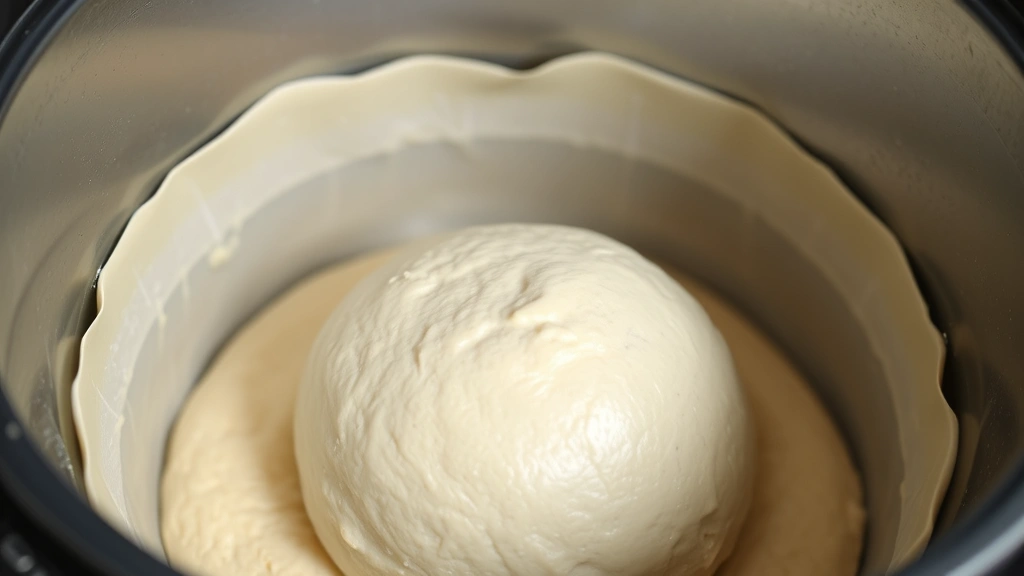
- After approximately 15-20 minutes, you can briefly peek to check the dough consistency. It should look like a soft, smooth ball. If it seems too wet and sticky, add 1 tablespoon of flour at a time; if too dry, add water by the teaspoon.
- Allow the machine to complete its rising cycles. Most machines have two or three rise periods built into the cycle.
- When the machine begins the baking phase, you may notice the aroma starting to develop. This is when your kitchen will start smelling absolutely incredible.
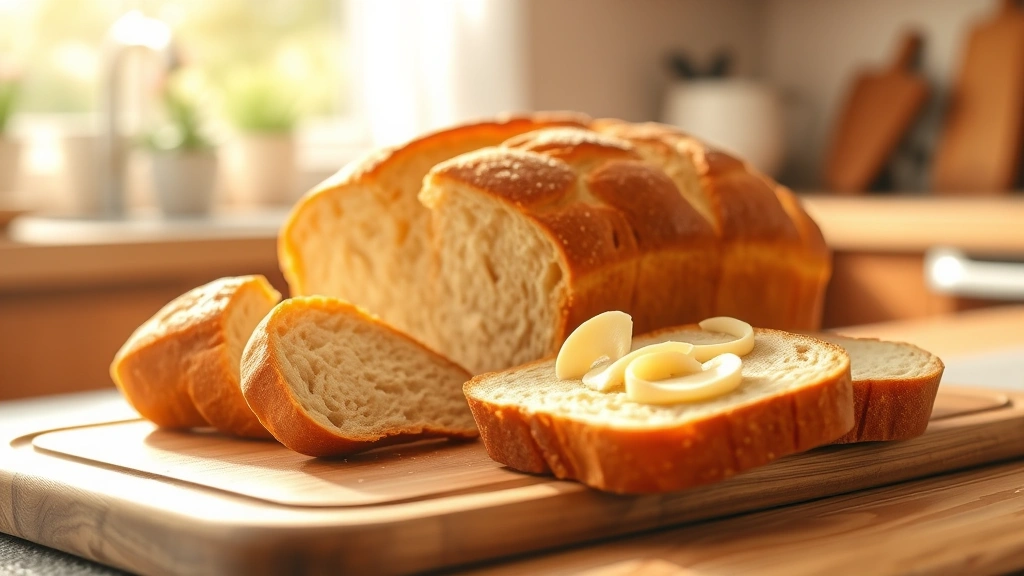
- The machine will beep when the cycle is complete. The bread should have a beautiful golden-brown crust and should sound hollow when gently tapped on the bottom.
- Carefully remove the bread pan from the machine using oven mitts, as it will be very hot.
- Turn the pan sideways and gently shake the bread loaf out onto a wire cooling rack. Be careful, as the pan and bread are extremely hot.
- If the bread seems stuck, run a thin knife around the edges before turning it out onto the rack.
- Allow the bread to cool on the rack for at least 1 hour before slicing. This cooling time allows the interior crumb to set properly.
- Once completely cooled, slice with a sharp bread knife using a gentle sawing motion rather than pressing down, which can crush the tender crumb.
- Store any leftover bread in an airtight container or bread box at room temperature for up to 3 days, or wrap tightly and freeze for up to 1 month.
Pro Tips
- Water temperature is absolutely critical for success. Water that’s too hot (above 120°F) will kill the yeast, resulting in dense, flat bread. Water that’s too cold won’t activate the yeast properly. An instant-read thermometer is invaluable here.
- Different bread machines have slightly different cycle lengths and heat settings. Check your machine’s manual to understand its specific cycle, and note any adjustments you make for future batches.
- The dough consistency check around the 15-20 minute mark is optional but highly recommended for first-time users. The dough should look like a soft ball, not a soup or a stiff dough.
- For a crispier crust, you can remove the bread from the machine pan 5-10 minutes before the cycle ends and transfer it to a preheated 350°F oven to finish baking. This gives you more control over crust texture.
- If your bread machine has a whole wheat or delay-start cycle, do not use the delay-start feature with this recipe, as the yeast may activate prematurely in the warm pan, causing uneven rising.
- The bread will continue to cool and set for several hours after removal from the machine. Slicing too early will result in gummy interior crumb, so patience is worth it.
- For a softer crust, brush the warm loaf with melted butter immediately after removing it from the machine.
- If you notice your bread is consistently too dense, your water may be too cold, your yeast may be expired, or you may need to add 1-2 tablespoons more bread flour to the recipe.
- Conversely, if your bread is too airy with large holes, try reducing the sugar slightly or using less yeast in your next batch.
- This recipe works in 1.5-pound capacity bread machines. For 2-pound machines, increase all ingredients by 50% (so 1½ cups water, 3 tablespoons sugar, etc.).
- Store yeast in the refrigerator or freezer after opening to extend its shelf life and ensure consistent results batch after batch.