
Amish bread is a beloved sourdough starter recipe that has been passed down through generations, creating a tangy, naturally leavened loaf that’s perfect for beginners and experienced bakers alike. This easy Amish bread recipe requires minimal hands-on time and produces results that taste like they came straight from a traditional bakery.
The beauty of Amish bread lies in its simplicity and the magical fermentation process that develops deep flavor with just a few basic ingredients. What makes this recipe special is the use of a sourdough starter, which you’ll either create from scratch or receive as a gift (a common Amish tradition). Unlike commercial yeast breads that rise quickly, Amish bread develops its character slowly, allowing the natural yeasts and bacteria to create complexity and digestibility.
This recipe has become increasingly popular outside Amish communities because it’s genuinely manageable for home bakers. The long fermentation time actually works in your favor—you’re not rushed, and the bread develops superior flavor and texture compared to quick-rise methods. Many bakers find that Amish bread is easier to digest and has a more satisfying crumb structure than conventional sandwich bread.
The sourdough starter is the heart of this recipe, and maintaining it becomes a rewarding kitchen ritual. You’ll feed it regularly, and it rewards you with countless loaves of bread. Some families have kept the same starter alive for decades, making each loaf a connection to their baking heritage.
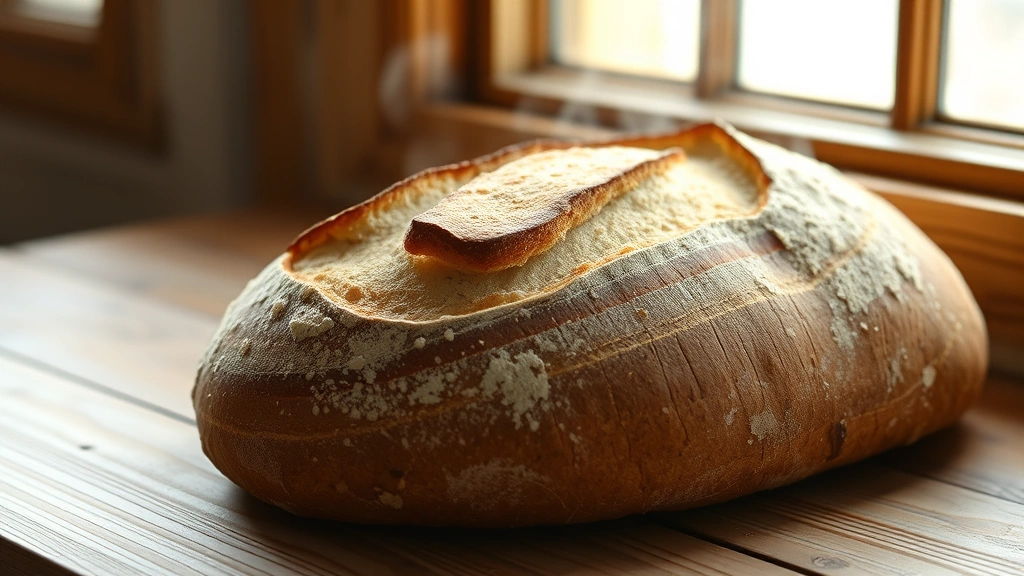
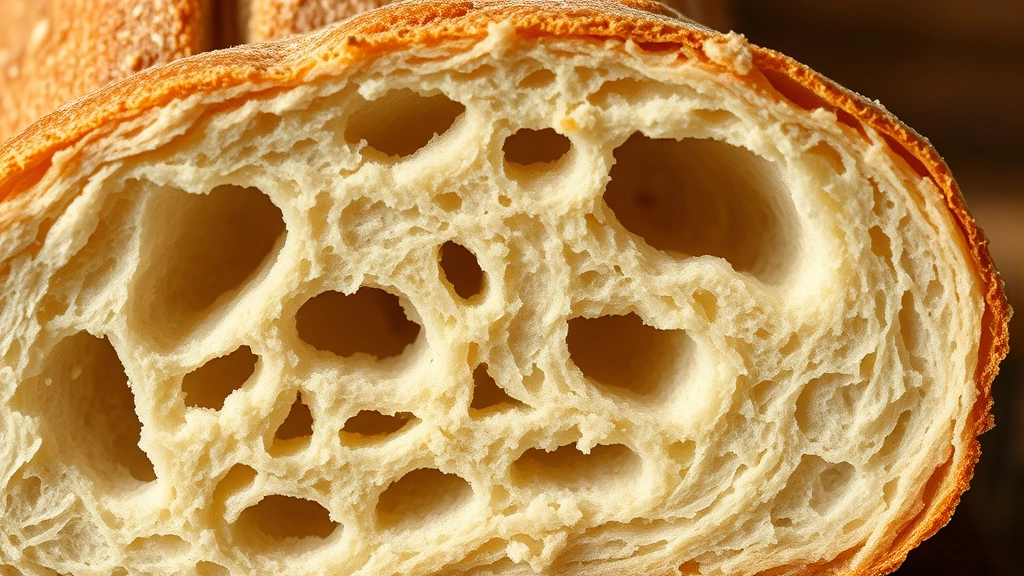
What you’ll love about this Amish bread recipe is how forgiving it is. The long rise times mean you have flexibility in your schedule. You can let it rise overnight, adjust timing based on your kitchen temperature, and still end up with beautiful results. The crust develops a wonderful caramelization, while the interior stays soft and tender with those characteristic irregular holes that indicate proper fermentation.
For detailed guidance on bread baking basics, this recipe incorporates traditional techniques that have stood the test of time. The scoring technique helps the bread expand properly in the oven, creating those beautiful patterns on top.
Many people are surprised to learn that making Amish bread is actually less complicated than making sandwich bread with commercial yeast. You’re working with nature’s own leavening system, which is more stable and forgiving. The fermentation process handles most of the heavy lifting for you.
If you’re new to sourdough baking, this recipe is an excellent starting point. It uses straightforward methods and clear timelines. The result is a loaf with superior shelf life, better flavor development, and that authentic rustic quality that makes homemade bread so special. Whether you’re baking for your family, sharing with neighbors, or just wanting to experience the satisfaction of creating bread from scratch, this Amish bread recipe delivers every time.
For more inspiration on traditional bread baking, check out Serious Eats’ sourdough collection, explore Bon Appétit’s artisan bread guide, and discover additional techniques at New York Times Cooking’s bread recipes. You might also enjoy Serious Eats’ sourdough starter guide and Bon Appétit’s sourdough tutorial.
Ingredients
- 1 cup active sourdough starter, fed 4-8 hours prior
- 1½ cups warm water (110°F)
- 3½ cups bread flour
- 1½ teaspoons salt
- ½ teaspoon sugar
- Extra water for adjusting dough consistency
- Cornmeal or flour for dusting (optional)
Instructions
- In a large mixing bowl, combine the active sourdough starter with warm water, stirring until well incorporated. The mixture should be slightly cloudy and bubbly.
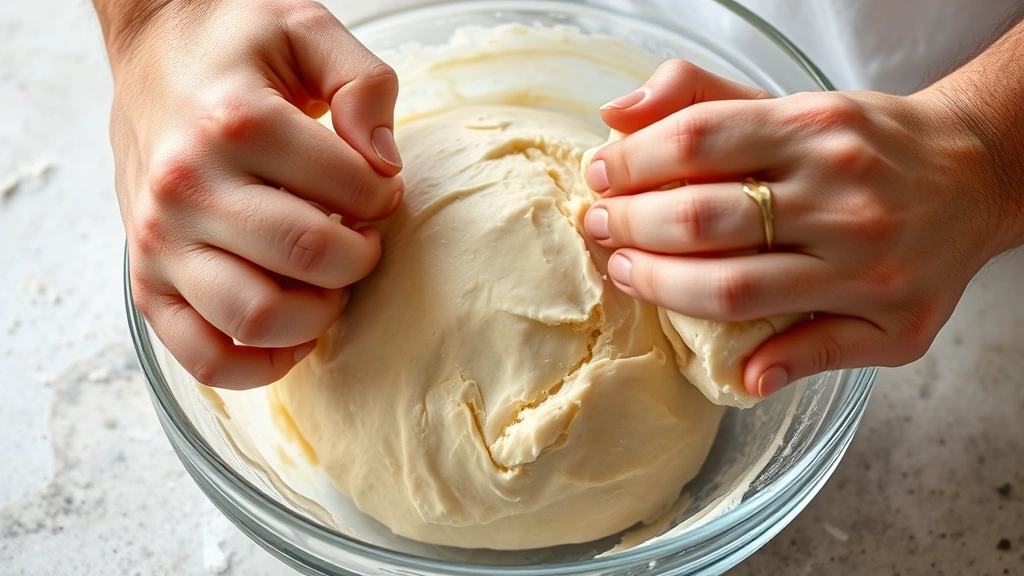
- Add bread flour, salt, and sugar to the starter mixture. Mix with a sturdy spoon or your hands until all flour is incorporated and a shaggy dough forms. The dough should be slightly sticky but hold together.
- Cover the bowl with a damp kitchen towel or plastic wrap and let it rest at room temperature for 30 minutes. This autolyse period allows the flour to fully hydrate.
- After the rest period, perform a series of stretch and folds: wet your hand, reach into the dough, stretch it up and fold it over itself. Rotate the bowl and repeat 4-6 times. The dough will become smoother and more cohesive.
- Cover the bowl again and let it bulk ferment for 4-5 hours at room temperature, performing stretch and folds every 60 minutes for the first 2-3 hours (typically 3-4 sets of folds total).
- After bulk fermentation, the dough should be visibly risen, puffy, and show signs of fermentation bubbles. Turn the dough out onto a lightly floured surface.
- Gently pre-shape the dough into a round by folding the edges toward the center, creating surface tension. Let it rest for 20-30 minutes on the counter.
- Perform the final shaping: flip the dough seam-side down, fold the edges toward the center again, and roll it toward you, creating a tight cylinder or boule shape.
- Place the shaped dough seam-side up in a banneton basket or bowl lined with a flour-dusted kitchen towel. Cover loosely with plastic wrap.
- Refrigerate the shaped dough for 12-18 hours. This cold fermentation develops flavor and makes scoring easier. The dough can be baked directly from the refrigerator.
- Remove the dough from the refrigerator 30 minutes before baking. Place a Dutch oven in your oven and preheat to 475°F for at least 45 minutes.
- Carefully invert the cold dough onto parchment paper. Score the top with a sharp knife or bread lame, making one or two deep cuts at a 30-degree angle.
- Transfer the dough on parchment into the hot Dutch oven. Cover with the lid and bake for 25 minutes, trapping steam inside.
- Remove the Dutch oven lid and continue baking for 20-25 minutes until the crust is deep golden brown and the loaf sounds hollow when tapped on the bottom.
- Remove the bread from the Dutch oven and transfer to a wire cooling rack. Let cool completely before slicing, at least 1-2 hours. This allows the crumb structure to set properly.
- Repeat the shaping and baking process with the second portion of dough if making two loaves, or store shaped dough in the refrigerator for up to 2 days.
Pro Tips
- **Sourdough Starter Maintenance**: Keep your starter in a clean jar at room temperature, feeding it with equal parts flour and water (typically 1:1:1 ratio of starter to flour to water) every 24 hours, or every 12 hours if kept at warmer temperatures. Discard about half before feeding to maintain manageable quantities.
- **Temperature Matters**: Bulk fermentation time varies significantly based on kitchen temperature. Warmer kitchens (75-80°F) may ferment in 3-4 hours, while cooler kitchens (65-70°F) may need 5-6 hours. Look for visual cues—the dough should increase 50-75% in volume and show bubbles on the surface.
- **The Cold Fermentation Advantage**: Refrigerating the shaped dough overnight is not just convenient; it’s actually beneficial. Cold temperatures slow fermentation, allowing deeper flavor development and making the dough easier to score without deflating.
- **Dutch Oven Essentials**: Using a Dutch oven creates a steamy environment that allows the bread to expand fully (oven spring) before the crust sets. This creates that bakery-quality crust. If you don’t have a Dutch oven, you can place a baking stone on the middle rack, place your bread on parchment, and pour 1 cup of boiling water into a preheated cast iron skillet below the stone.
- **Scoring Technique**: Score with confidence and speed—hesitant cuts create ragged tears. Use a sharp blade at a 30-degree angle, cutting about ¼-inch deep. Proper scoring controls where the bread expands and creates an attractive ear.
- **Hydration Level**: This recipe uses moderate hydration (approximately 65%), making it beginner-friendly. If you want a more open crumb structure, gradually increase water by ¼ cup increments in future bakes.
- **Troubleshooting Dense Crumb**: This usually indicates insufficient fermentation or insufficient starter activity. Ensure your starter is truly active and bubbly before mixing. Look for the dough to increase 50-75% during bulk fermentation.
- **Troubleshooting Flat Bread**: Over-fermentation causes the dough to lose structure. Reduce bulk fermentation time by 30-60 minutes in your next bake. Also ensure your starter isn’t too young or weak.
- **Flour Adjustments**: Bread flour contains more protein than all-purpose flour, creating better structure. If substituting all-purpose flour, reduce water by 2-3 tablespoons as it absorbs less liquid.
- **Storage**: Completely cooled Amish bread keeps well wrapped at room temperature for 3-4 days, in the refrigerator for up to 1 week, or frozen for up to 3 months. The naturally acidic nature of sourdough extends shelf life compared to commercial yeast breads.