
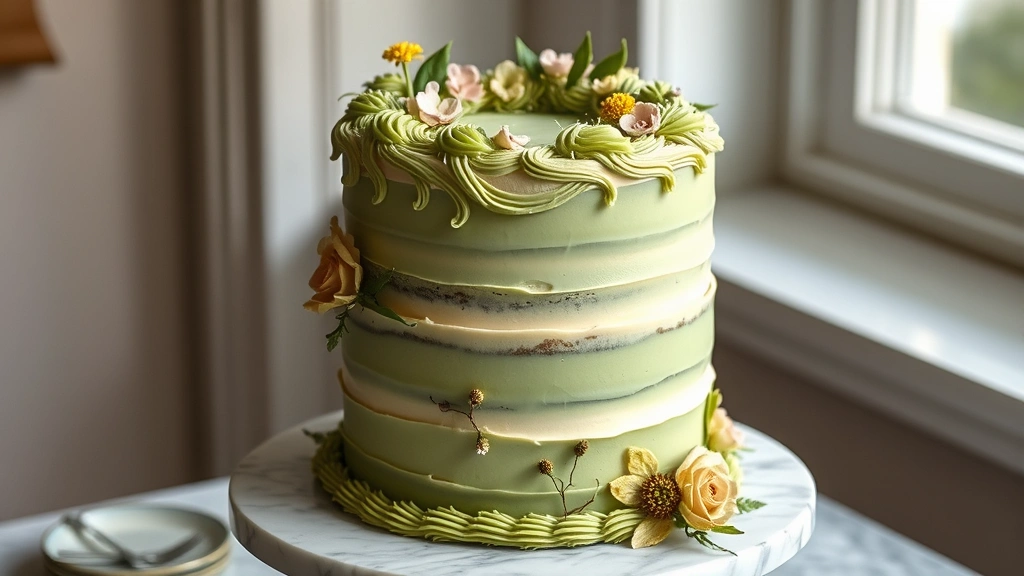
Storybook Vale Recipe is a whimsical, enchanting dessert that brings fairy tale magic to your kitchen. This delightful creation combines delicate layers of vanilla cake, luscious cream cheese frosting, and edible flowers to create a showstopper that tastes as magical as it looks. Perfect for special occasions, tea parties, or whenever you want to add a touch of storybook charm to your table.
Originally inspired by classic British baking traditions and modern cake design, this recipe has become a beloved favorite among home bakers who appreciate both beauty and flavor. The Storybook Vale Recipe gets its name from its enchanted forest aesthetic—think moss-covered cake bases, whimsical decorations, and a color palette inspired by fairy tale illustrations.
What makes this recipe so special is how accessible it truly is. Despite its fancy appearance, the Storybook Vale Recipe uses simple, everyday ingredients and straightforward techniques that even beginner bakers can master. Our vanilla cake base serves as the perfect canvas for your creativity, while our signature cream cheese frosting provides the ideal texture for stacking and decorating.
The beauty of the Storybook Vale Recipe lies in its versatility. You can customize the colors, flavors, and decorations to match any theme or season. Spring versions might feature pastel colors and fresh flowers, while autumn renditions could showcase warm tones and woodland elements. Learn our essential cake decorating tips to make your creation truly Instagram-worthy.
Baking this Storybook Vale Recipe is more than just following steps—it’s an experience. As you layer the cakes, pipe the frosting, and add those final magical touches, you’ll feel like you’re creating something from a fairy tale yourself. Whether you’re baking for a child’s birthday, a bridal shower, or simply to brighten someone’s day, this recipe delivers joy with every bite.
For those new to cake decorating, don’t worry! Our piping techniques guide breaks down everything you need to know. And if you’re looking for inspiration, check out our collection of themed cake ideas for endless possibilities.
According to Bon Appétit’s cake decorating trends, whimsical and storybook-inspired designs are having a major moment in the baking world. The Storybook Vale Recipe perfectly captures this aesthetic while remaining grounded in classic baking fundamentals. For more advanced decorating techniques, Serious Eats offers comprehensive cake decoration guidance.
The key to success with any Storybook Vale Recipe is patience and practice. Take your time with each layer, ensure your frosting is the right consistency, and don’t be afraid to make adjustments as you go. As The New York Times demonstrates in their layer cake guide, proper technique makes all the difference.
Whether this is your first time baking a decorated cake or your hundredth, the Storybook Vale Recipe offers something magical. It’s a recipe that celebrates creativity, encourages experimentation, and most importantly, brings smiles to everyone who sees it. So gather your ingredients, clear your schedule, and prepare to create a dessert that’s truly enchanting.
Ingredients
- 2 1/4 cups all-purpose flour
- 2 1/2 teaspoons baking powder
- 1/2 teaspoon salt
- 3/4 cup (1 1/2 sticks) unsalted butter, softened
- 1 1/2 cups granulated sugar
- 3 large eggs, room temperature
- 1 cup whole milk, room temperature
- 2 teaspoons vanilla extract
- 1/2 teaspoon almond extract (optional)
- 16 oz cream cheese, softened
- 1/2 cup (1 stick) unsalted butter, softened
- 3 1/2 cups powdered sugar
- 1 tablespoon vanilla extract
- 2-3 tablespoons heavy cream or milk
- Gel food coloring (sage green, cream, and soft pastels)
- Edible flowers (pansies, violets, or primrose)
- Green sanding sugar or sprinkles
- Fondant or modeling chocolate (optional, for decorative elements)
- Small fondant cutters or cookie cutters
- Piping bags and tips (round and leaf tips recommended)
Instructions
- Preheat your oven to 350°F (175°C). Grease and flour two 8-inch round cake pans, then line the bottoms with parchment paper for easy removal.
- In a medium mixing bowl, whisk together the all-purpose flour, baking powder, and salt. Set this dry mixture aside.
- In a large mixing bowl, cream together the softened butter and granulated sugar, beating on medium-high speed for 3-4 minutes until the mixture is light and fluffy.
- Add the eggs one at a time to the butter mixture, beating well after each addition. Scrape down the sides of the bowl as needed to ensure even mixing.
- Stir in the vanilla extract and almond extract (if using) into the batter.
- Alternate adding the dry flour mixture and milk to the butter mixture, beginning and ending with the flour. Add about one-third of the flour mixture, mix briefly, then add half the milk, mix, then add another third of the flour, mix, add the remaining milk, mix, and finally add the last third of the flour. This prevents the batter from becoming overmixed.
- Divide the batter evenly between the prepared cake pans and smooth the tops with a spatula.
- Bake for 32-38 minutes, or until a toothpick inserted into the center comes out clean or with just a few moist crumbs. The cakes should spring back when lightly touched.
- Remove the cakes from the oven and let them cool in the pans for 15 minutes, then turn out onto wire cooling racks to cool completely, at least 2 hours or until completely room temperature.
- While the cakes cool, prepare the cream cheese frosting by beating the softened cream cheese and butter together in a large bowl on medium speed for 2-3 minutes until smooth.
- Gradually add the powdered sugar to the cream cheese mixture, beating on low speed to avoid a sugar cloud, then increasing to medium speed and beating until fully combined.
- Add the vanilla extract and beat for another minute until the frosting is light and fluffy.
- Add heavy cream or milk one tablespoon at a time until you reach the desired consistency—it should be spreadable but still hold its shape for piping.
- Divide the frosting into separate bowls and tint with gel food coloring to create your storybook palette. Sage green, soft gray, pale pink, and cream work beautifully together.
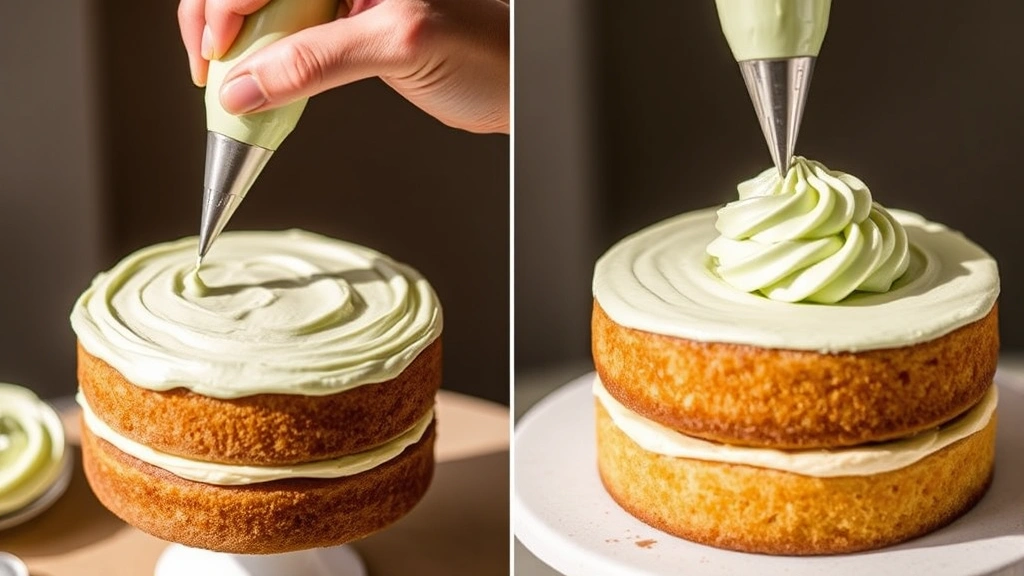
- Once the cakes are completely cool, use a serrated bread knife to level the tops if needed, creating flat surfaces for stacking.
- Place the first cake layer on your cake board or serving plate. Secure it with a small dab of frosting.
- Spread a layer of your chosen frosting (about 1/2 inch thick) evenly over the first cake layer using an offset spatula.
- Place the second cake layer on top, pressing down gently to create an even cake.
- Crumb coat the entire cake with a thin layer of frosting—this seals in crumbs and creates a base for the final frosting layer. Refrigerate for 15-20 minutes.
- Apply the final layer of frosting, starting with the top and working down the sides. Use your offset spatula to create smooth or textured surfaces depending on your desired aesthetic.
- Transfer your piping bag fitted with a small round tip to create moss-like texture by piping small dots and swirls around the base and lower portions of the cake.
- Switch to a leaf tip and pipe decorative leaves in sage green around the middle and top sections of the cake.
- Arrange your edible flowers strategically around the cake, gently pressing them into the frosting. Position them to look like they’re growing from the ‘forest floor’ at the base and scattered naturally up the sides.
- Sprinkle green sanding sugar around the base and lower sections to create a moss or grass effect.
- Add any fondant decorative elements you’ve created—tiny mushrooms, woodland creatures, or storybook-inspired toppers—pressing them gently into the frosting.
- Chill the finished cake for at least 30 minutes before serving to allow the frosting to set and the colors to fully develop.
- Slice with a long, thin, sharp knife that you’ve dipped in hot water and wiped clean between each slice to ensure clean cuts.

Pro Tips
- **Cake Make-Ahead Tips**: Both cake layers can be baked 1-2 days in advance. Wrap them individually in plastic wrap and store at room temperature or refrigerate. Bring to room temperature before frosting for best results.
- **Frosting Consistency Matters**: Your cream cheese frosting should be thick enough to hold decorative piping but spreadable for crumb coating. If it’s too soft, refrigerate for 10-15 minutes. If too stiff, add cream one teaspoon at a time.
- **Color Coordination**: Gel food coloring works better than liquid coloring because it won’t thin out your frosting. Start with a tiny amount and add more as needed—it’s easier to add color than remove it.
- **Edible Flower Safety**: Only use flowers that are specifically grown for consumption and pesticide-free. Pansies, violets, roses, and primroses are excellent choices. Avoid flowers from florists or gardens treated with chemicals.
- **Assembling for Stability**: Use a cake turntable when frosting to ensure even application. If your cake is leaning, insert a thin wooden dowel vertically through the center before adding the top layer for extra support.
- **Temperature Control**: Keep your frosting and cake components at proper temperatures. Work in a cool kitchen, and refrigerate the cake between decorating steps to prevent frosting from becoming too soft.
- **Piping Techniques**: Practice your piping on parchment paper first before applying to the cake. Consistency in pressure creates more uniform, attractive results.
- **Storage Instructions**: Store the finished Storybook Vale Recipe in the refrigerator, loosely covered, for up to 3 days. Remove 30 minutes before serving for the best flavor and texture.
- **Flavor Variations**: Substitute the almond extract with peppermint extract, or add lemon zest to the batter for a citrus version. The frosting can be flavored with different extracts as well.
- **Serving Suggestion**: This cake pairs beautifully with fresh berries, a cup of tea, or a glass of milk. It’s perfect for baby showers, bridal events, children’s parties, or anyone who loves whimsical, beautiful desserts.