
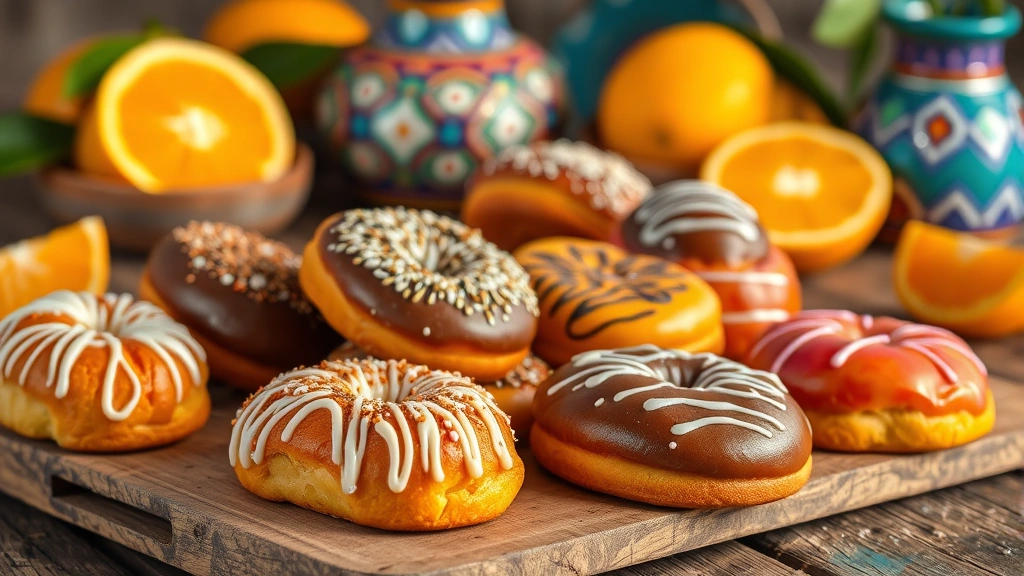
Pan dulce, the beloved Mexican sweet bread, is a delightful treat that brings warmth and joy to any table. These colorful, artisan-style pastries have been a staple in Mexican bakeries for generations, and now you can master the art of making them at home. The beauty of pan dulce lies not only in its tender, slightly sweet crumb but also in the decorative sugar topping that makes each piece a work of edible art.
Making pan dulce at home might seem intimidating, but with the right techniques and a bit of patience, you’ll be creating bakery-quality results in no time. The dough itself is enriched with eggs, butter, and a touch of orange zest, creating a soft, luxurious texture that melts in your mouth. What sets authentic pan dulce apart is the conchas’ distinctive shell-like pattern on top, created by carefully placing scored sugar paste over the dough before baking.
This comprehensive guide will walk you through every step of the process, from mixing the dough to achieving that perfect golden-brown exterior. We’ll explore the secrets that professional bakers use, including proper fermentation times, humidity control, and the importance of high-quality ingredients. Whether you’re making these for a special breakfast, a holiday celebration, or simply to impress your family and friends, this pan dulce recipe will become your go-to reference.
The magic of pan dulce begins with understanding the dough’s structure. Unlike regular bread, pan dulce dough is enriched, meaning it contains more fat and eggs, which creates that signature tender crumb. The fermentation process is crucial—allowing the dough to rise slowly develops flavor and creates the perfect texture. Many home bakers skip this step or rush it, which is why their pan dulce doesn’t quite match the bakery version.
One of the most rewarding aspects of baking pan dulce at home is the ability to customize the toppings. Traditional conchas come in pink, white, or chocolate varieties, but you can experiment with different colors and even flavored variations. Some bakers add anise seeds, cinnamon sugar, or chocolate chips to create unique flavor combinations that reflect their personal preferences.
For those looking to expand their pan dulce repertoire, don’t forget about other varieties like orejas (ears), polvorones (shortbread-like cookies), and jamoncillos (milk fudge candies). Each type requires slightly different techniques, but once you master the basic dough, you’ll find that adapting it for various shapes and toppings becomes second nature. Check out our complete guide to pan dulce types for more inspiration.
The importance of temperature control cannot be overstated when working with enriched doughs. Too warm, and the butter will melt, making the dough greasy and difficult to work with. Too cold, and the dough becomes stiff and hard to shape. Room temperature of around 75°F is ideal for pan dulce making. If your kitchen is warm, you might need to chill the dough between steps.
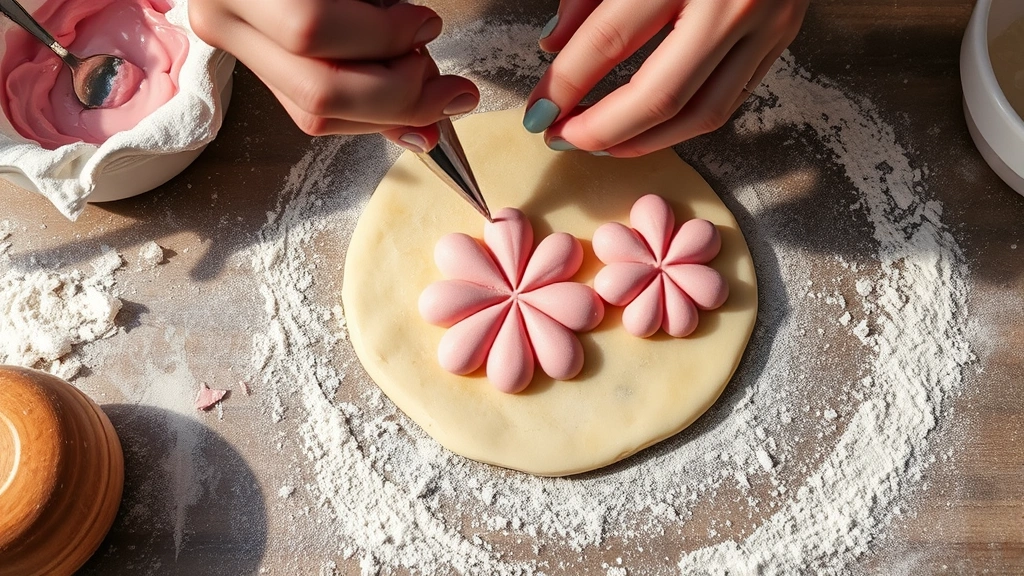
Many beginners struggle with the sugar paste (pasta) that tops the conchas. This mixture of flour, butter, sugar, and egg white needs to be the right consistency—firm enough to hold its shape when piped but soft enough to cut through the dough without tearing it. We’ll cover the exact ratios and techniques to get this just right.
The baking process itself requires attention to detail. Pan dulce is typically baked at a moderate temperature (around 375-400°F) until the top is golden brown and the sugar paste has caramelized slightly. Underbaking will result in a doughy texture inside, while overbaking can make the bread dry. An instant-read thermometer inserted into the center should register around 190°F when done.
If you’re interested in learning more about Mexican baking traditions, explore the rich history of Mexican pastries. Pan dulce is just one of many treasures in the Mexican baking tradition, and understanding the cultural context of these recipes adds another layer of appreciation to your baking.
For advanced techniques and professional tips, check out resources like Serious Eats’ pan dulce guide and Bon Appétit’s concha recipe. These sources provide excellent visual references and additional insights from experienced bakers.
Storage is an important consideration when baking pan dulce. These pastries are best enjoyed fresh, ideally within a day or two of baking. However, they can be stored in an airtight container at room temperature for up to three days, or frozen for up to a month. To refresh day-old pan dulce, simply wrap it in foil and warm it in a 300°F oven for about 10 minutes.
Whether this is your first time making pan dulce or you’re a seasoned baker looking to refine your technique, this recipe offers something for everyone. The combination of technical skill and creative expression makes pan dulce baking a deeply satisfying culinary pursuit. So gather your ingredients, clear your schedule, and prepare to embark on a delicious journey into the world of Mexican sweet breads.
Ingredients
- 3 cups (360g) bread flour
- 1 cup (120g) all-purpose flour
- 2¼ teaspoons (7g) instant yeast
- ½ cup (100g) granulated sugar
- 1½ teaspoons (9g) salt
- Zest of 1 orange
- 5 large eggs (room temperature)
- 6 tablespoons (85g) unsalted butter (softened)
- For the sugar paste topping: 1 cup (120g) all-purpose flour
- ½ cup (100g) granulated sugar
- 4 tablespoons (57g) unsalted butter (softened)
- 1 large egg white
- ½ teaspoon vanilla extract
- Food coloring (pink, white, or chocolate brown)
- Extra egg white for egg wash
Instructions
- Combine bread flour, all-purpose flour, instant yeast, sugar, salt, and orange zest in the bowl of a stand mixer fitted with the dough hook attachment.
- Add 4 eggs and mix on low speed for about 2 minutes until a shaggy dough forms and all flour is incorporated.
- Increase speed to medium and knead for 5 minutes, then gradually add the remaining egg while mixing.
- With the mixer still running on medium speed, add softened butter one tablespoon at a time, waiting for each addition to incorporate before adding the next.
- Continue mixing for 8-10 minutes total until the dough is smooth, elastic, and slightly sticky but holds together.
- Perform a windowpane test: take a small piece of dough and gently stretch it between your fingers; it should stretch thin enough to see light without tearing.
- Transfer dough to a lightly oiled bowl, cover with plastic wrap, and let rise at room temperature for 2-2.5 hours until approximately doubled in size.
- While dough rises, prepare the sugar paste topping by combining flour, sugar, and softened butter in a small bowl.
- Mix the flour-butter mixture until it resembles coarse breadcrumbs, then add egg white and vanilla extract.
- Mix until a smooth, spreadable paste forms, then divide into portions and color each with 2-3 drops of food coloring.
- Transfer colored paste to piping bags fitted with medium round tips and refrigerate until ready to use.
- After the first rise, gently deflate the dough and divide it into 12-16 equal portions (approximately 55-65g each).
- Shape each portion into a smooth ball by cupping it in your palm and rolling it gently against the work surface in circular motions.
- Place shaped dough balls on parchment-lined baking sheets, spacing them about 3 inches apart.
- Cover with plastic wrap and let rise for 1.5-2 hours at room temperature until they’ve increased in size by about 50% and feel puffy when gently pressed.
- Preheat oven to 375°F and ensure racks are positioned in the upper and lower thirds of the oven.
- Gently brush the top of each risen dough ball with egg white, taking care not to deflate them.
- Pipe the colored sugar paste onto the top of each concha in a shell-like pattern, starting from the center and creating curved lines outward.
- Use a small knife to carefully cut shallow lines through the sugar paste, creating the characteristic shell design, being careful not to cut into the dough below.
- Bake for 18-22 minutes until the sugar paste is set and lightly caramelized and the bread is golden brown on the bottom and sides.
- Cool on baking sheets for 5 minutes, then transfer to wire racks to cool completely before serving.

Pro Tips
- Room temperature ingredients are essential: cold eggs and butter won’t incorporate properly into the dough, resulting in a less tender crumb and uneven texture.
- The windowpane test is crucial for determining proper gluten development; if your dough tears immediately, continue mixing for another minute or two.
- Humidity affects pan dulce baking significantly; on humid days, you may need to reduce water slightly or extend rising times slightly.
- The sugar paste consistency is critical: too stiff and it won’t pipe smoothly, too soft and it’ll spread into the dough instead of sitting on top.
- Don’t skip the second rise (proofing); this final rise develops flavor and creates the light, airy interior that distinguishes excellent pan dulce from mediocre versions.
- If making the sugar paste ahead, store it in an airtight container in the refrigerator for up to 5 days; bring to room temperature before piping.
- For chocolate conchas, replace 3 tablespoons of flour in the sugar paste with 3 tablespoons unsweetened cocoa powder and add 1 tablespoon extra sugar.
- An instant-read thermometer reading of 190°F in the center indicates perfect doneness; this ensures the interior is fully cooked without overbaking.
- Fresh pan dulce is best enjoyed within 24 hours but can be stored in an airtight container at room temperature for up to 3 days.
- To refresh day-old pan dulce, wrap tightly in foil and warm in a 300°F oven for 10-12 minutes until warmed through.
- Freeze unbaked shaped dough for up to 2 weeks; thaw overnight in the refrigerator and proceed with second rise and baking as directed.