
Einkorn bread is an ancient grain treasure that produces the most tender, flavorful loaf with surprisingly minimal effort. Unlike modern wheat, einkorn has a lower gluten content and unique protein structure that creates a delicate crumb and subtle nutty flavor profile. This recipe guides you through creating bakery-quality einkorn bread at home using simple techniques and readily available ingredients.
What makes einkorn special is its heritage—it’s one of the first grains cultivated by humans, and bakers are rediscovering its magic. The dough feels different in your hands, more extensible and forgiving than traditional bread dough. It requires less kneading, shorter fermentation times, and produces results that are genuinely remarkable. Whether you’re exploring ancient grains or seeking a digestible bread alternative, this einkorn bread recipe delivers on both flavor and texture.
For best results, source high-quality einkorn flour from specialty mills or reputable online sources. The flour’s protein composition means standard bread techniques need slight adjustments—we’ll use a longer, cooler autolyse and trust the dough’s natural development. You’ll notice the dough feels silkier than typical bread dough, which is exactly what you want. No fancy equipment required: just your hands, a Dutch oven, and patience.
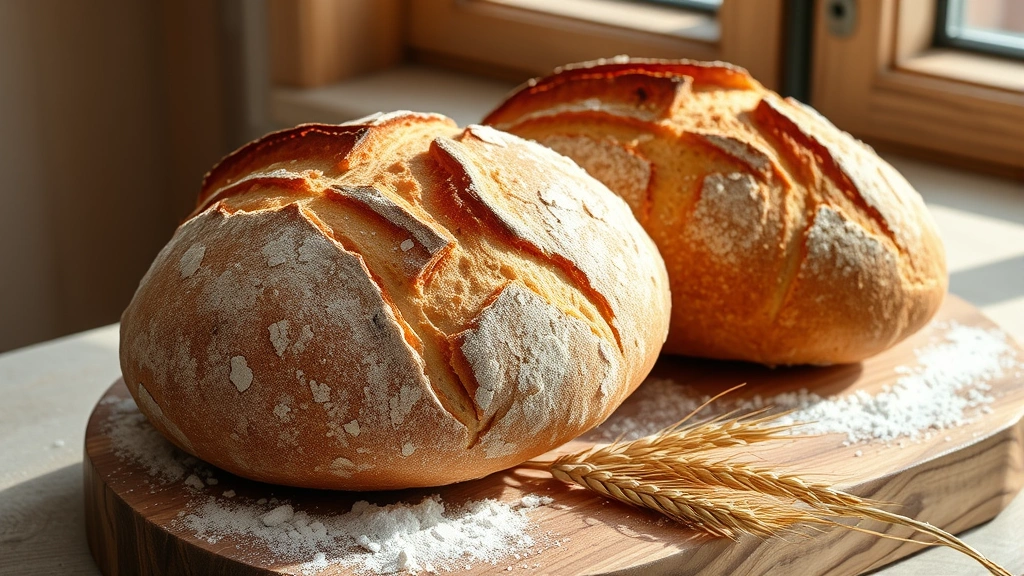
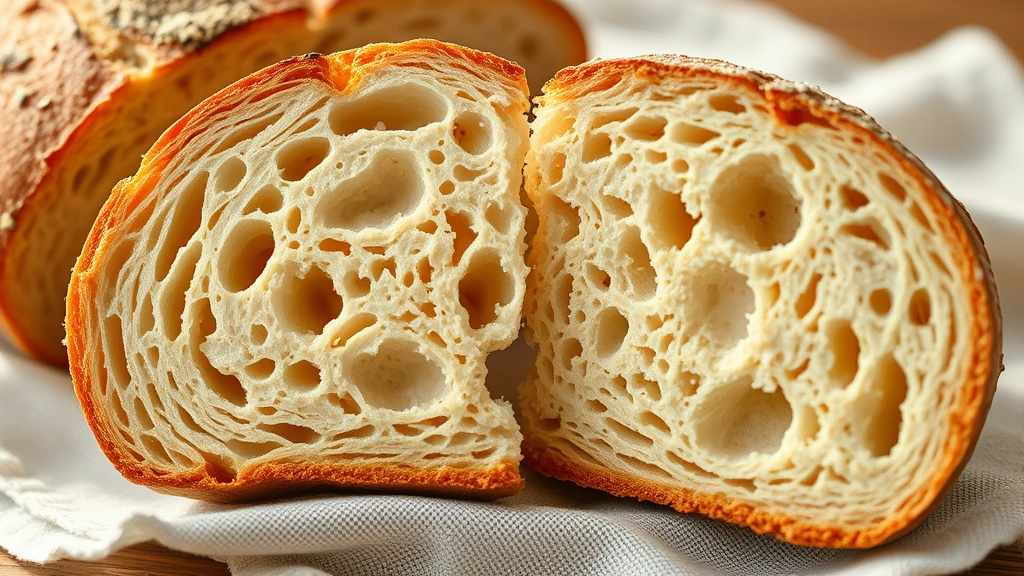
This recipe produces two beautiful loaves with a crispy, caramelized crust and an open, tender crumb. The fermentation process develops complex flavors while the einkorn grain’s natural sweetness shines through. First-time einkorn bakers often express amazement at how forgiving this grain is—the dough practically makes itself. Once you master this basic formula, you’ll understand why ancient grains are experiencing a modern renaissance among serious home bakers.
For more sourdough starter techniques, explore our comprehensive guide. If you’re interested in whole grain baking fundamentals, we have detailed breakdowns of fermentation science. Learn about Dutch oven bread baking methods for perfect crust development. Check out our bread scoring techniques for professional presentation. For additional inspiration, explore ancient grain recipes beyond just bread.
External resources include Serious Eats’ comprehensive bread baking guide, Bon Appétit’s bread recipe collection, New York Times no-knead bread technique, Serious Eats’ whole wheat bread science, and New York Times bread baking fundamentals.
Ingredients
- 500g einkorn flour (approximately 3¾ cups)
- 350ml filtered water (room temperature)
- 10g fine sea salt
- 5g instant yeast or ½ teaspoon active dry yeast
- 5ml extra virgin olive oil (optional, for dough development)
- Additional einkorn flour for dusting and shaping
Instructions
- Combine 500g einkorn flour and 350ml room temperature filtered water in a large mixing bowl. Mix until all flour is hydrated and no dry bits remain. This is your autolyse stage. Cover with a damp kitchen towel and let rest for 30-45 minutes at room temperature. This resting period allows the einkorn flour to fully absorb water and begins gluten development naturally.
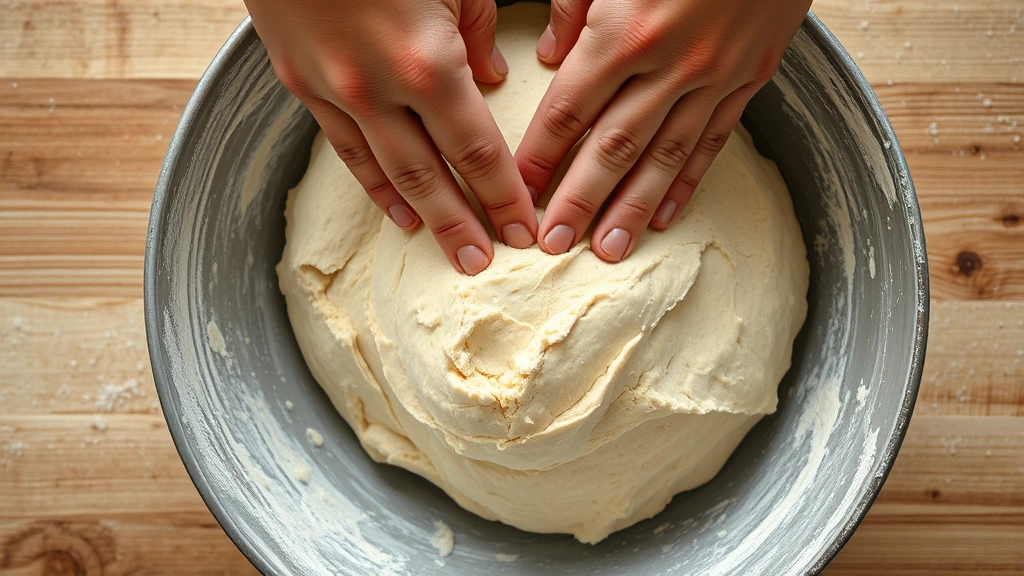
- After the autolyse rest, sprinkle 10g fine sea salt and 5g instant yeast evenly over the dough surface. Using wet hands, squeeze and fold the dough 10-12 times, incorporating the salt and yeast thoroughly. The dough should come together into a shaggy, cohesive mass. Wet hands prevent sticking and make this process easier than using dry hands.
- Perform the first round of stretch and folds immediately after incorporating salt and yeast. Wet your hand, then reach to one side of the dough, pull it up and over itself, rotating the bowl ¼ turn. Repeat this motion 4 times until you’ve gone around the entire bowl once. Rest for 30 minutes covered.
- Perform the second round of stretch and folds after 30 minutes. Repeat the same motion—wet hand, pull and fold, rotate bowl—four times around. The dough will feel noticeably stronger and more cohesive. Cover and rest for 30 minutes.
- Perform the third and final round of stretch and folds after another 30 minutes. By now the dough should feel elastic and alive. You may notice small bubbles visible on the surface. Cover and allow the dough to bulk ferment for 2-3 hours at room temperature, until it increases by approximately 50-75% in volume and shows visible fermentation activity.
- Once bulk fermentation is complete, gently turn the dough onto a lightly floured work surface. Divide into two equal pieces using a bench scraper or knife, cutting gently without degassing the dough excessively. Shape each piece into a round by gently pulling the sides toward the center, creating surface tension.
- Place each shaped round seam-side up into a floured banneton basket or a bowl lined with a well-floured kitchen towel. Cover loosely with plastic wrap or a damp towel. Place in the refrigerator for 12-18 hours. This cold fermentation develops flavor and makes scoring easier while giving you flexibility in your baking schedule.
- Remove dough from refrigerator 30 minutes before baking. Preheat your oven to 475°F (245°C) with a Dutch oven inside for 45 minutes. The extended preheat ensures the Dutch oven reaches optimal temperature for oven spring and crust development.
- Carefully turn one cold dough round onto parchment paper, seam-side down. Using a sharp knife or bread lame, score the top with a decisive ½-inch deep slash at a 30-degree angle. A confident, quick motion creates the best score without dragging through the dough.
- Transfer the scored dough (on parchment) into the preheated Dutch oven. Cover with the lid and bake for 25 minutes with the lid on. This trapped steam creates the crispy, caramelized crust characteristic of excellent bread.
- Remove the Dutch oven lid and bake for an additional 20-22 minutes until the crust is deep golden brown. The loaf should sound hollow when tapped on the bottom. Transfer to a wire cooling rack.
- Repeat the scoring and baking process with the second loaf, allowing it to bake while the first loaf cools. You can adjust timing slightly based on your oven’s behavior—if crust is browning too quickly, reduce the final uncovered baking time by 2-3 minutes.
- Cool both loaves completely on a wire rack for at least 1 hour before slicing. This resting period allows the crumb structure to set properly. Cutting too early results in a gummy interior. Once fully cooled, store in a paper bag or linen cloth at room temperature for up to 3 days, or freeze for longer storage.
Pro Tips
- Einkorn flour behaves differently than modern wheat flour—it’s more delicate and requires less manipulation. Over-mixing develops the gluten too much, resulting in dense bread instead of the open crumb we want.
- Water temperature matters significantly in bread baking. Room temperature water (68-72°F) ensures predictable fermentation timing. Warmer water accelerates fermentation; cooler water slows it down.
- The autolyse step is crucial for einkorn specifically. This grain’s unique protein structure benefits from a full hydration rest before yeast introduction, improving extensibility and final crumb structure.
- Stretch and folds replace traditional kneading, building strength gently over time. This technique is especially important for einkorn because aggressive mixing can overdevelop the delicate gluten network.
- Cold fermentation (retarding) serves multiple purposes: it develops complex flavors through slow microbial activity, makes shaping and scoring easier with firm dough, and gives you scheduling flexibility.
- Dutch oven baking is essential for einkorn bread success. The trapped steam allows the crust to develop properly while the crumb expands. Without this steam environment, the crust forms too quickly and prevents proper oven spring.
- Scoring depth and angle affect how the bread opens during baking. A ½-inch deep score at 30 degrees creates a professional “ear” and allows controlled expansion.
- Einkorn bread’s open crumb comes from proper fermentation and handling, not from aggressive mixing. Trust the process—gentle handling produces better results than aggressive techniques.
- If your einkorn flour feels particularly dry or absorbs water unevenly, increase hydration by 5-10ml and adjust your stretch and fold technique accordingly.
- Room temperature during fermentation significantly impacts timeline. In cooler kitchens (under 68°F), extend bulk fermentation by 1-2 hours. In warmer kitchens (over 75°F), reduce timing accordingly.
- Einkorn naturally produces a slightly sweeter, nuttier bread than modern wheat varieties. This flavor develops during fermentation—longer fermentation times intensify these characteristics.
- Store finished bread in a paper bag or linen cloth, never plastic, which traps moisture and softens the crust. Plastic is fine for freezing, but not for room temperature storage.
- Leftover einkorn bread makes exceptional toast, which further develops the grain’s nutty flavor profile. Day-old bread also works beautifully for breadcrumbs, croutons, and bread pudding.