
Date syrup is one of those magical ingredients that transforms your kitchen into a gourmet haven with minimal effort. This homemade date paste alternative is naturally sweet, deeply caramel-like, and infinitely more delicious than anything store-bought. Whether you’re drizzling it over fluffy pancakes, swirling it into Greek yogurt, or using it as a natural baking sweetener, this recipe delivers restaurant-quality results in your own kitchen.
I grew up watching my grandmother make date syrup the traditional way, and I’ve spent years perfecting this method to make it foolproof for everyone. The beauty of date syrup lies in its simplicity—just dates and water create this luxurious, velvety sauce that tastes like liquid caramel. Unlike refined syrups loaded with preservatives, homemade date syrup is pure, wholesome, and packed with natural minerals and fiber. It’s naturally vegan, gluten-free, and requires no fancy equipment.
The magic happens when you slowly reduce date-infused water until it becomes thick, glossy, and utterly irresistible. This isn’t a quick recipe—it’s a meditation on patience and the reward that comes from doing things the right way. Every batch I make is slightly different depending on the date variety and season, which keeps things interesting. Some batches are darker and more molasses-like, while others remain lighter and more delicate. Both are absolutely divine.
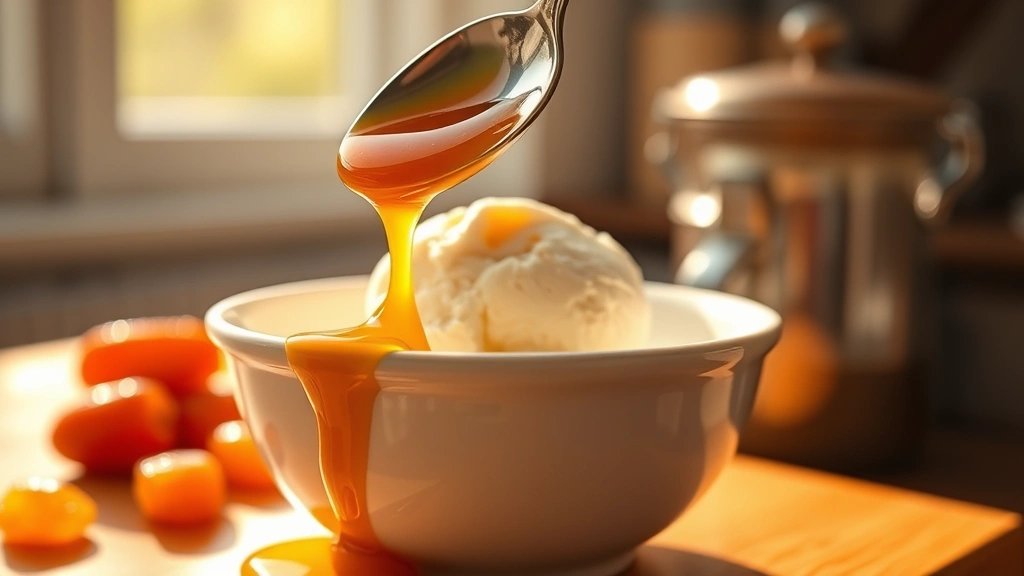
What makes this recipe so special is its versatility. Serve it warm over vanilla ice cream for an elegant dessert, drizzle it over creamy oatmeal for breakfast, or use it in Middle Eastern pastries. I’ve even stirred a spoonful into my morning coffee for a naturally sweet pick-me-up. According to Bon Appétit’s date syrup guide, this ingredient has been used for centuries in Mediterranean and Middle Eastern cuisine, and for good reason.
The recipe requires just two ingredients and three pieces of equipment: a saucepan, a strainer, and a wooden spoon. I always use Medjool dates for their buttery texture and rich flavor, though Deglet Noor dates work beautifully too. The key is using filtered water—tap water can sometimes affect the final flavor profile. This recipe yields about one cup of finished syrup, though you can easily double or triple it.
What I love most about making date syrup at home is the aroma that fills your kitchen. As the dates break down and the water reduces, your home smells like a high-end patisserie. Your family will be drawn to the kitchen wondering what magical thing is happening. The color deepens from golden amber to rich mahogany as it reduces, which is your visual cue that it’s almost ready.
This syrup keeps beautifully in the refrigerator for up to three weeks in a glass jar, making it perfect for meal prep. I like to make a big batch on Sunday and enjoy it throughout the week. Cold date syrup becomes slightly thicker and more sauce-like, which is perfect for drizzling. Warm date syrup is more pourable, ideal for pouring. Both are equally delicious.
I’ve included detailed notes below covering everything from selecting the best dates to troubleshooting common issues. Whether you’re a seasoned cook or a kitchen novice, this recipe is genuinely foolproof. The most common mistake is rushing the reduction process—resist that urge. Low and slow is always better. Your patience will be rewarded with the most incredible syrup you’ve ever tasted. Trust me, once you try homemade date syrup, you’ll never go back to store-bought versions again.
Ingredients
- 2 cups pitted Medjool dates (about 1 pound)
- 3 cups filtered water
Instructions
- Rinse your Medjool dates thoroughly under cool running water to remove any dust or debris. Pat them dry with paper towels and remove any remaining pits if you’re using unpitted dates. If using pre-pitted dates, simply give them a quick rinse and dry them.
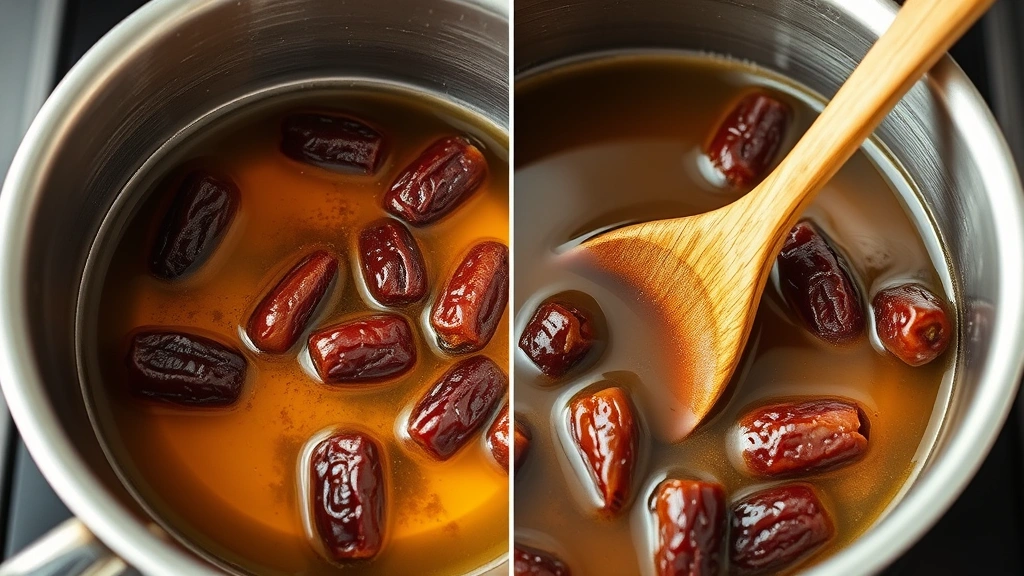
- Place the cleaned dates in a medium saucepan and add the filtered water. The water should just barely cover the dates—add a bit more if needed. Stir gently to combine.
- Bring the mixture to a boil over medium-high heat, then immediately reduce the heat to medium-low. You want a gentle simmer, not a rolling boil, which can cause the dates to break apart too quickly.
- Let the dates simmer for 15-20 minutes, stirring occasionally with a wooden spoon. The dates will gradually soften and begin to break down into the water, creating a murky, date-colored liquid.
- After 20 minutes, the dates should be very soft and falling apart. Use your wooden spoon to break them down further, pressing them against the sides of the pan to release all their natural sugars and flavor into the water.
- Pour the entire mixture through a fine-mesh strainer set over a medium saucepan, pressing the softened dates firmly with the back of your spoon to extract all the liquid. Work slowly and deliberately—you want to extract every drop of syrup while leaving the date solids behind.
- Discard the date solids remaining in the strainer (you can compost these or save them for baking if desired). You should have about 2 cups of date-infused liquid.
- Return the strained liquid to the saucepan and place it over medium heat. Bring it to a gentle simmer, then reduce the heat to medium-low and let it simmer uncovered for 20-30 minutes.
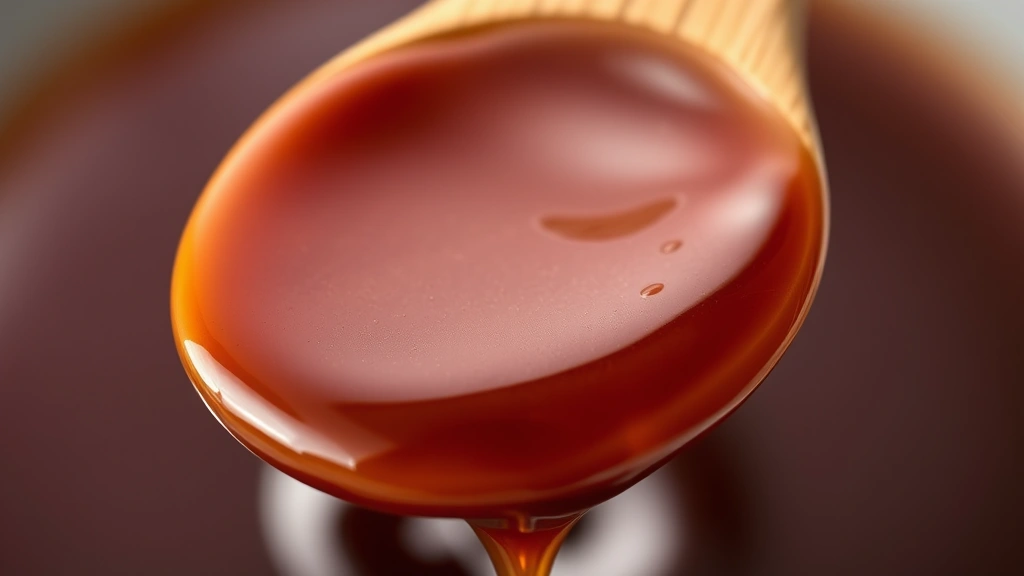
- As the syrup reduces, stir it occasionally and watch for the color to deepen from light amber to a deeper mahogany brown. The mixture will become noticeably thicker and more viscous as water evaporates.
- Test the consistency by dipping a wooden spoon into the syrup and tilting it. When the syrup coats the back of the spoon and slowly drips down, it’s close to done. If you prefer a thicker syrup, continue cooking for another 5-10 minutes.
- Remove the saucepan from heat and let the syrup cool for 5 minutes. It will continue to thicken slightly as it cools.
- Carefully pour the hot syrup into a clean glass jar or bottle using a funnel if desired. Be very careful as the syrup is extremely hot and can cause burns.
- Allow the syrup to cool to room temperature before covering and refrigerating. It will thicken further as it cools completely.
- Store in a tightly sealed glass jar in the refrigerator for up to 3 weeks. The syrup may crystallize slightly over time—simply gently warm it in a saucepan over low heat to return it to its smooth, pourable consistency.
Pro Tips
- **Choosing Your Dates**: Medjool dates are my top choice for this recipe because they’re buttery, sweet, and create the most luxurious syrup. However, Deglet Noor dates work beautifully too and create a slightly less sweet, more nuanced flavor. Avoid pre-packaged chopped dates as they often contain added oils and sugar.
- **Water Quality Matters**: I always use filtered water because tap water can sometimes impart mineral flavors that interfere with the pure date taste. If you don’t have filtered water, let tap water sit out for a few hours before using to allow chlorine to evaporate.
- **The Reduction Process**: This is crucial and worth repeating—don’t rush this step. Low and slow heat creates a smoother, more refined syrup. High heat can cause the syrup to caramelize unevenly and develop bitter notes.
- **Thickness Preferences**: Some people prefer a thinner, pourable syrup while others like it thick enough to spoon onto desserts. Thinner syrup requires 20 minutes of reduction, while thicker syrup needs 30+ minutes. Write down your preferred cooking time for future batches.
- **Straining Tips**: For the smoothest possible syrup, strain twice—first through a regular fine-mesh strainer, then through cheesecloth. This removes any tiny date particles that create grittiness.
- **Make-Ahead and Storage**: This syrup keeps beautifully in glass jars in the refrigerator for 3 weeks. You can also freeze it in ice cube trays for individual portions that last up to 3 months. Thaw at room temperature before using.
- **Troubleshooting Crystallization**: If your syrup crystallizes in the refrigerator (which is completely normal), gently warm it in a saucepan over low heat or microwave in 30-second intervals, stirring between each interval.
- **Using Crystallized Syrup**: Crystallized date syrup is actually wonderful—it creates beautiful texture in baked goods and acts almost like a date paste. Use it as-is in cookies and cakes, or warm it gently if you prefer the pourable version.
- **Scaling the Recipe**: This recipe doubles and triples beautifully. Simply multiply the ingredients by the desired amount, though you may need to increase cooking time slightly for larger batches.
- **Recipe Variations**: Add a pinch of sea salt to enhance the date flavor, a stick of cinnamon during cooking for warmth, or a few drops of vanilla extract after cooling for additional complexity. Each addition is optional but delicious.
- **Nutritional Benefits**: Date syrup contains natural fiber, potassium, magnesium, and antioxidants. It’s a wholesome alternative to refined sugars and works beautifully for those following paleo, vegan, or whole-food diets.
- **Serving Suggestions**: Drizzle over ice cream, yogurt, oatmeal, or pancakes; swirl into smoothie bowls; use as a topping for cheese boards; or brush onto baked goods before serving. It’s also incredible spooned directly from the jar—no judgment here.