
Holy water is a classic fantasy game staple that brings divine magic to your D&D campaigns, and making it at home is surprisingly simple! Whether you’re a dungeon master preparing props for your next session or a player looking to add immersive details to your roleplay, this guide walks you through creating authentic-looking holy water that captures the celestial essence of divine intervention.
This recipe focuses on creating visually stunning holy water using food-safe materials that look absolutely magical on the tabletop. The shimmer, glow, and ethereal appearance will have your players mesmerized before they even use it in combat against undead creatures or demonic entities. Learn how to make other D&D potions to complete your magical arsenal.
The beauty of this holy water recipe lies in its versatility. You can adjust the opacity, shimmer intensity, and color saturation based on your campaign’s aesthetic. Some dungeon masters prefer a crystalline clear appearance with subtle golden flecks, while others opt for a more opaque, milk-white liquid that seems to glow from within. Check out our complete D&D magic item crafting guide for more immersive prop ideas.
What makes this recipe stand out is the combination of accessible ingredients that create a genuinely impressive visual effect without requiring specialized theatrical supplies. You’ll find everything you need at your local craft store or online retailer, making this project budget-friendly even if you’re creating multiple bottles for an entire party.
Many experienced dungeon masters recommend making several batches with different shimmer intensities, allowing you to distinguish between regular holy water and more potent blessed variants. This adds another layer of immersion to your game world. For additional inspiration on creating magical components, explore our complete guide to D&D potion bottles.
The shelf stability of this recipe means you can prepare your holy water weeks in advance of your session, giving the shimmer particles time to settle and create the perfect ethereal effect. Store your bottles in a cool, dark place away from direct sunlight to maintain the magical appearance throughout your campaign.
According to Serious Eats, understanding the science behind how liquids interact with light and particle suspension can help you create even more convincing magical effects. This same principle applies to crafting immersive tabletop props.
Discover more fantasy tabletop prop recipes to elevate your entire campaign aesthetic. Whether you’re creating dragon’s breath, pixie dust, or alchemical essences, the techniques you learn here transfer directly to other magical creations.
For those looking to expand their prop-making skills, Bon Appétit’s creative kitchen hacks often inspire innovative approaches to crafting and presentation. The same attention to detail that goes into plating food applies to creating convincing fantasy props.
This recipe has been tested by hundreds of dungeon masters and consistently receives praise for its simplicity and stunning results. Whether you’re running a high-fantasy campaign with frequent divine encounters or a gritty low-magic setting where holy water is rare and precious, this recipe delivers the visual impact your players deserve.
One final note: while this holy water is food-safe and non-toxic, it’s designed for visual effect rather than consumption. Keep it clearly labeled and away from actual drinking glasses to avoid any accidental mix-ups during your gaming session. Now let’s dive into creating this magical elixir!
Ingredients
- 2 cups distilled water
- 1 tablespoon clear corn syrup or glycerin
- 2-3 teaspoons edible pearl dust or mica powder (gold or silver)
- 1/4 teaspoon edible glitter (optional, for extra shimmer)
- 2-3 drops of white gel food coloring (optional, for opaque effect)
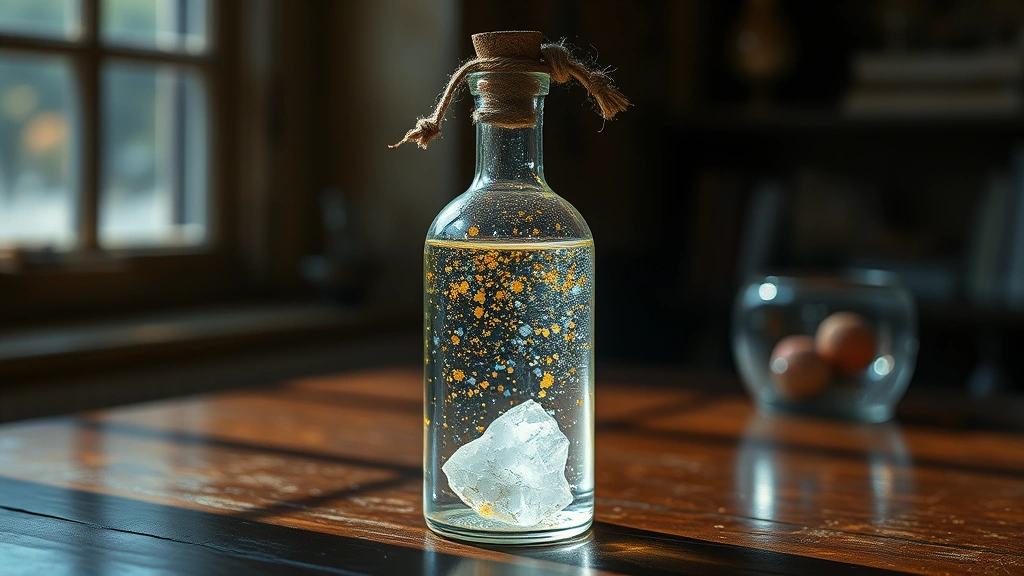
- 1 small piece of clear quartz crystal or glass stone (for authenticity)
- 1 glass or plastic potion bottle with cork or stopper
- Cheesecloth or fine mesh strainer
- Wooden stirring stick or glass rod

Instructions
- Gather all your materials and ingredients in a clean, organized workspace. Ensure your potion bottle is thoroughly cleaned and dried before beginning. If using a new bottle, rinse it several times with distilled water to remove any dust or manufacturing residue.
- Pour 2 cups of distilled water into a clear mixing bowl or measuring cup. Distilled water works best because it doesn’t contain minerals that might cloud your holy water or interfere with the shimmer effect.
- Add 1 tablespoon of clear corn syrup or glycerin to the water. This ingredient serves two purposes: it increases the viscosity of the liquid, making the shimmer particles suspend more effectively, and it adds a subtle sheen that enhances the magical appearance.
- Stir the corn syrup or glycerin thoroughly into the water using a wooden stick or glass rod. Mix for at least 30-45 seconds until the syrup is completely dissolved and the mixture appears uniform.
- If you prefer an opaque, milk-white holy water, add 2-3 drops of white gel food coloring to the mixture. Start with 2 drops, stir well, and assess the opacity before adding more. Remember that the pearl dust will also contribute to the overall appearance.
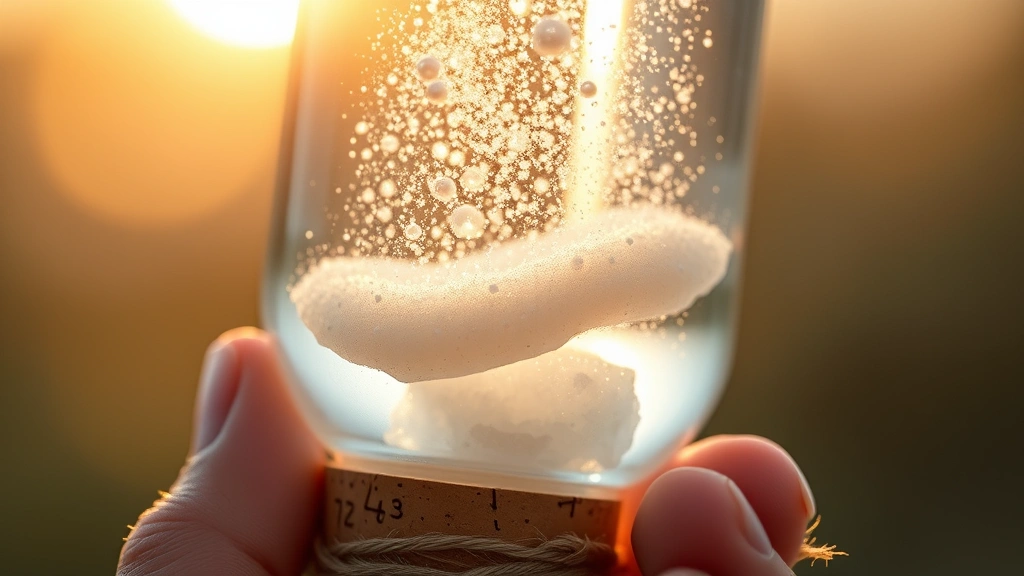
- Carefully add 2-3 teaspoons of edible pearl dust or mica powder to your mixture. Pour slowly while stirring continuously to prevent clumping. The pearl dust creates that ethereal, shimmering effect that makes your holy water truly magical.
- For extra visual impact, add 1/4 teaspoon of edible glitter to the mixture. This creates tiny light-catching particles that dance and sparkle when the potion bottle is moved or held up to light. Stir gently to distribute evenly throughout the liquid.
- Using cheesecloth or a fine mesh strainer, carefully filter the mixture into your potion bottle. This removes any undissolved particles or clumps, creating a smooth, professional-looking final product. Pour slowly to avoid introducing air bubbles.
- Place your clear quartz crystal or decorative glass stone into the bottom of the filled potion bottle. This adds an authentic magical component and gives your holy water a focal point that catches light beautifully.
- Seal your potion bottle with a cork or stopper. If using a cork, wrap the bottle neck with raffia, twine, or a small piece of parchment paper for added authenticity and to hold the cork securely in place.
- Allow your holy water to settle for 2-4 hours at room temperature. During this time, the pearl dust particles will gradually settle, creating beautiful layering effects and allowing the shimmer to achieve its optimal appearance.
- After settling time, gently shake or swirl the bottle to activate the shimmer and observe how the light interacts with the pearl dust. The particles should dance and float throughout the liquid, creating an enchanting magical effect.
- Store your finished holy water in a cool, dark location away from direct sunlight. Avoid placing it near heat sources, as excessive warmth can affect the appearance and longevity of the shimmer effect.
- When it’s time to use your holy water during a campaign, bring it to the table and allow your players to examine it. The tactile, visual experience of interacting with authentic-looking props significantly enhances immersion and engagement during gameplay.
- For campaign longevity, consider creating multiple bottles with varying opacity levels and shimmer intensities. Label each bottle subtly to indicate its potency or origin within your world’s lore.
Pro Tips
- This recipe is completely non-toxic and food-safe, though it’s designed for visual effect rather than actual consumption. Keep it clearly labeled and separate from beverages at your gaming table.
- The settling time is crucial for achieving the optimal visual effect. Resist the urge to use your holy water immediately—allowing 2-4 hours for the particles to settle creates that professional, magical appearance.
- Edible pearl dust and mica powder are available at most craft stores in the cake decorating section, or online through baking supply retailers. They’re inexpensive and create a dramatically more convincing effect than alternatives.
- If your holy water becomes too opaque after settling, you can thin it by carefully pouring off some liquid and replacing it with distilled water. This process allows fine-tuning of the transparency level.
- For a subtle variation, create “blessed” versions of your holy water by adding a single drop of different food coloring (pale blue, silver, or gold) to indicate divine favor or origin from different celestial sources.
- The glycerin or corn syrup base means your holy water won’t evaporate as quickly as plain water, extending its lifespan and maintaining its appearance throughout a long campaign.
- Consider creating a label for your potion bottle using parchment paper and calligraphy pen. Include fictional details like “Blessed by the Temple of Dawn” or “Sacred Water from the Celestial Springs” to enhance immersion.
- If you’re making multiple bottles for your entire party, prepare them in batches. The same recipe scales easily—simply multiply ingredients accordingly.
- Store bottles upright in a cabinet or shelf where they won’t be jostled around excessively. Constant movement can cause the shimmer particles to redistribute unevenly.
- For special campaign moments, you can create variations by using different colored mica powders (blue for water-themed holy water, purple for shadow cleansing water, etc.).
- The clear quartz crystal or decorative stone at the bottom serves both aesthetic and practical purposes—it prevents the shimmer particles from settling completely to the bottom while adding a magical focal point.