

Gorditas are one of my absolute favorite Mexican street foods, and honestly, they’re so much easier to make at home than you’d think! These soft, pillowy pockets of masa are filled with your favorite toppings and are perfect for lunch, dinner, or even a fun appetizer. I love making a big batch of these on the weekend because they’re great for meal prep and everyone in the family loves them.
The beauty of gorditas is that they’re incredibly versatile. You can fill them with anything from seasoned shredded chicken to carnitas, refried beans, or even vegetarian options like sautéed mushrooms and cheese. I typically set up a little toppings bar and let everyone customize their own—it’s always a hit with guests!
What makes these gorditas truly special is the technique. Unlike regular tortillas, gorditas have a thicker, fluffier texture because they’re cooked in a specific way that creates those gorgeous golden pockets. The key is starting them on a griddle or skillet and then finishing them in the oven or under a broiler for that perfect char. This recipe is from my abuela, and I’ve perfected it over the years to make it foolproof.
If you’re new to making gorditas, don’t worry—this is genuinely one of the simplest Mexican recipes to master. All you need is masa harina, water, salt, and a little oil. From there, it’s just shaping and cooking. I always recommend having all your toppings prepped and ready before you start cooking, because once they’re done, you’ll want to serve them immediately while they’re still warm and soft.
For the filling, I’m sharing my favorite cilantro lime chicken recipe, which pairs beautifully with these. You could also use any carnitas recipe you love, or keep things simple with homemade refried beans. Don’t skip the fresh toppings—that’s where the magic really happens! Crisp cabbage, creamy avocado, tangy crema, and fresh cilantro transform these into something restaurant-quality.
If you’re looking for more Mexican comfort food inspiration, check out this chile relleno recipe or these street-style tacos. Both are equally simple and equally delicious.
For more detailed techniques on working with masa, I always reference Serious Eats’ guide to homemade corn tortillas and Bon Appétit’s gordita inspiration. The New York Times has an excellent breakdown of traditional gordita preparation methods as well.
These are perfect for feeding a crowd, and they’re so budget-friendly that you can make them regularly without breaking the bank. Plus, your kitchen will smell absolutely amazing while they’re cooking. Let’s get started!
Ingredients
- 2 cups masa harina (corn flour for tortillas)
- 1 1/4 cups warm water
- 1/2 teaspoon salt
- 2 tablespoons vegetable oil, divided
- 2 cups shredded cooked chicken (or carnitas, or refried beans)
- 1 cup shredded cabbage
- 1/2 cup Mexican crema or sour cream
- 1/2 cup crumbled queso fresco
- 1/4 cup fresh cilantro, chopped
- 1 avocado, sliced
- 1 lime
- Salsa of your choice (for serving)
- Optional: jalapeños, pickled onions, or additional toppings
Instructions
- In a large mixing bowl, combine the masa harina and salt. Slowly add the warm water, mixing with your hands until you have a soft dough that resembles Play-Doh. The consistency should be moist but not wet—if it’s too dry, add water a tablespoon at a time; if it’s too wet, sprinkle in a bit more masa harina.
- Let the dough rest for 5 minutes, then knead it gently for another minute. This helps the masa hydrate fully and become easier to work with.
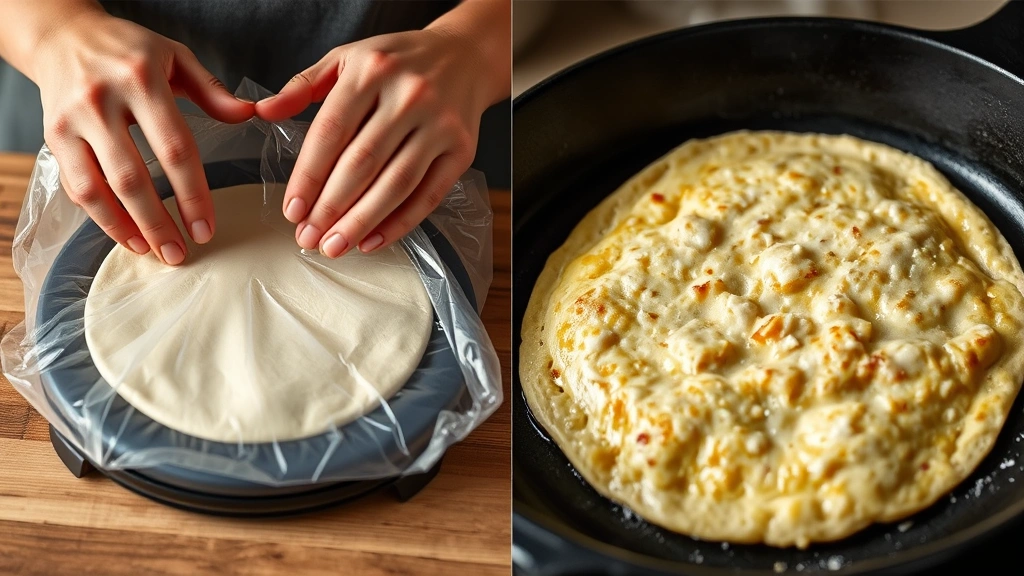
- Prepare your work surface by placing a piece of plastic wrap (cut from a storage bag works great) on a flat counter or cutting board. This prevents sticking and makes cleanup easier.
- Divide the dough into 8-10 equal portions and roll each into a ball about the size of a golf ball. Cover the balls with a damp towel to prevent them from drying out.
- Take one ball of dough and place it between two sheets of plastic wrap. Using a tortilla press or the bottom of a heavy skillet, press the dough into a thick disc about 1/4-inch thick and 3-4 inches in diameter. The key is keeping them thicker than regular tortillas.
- Carefully peel away the top plastic wrap and flip the gordita onto your hand or a small plate, then remove the remaining plastic wrap.
- Heat 1 tablespoon of oil in a large skillet or griddle over medium-high heat. Once the oil is shimmering, carefully place 2-3 gorditas onto the hot surface.
- Cook for 3-4 minutes on the first side without moving them, until they develop a light golden color and small blisters appear. This is what creates that beautiful texture!
- Flip the gorditas carefully and cook for another 2-3 minutes on the second side until golden brown.
- Transfer the cooked gorditas to a clean kitchen towel to keep them warm and soft while you continue cooking the remaining batch, adding more oil as needed.
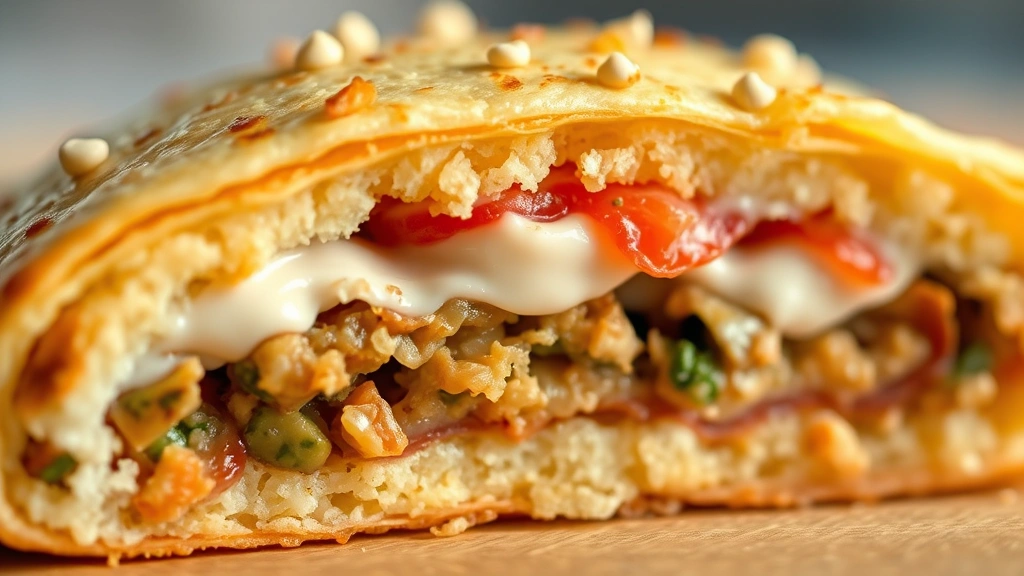
- Once all gorditas are cooked, carefully slice them horizontally about three-quarters of the way through, creating a pocket (don’t cut all the way through). You want to be able to stuff them without them falling apart.
- Warm your filling (chicken, beans, or your chosen protein) in a small saucepan over low heat.
- Assemble the gorditas by gently opening each pocket and stuffing with about 2-3 tablespoons of your chosen filling.
- Top with shredded cabbage, a drizzle of crema, crumbled queso fresco, fresh cilantro, and a slice of avocado.
- Squeeze fresh lime juice over the top and serve immediately with salsa on the side. Eat while still warm for the best experience!
Pro Tips
- **Masa Harina Quality Matters**: Use good quality masa harina—brands like Maseca or Bob’s Red Mill work beautifully. The quality really does affect the final texture.
- **Water Temperature**: Warm water helps the masa hydrate better and creates a softer, more pliable dough. Cold water can result in a crumbly texture.
- **Don’t Over-Mix**: Once your dough comes together, resist the urge to knead it excessively. This can make the gorditas tough instead of soft and pillowy.
- **Plastic Wrap is Your Friend**: Instead of flour, use plastic wrap when pressing your gorditas. This prevents them from sticking and drying out, and keeps your dough nice and moist.
- **Thickness is Key**: The main difference between gorditas and regular tortillas is the thickness. Don’t press them too thin, or they won’t have that characteristic fluffy pocket.
- **Oil Temperature**: Make sure your oil is hot enough (medium-high heat) before adding the gorditas. If the temperature is too low, they’ll absorb oil instead of cooking. Too hot, and they’ll burn before cooking through.
- **The Blister Indicator**: Those little golden blisters that form on the surface are a sign you’re doing it right. They indicate the outside is cooking properly and creating that delicious texture.
- **Filling Options**: While I love chicken and carnitas, you can also fill these with sautéed mushrooms and cheese for vegetarians, chorizo and potatoes for a heartier option, or even just beans and cheese for the simplest version.
- **Make-Ahead Tip**: You can prepare the dough up to 2 hours in advance and keep it covered with a damp towel. You can also cook the gorditas ahead and reheat them in a 350°F oven for about 5 minutes before filling.
- **Storage**: Cooked gorditas can be stored in an airtight container in the refrigerator for up to 3 days. Reheat them in a skillet over medium heat for about 2 minutes per side to restore their softness.
- **Topping Bar Idea**: For parties, I set up all the toppings in separate bowls and let guests assemble their own. It’s interactive, fun, and everyone gets exactly what they want.
- **Authentic Variations**: In different regions of Mexico, gorditas are filled differently. Some are fried, some are baked, and some are cooked entirely on a griddle. This method is the most home-cook friendly.
- **Batch Cooking**: If making a large batch, you can keep finished gorditas warm in a 200°F oven wrapped in foil while you finish cooking the rest.