
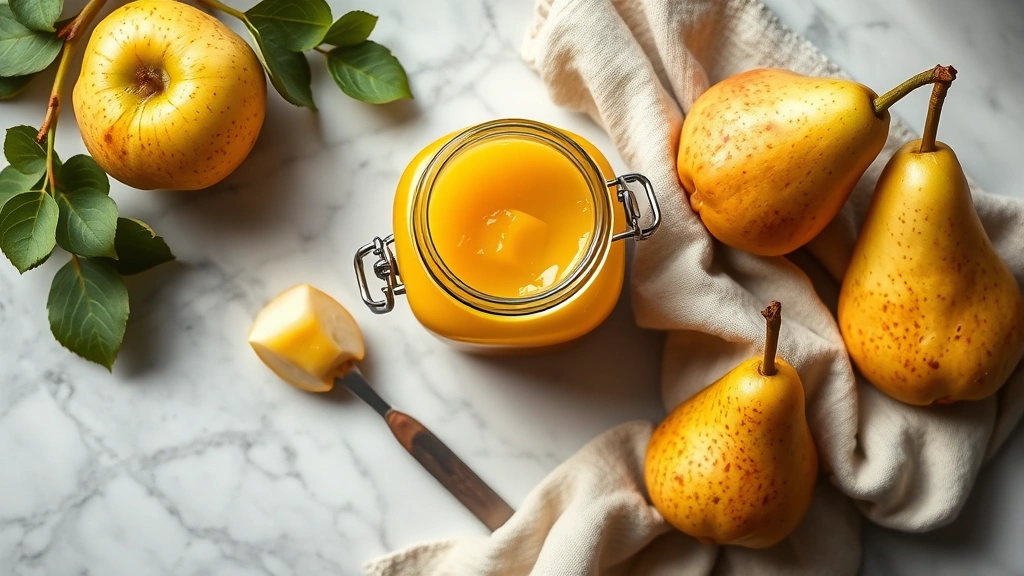
Pear butter is one of those elegant, homemade preserves that tastes infinitely better than anything store-bought, and honestly? It’s shockingly simple to make. This velvety spread captures the essence of ripe pears—sweet, fragrant, and utterly luxurious—in a way that makes your kitchen smell absolutely divine while it simmers away.
I first fell in love with pear butter at a farmers market in the fall, when the vendor let me taste it on a warm croissant. One bite and I was hooked. The buttery texture, the subtle spice notes, the way it melted on my tongue—I knew I had to recreate it at home. After some experimentation and plenty of taste-testing (which, let’s be honest, is the best part of recipe development), I’ve perfected a method that yields restaurant-quality results every single time.
What makes pear butter different from pear jam is the cooking time and texture. While jam contains fruit pieces and is set with pectin, butter is cooked down for hours until the fruit breaks down completely and becomes this gorgeous, spreadable consistency. It’s more concentrated, more flavorful, and honestly more impressive when you serve it to guests. The best part? You need just a handful of ingredients.
This recipe is perfect for late summer and early fall when pears are at their peak. I like to use a mix of Bosc and Bartlett pears—the Bosc adds complexity and depth, while the Bartlett contributes natural sweetness and helps the butter set properly. You’ll also want to invest in a good food mill or immersion blender, as these tools make achieving that silky texture almost effortless.
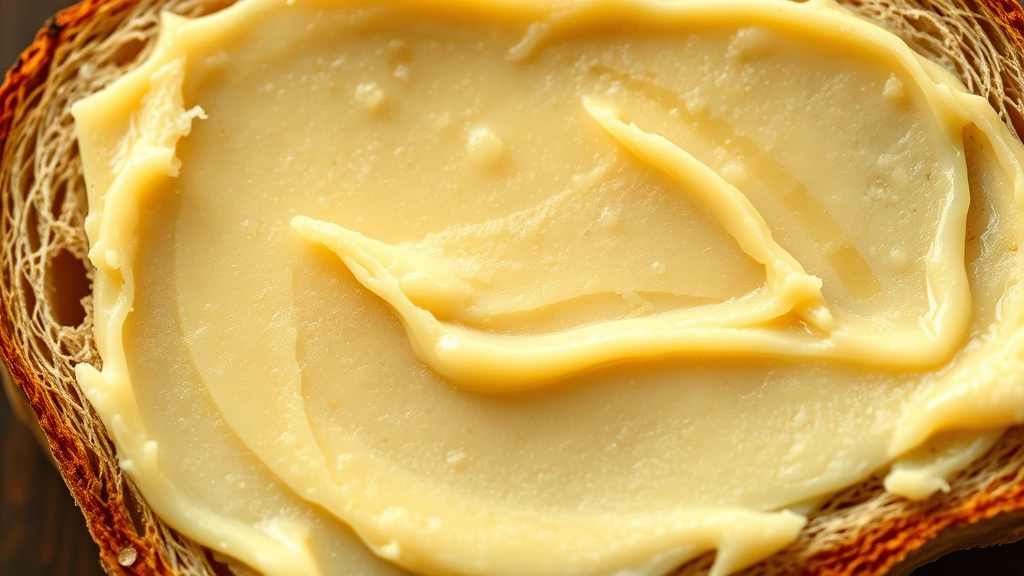
I serve this pear butter on English muffins, swirled into yogurt, spread on toast, or even as a sophisticated accompaniment to cheese boards. It’s also wonderful as a gift—jar it up in pretty mason jars with cute labels, and you’ve got something that looks store-bought but tastes infinitely better. For more inspiration on fruit butters and preserves, check out this Serious Eats guide to preserving, or explore more fall preserve recipes at Bon Appétit.
Ingredients
- 4 pounds fresh pears (a mix of Bosc and Bartlett), peeled, cored, and roughly chopped
- 1/2 cup water
- 1/2 cup granulated sugar
- 1/4 cup light brown sugar
- 2 tablespoons honey
- 1 tablespoon fresh lemon juice
- 1/2 teaspoon vanilla extract
- 1/4 teaspoon ground cinnamon
- 1/8 teaspoon ground nutmeg
- Pinch of sea salt
- 1/4 teaspoon ground ginger (optional, for extra warmth)
Instructions
- Prepare your pears by washing them thoroughly under cool running water. Peel each pear using a vegetable peeler or sharp knife, working over a large bowl to catch any juices. Cut the pears in half lengthwise and use a small spoon or melon baller to remove the core. Roughly chop the pears into 1-inch pieces—they’ll break down significantly during cooking, so uniform sizing isn’t critical at this stage.
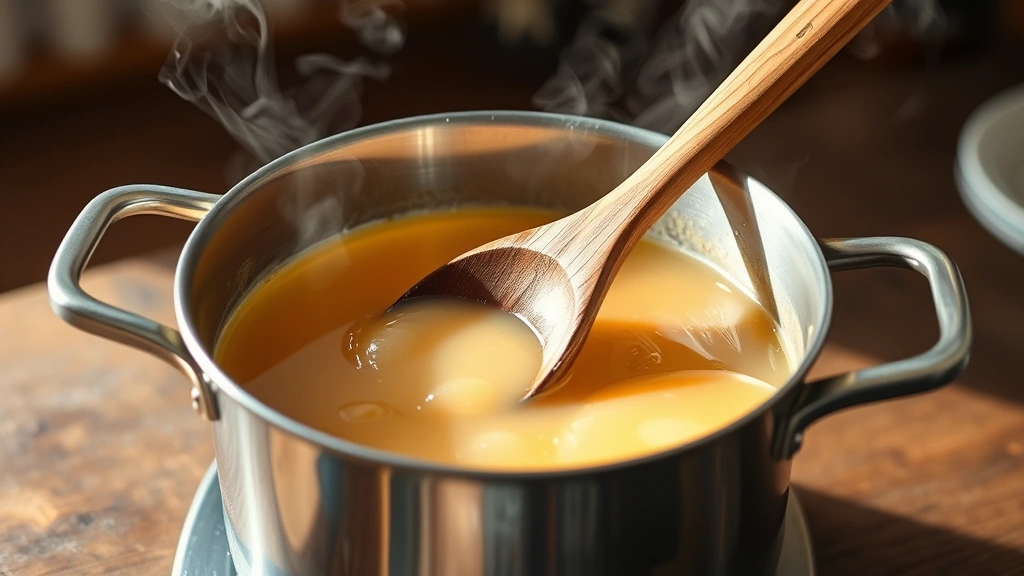
- Add the chopped pears and the water to a large, heavy-bottomed stainless steel or enameled Dutch oven or wide saucepan. The water helps prevent sticking during the initial cooking phase and helps the pears release their natural juices. Bring the mixture to a simmer over medium-high heat, stirring occasionally with a wooden spoon.
- Once the pears reach a gentle simmer, reduce the heat to medium and continue cooking, uncovered, for about 25-30 minutes, stirring every 5-10 minutes to ensure even cooking. The pears should break down significantly and become very soft. When you can easily mash the pears against the side of the pot with your spoon, they’re ready for the next step.
- Working in batches if necessary, carefully transfer the cooked pears to a food mill fitted with the fine disk, or use an immersion blender to puree the pears until completely smooth. If using a food mill, push the pears through in batches, scraping the bottom of the mill to ensure you get all the puree. This step removes any remaining fibers and creates that signature silky-smooth texture.
- Return the pear puree to your pot and stir in both sugars, the honey, lemon juice, vanilla extract, cinnamon, nutmeg, and salt. Stir well to combine all ingredients thoroughly. If you’re using the optional ground ginger, add it now. The mixture should be well combined and relatively smooth.
- Bring the pear mixture to a gentle simmer over medium heat. Reduce the heat to medium-low and let it simmer very gently, stirring frequently (every 8-10 minutes) to prevent sticking and scorching on the bottom. This slow, gentle cooking is crucial—rushing this step by cooking at too high a temperature can result in scorched pear butter. The butter should bubble gently and steadily.
- Continue cooking for approximately 1.5 to 2 hours, or until the mixture has reduced by about half and achieved a deep golden-brown color and thick, spreadable consistency. You’ll know it’s done when you drag a spoon through the butter and the trail stays separated for a moment before slowly filling back in. The mixture should coat the back of a spoon completely.
- To test for doneness, place a small spoonful of the pear butter on a chilled plate (keep a plate in your freezer for this purpose). Let it cool for 1-2 minutes. If it holds its shape and doesn’t weep liquid, it’s ready. If it’s too loose, continue cooking and retest every 10 minutes.
- Once the pear butter reaches the desired consistency, remove it from the heat and let it cool slightly for about 5 minutes, stirring occasionally to help release steam. While still warm, carefully ladle the pear butter into sterilized glass jars, leaving about 1/4 inch of headspace at the top.
- Wipe the rims of the jars clean with a damp cloth, then place the lids on top and screw the bands on until fingertip-tight (not overly tight, or they won’t seal properly). If you want shelf-stable pear butter, process the sealed jars in a boiling water bath for 10 minutes. Remove with jar tongs and let cool completely on a kitchen towel—you should hear the satisfying ‘pop’ of the lids sealing as they cool.
- Allow the pear butter to cool to room temperature before storing. Sealed jars will keep in a cool, dark pantry for up to one year. Once opened, refrigerate and use within 3-4 weeks. Unopened jars that didn’t seal properly should be refrigerated and used within 2-3 weeks.
Pro Tips
- **Choosing Your Pears**: The variety of pears you choose will affect both flavor and texture. Bosc pears have a more complex, slightly spicy flavor profile, while Bartlett pears are sweeter and more delicate. I recommend using about 60% Bosc and 40% Bartlett for the best balance, but you can adjust based on your preference.
- **Ripeness Matters**: Use pears that are ripe but still firm—avoid mushy pears, which will make watery butter. If your pears aren’t quite ripe, you can speed up the process by placing them in a paper bag with a ripe banana for 1-2 days.
- **The Importance of Patience**: Don’t rush the cooking process. Low and slow is the only way to achieve that deep, complex flavor and gorgeous color. High heat will cook it too quickly and result in lighter color and less developed flavor.
- **Preventing Scorching**: Stir frequently, especially toward the end of cooking when the mixture is thick and more prone to sticking. Use a heat-resistant silicone spatula to scrape the bottom and sides of the pot.
- **Flavor Variations**: Try adding a splash of brandy or bourbon during the last few minutes of cooking for an adult version. A star anise pod or a few cardamom seeds will add intriguing spice notes. Some people love adding a tablespoon of fresh thyme for herbal complexity.
- **Equipment Notes**: A wide, shallow pot is ideal because it increases the surface area, which helps the mixture reduce more efficiently. Avoid nonstick pans, which can be damaged by long cooking times and thick mixtures.
- **Storage and Gifting**: Pear butter makes an absolutely gorgeous gift. Take the time to use pretty jars, add beautiful labels with the date and flavor notes, and tie a ribbon around the top. Store in a cool, dark place—direct sunlight can fade the beautiful color over time.
- **Uses Beyond Toast**: Swirl into vanilla yogurt or whipped cream cheese, use as a filling for thumbprint cookies, glaze for roasted ham or pork chops, or serve alongside a cheese board with sharp cheddar or manchego.
- **Consistency Adjustments**: If your pear butter seems too thick after cooling, you can stir in a tablespoon or two of water or a splash of pear juice. If it’s too thin, return it to the pot and simmer for another 15-20 minutes.
- **No Water Bath Option**: If you prefer not to process your jars in a water bath, simply let them cool completely, refrigerate, and use within 2-3 weeks. The flavor will be just as delicious.