
Poached pears are the elegant dessert you’ve been dreaming of – and they’re surprisingly simple to make! This classic French technique transforms humble pears into a stunning, sophisticated treat that looks like it came straight from a Michelin-starred restaurant. The beauty of poaching is that the pears become incredibly tender while absorbing all the warm spices and subtle flavors from the cooking liquid. Whether you’re hosting a dinner party or treating yourself to something special, this poached pear recipe delivers restaurant-quality results with minimal effort.
I absolutely love making poached pears because they’re forgiving, elegant, and endlessly versatile. You can serve them warm or chilled, dress them up with whipped cream and chocolate, or keep them simple with just a drizzle of the reduced syrup. The cooking liquid becomes this gorgeous, glossy sauce that’s absolutely divine. Plus, your kitchen will smell absolutely heavenly while they cook – like a cozy French café.
The key to perfect poached pears is using firm pears that are just barely ripe, maintaining a gentle simmer (not a rolling boil), and giving them enough time to become tender and translucent. The poaching technique is one of the most valuable skills in your cooking arsenal, and once you master it with pears, you can apply it to apples, quinces, and even stone fruits. This recipe is foolproof, stunning, and absolutely worth making this week!
According to Bon Appétit’s poached pear guide, the secret is keeping your liquid at a gentle bubble. I also love the approach shared by Serious Eats, which emphasizes the importance of pear selection. For an in-depth technique tutorial, The New York Times cooking section has excellent step-by-step guidance. You can also explore chocolate pear pairings and vanilla bean variations for serving inspiration.
Ingredients
- 4 firm but ripe pears (Bosc or Anjou work beautifully)
- 2 cups water
- 1 cup dry white wine or additional water
- ¾ cup sugar
- 1 vanilla bean, split lengthwise (or 1 teaspoon vanilla extract)
- 3-4 whole star anise pods
- 2 cinnamon sticks, broken in half
- 4-5 whole cloves
- 2 strips fresh lemon zest
- 2 tablespoons fresh lemon juice
- 1 tablespoon honey
- Pinch of sea salt
- Optional: whipped cream or crème fraîche for serving
- Optional: fresh mint leaves for garnish
Instructions
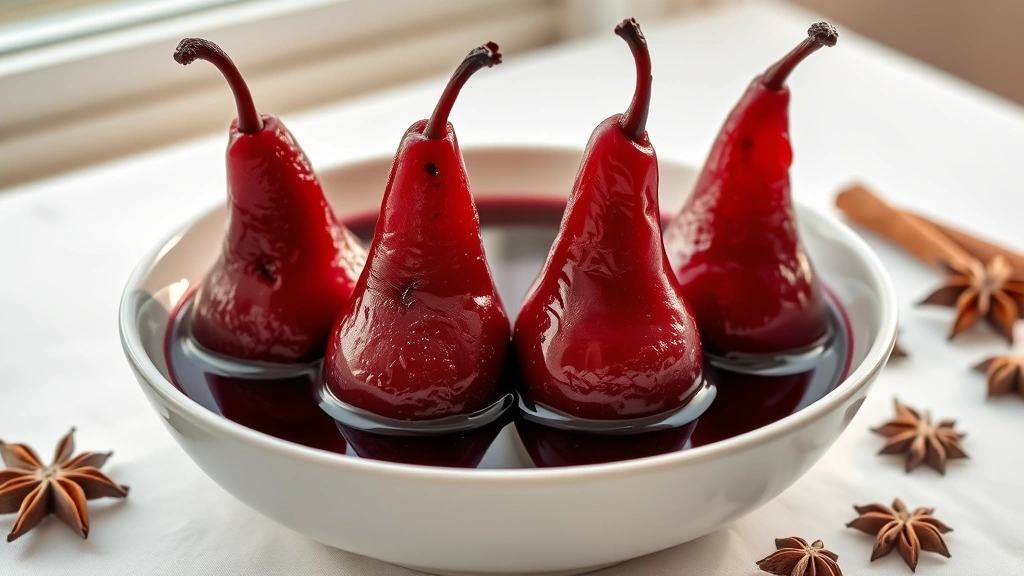
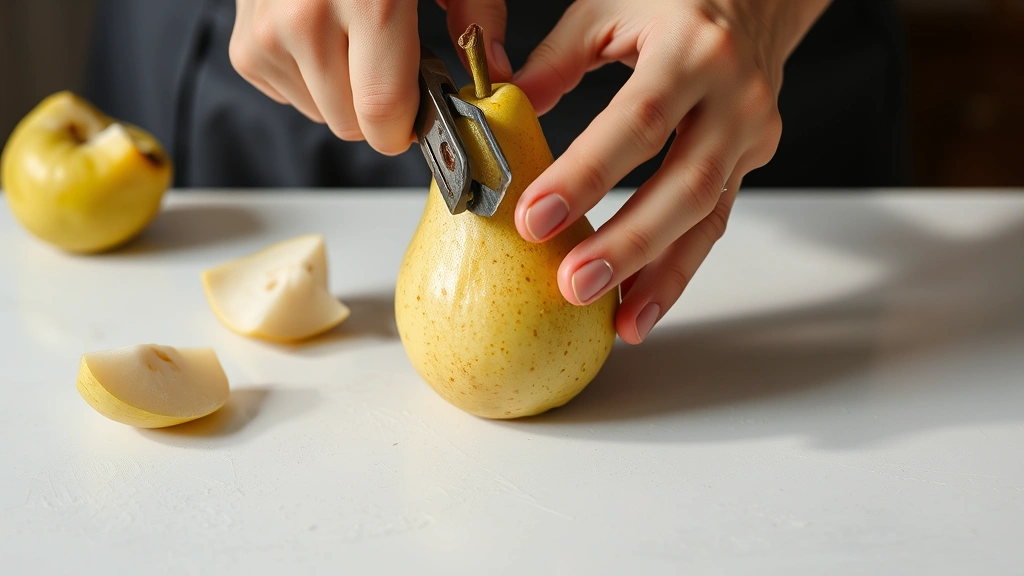
- Peel the pears using a vegetable peeler or small knife, working carefully to remove only the skin while keeping the pear intact. Leave the stems attached for a beautiful presentation – this is what gives poached pears their signature elegant look.
- Using a melon baller or small spoon, carefully scoop out the bottom core of each pear from the base, creating a small cavity. Try to remove just the seeds and fibrous center while keeping the pear shape intact. This prevents the pears from splitting and creates a nice serving vessel.
- In a large saucepan or Dutch oven, combine the water, white wine, and sugar. Stir over medium heat until the sugar dissolves completely, about 2-3 minutes – you want a clear, syrupy liquid with no granules remaining.
- Split the vanilla bean lengthwise using a small knife and scrape out the tiny black seeds, adding both the seeds and the pod to the poaching liquid. Add the star anise, cinnamon sticks, cloves, lemon zest, lemon juice, honey, and sea salt.
- Bring the poaching liquid to a gentle simmer over medium heat. You should see small, lazy bubbles breaking the surface – not a rolling boil. Let it simmer for about 5 minutes to allow all the spices to infuse their flavors into the liquid.
- Carefully place the peeled pears into the simmering liquid, standing them upright if possible, or laying them on their sides if they don’t fit. The liquid should come most of the way up the sides of the pears – if needed, add a bit more water.
- Reduce the heat to medium-low and maintain a very gentle simmer. You want barely any movement in the liquid. Cover the pan partially with a lid or place a parchment paper cartouche (circle of parchment with a small hole in the center) directly on the pears to keep them submerged and ensure even cooking.
- Poach for 25-30 minutes, depending on the size and ripeness of your pears. The pears are done when a fork or knife pierces them easily but they still hold their shape. They should be tender but not falling apart – think of the texture of perfectly cooked butter.
- Using a slotted spoon, carefully transfer the poached pears to a serving dish, standing them upright if possible for that gorgeous presentation. Set aside and let cool slightly.
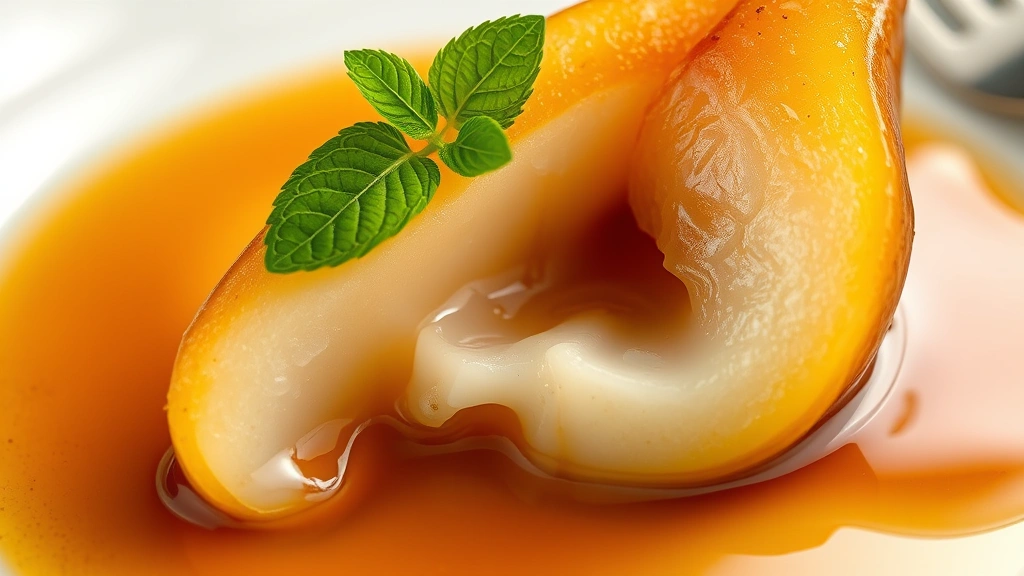
- Strain the poaching liquid through a fine-mesh sieve into a saucepan, discarding the spices and lemon zest. Bring the strained liquid to a boil over medium-high heat and simmer for 5-8 minutes until it reduces by about one-third and becomes slightly syrupy. This reduction concentrates all the flavors into a glossy sauce.
- Pour the warm reduction over and around the cooled pears. You can serve them warm or refrigerate them for up to 3 days. The pears will continue to absorb the flavors and develop a beautiful deep red or purple hue from the wine and spices.
- When ready to serve, spoon additional poaching liquid around each pear, top with a dollop of whipped cream or crème fraîche if desired, and garnish with fresh mint leaves for a pop of color and freshness.
Pro Tips
- **Pear Selection**: Choose pears that are firm but just barely ripe – they should yield slightly to pressure but not be mushy. Bosc pears are my absolute favorite because they hold their shape beautifully, but Anjou, Comice, or Bartlett pears work wonderfully too. Avoid overly ripe pears as they’ll become mushy during poaching.
- **Wine Choices**: While dry white wine is traditional and creates a gorgeous amber color, you can substitute red wine for a deeper, more dramatic appearance. You can also use all water if you prefer a non-alcoholic version – the pears will still be delicious, just slightly lighter in flavor.
- **Spice Customization**: The spice blend is quite flexible! Love cardamom? Add 3-4 crushed pods. Prefer more warmth? Add a pinch of ground nutmeg or ginger. Want it more subtle? Use fewer spices or skip the star anise. The beauty of this recipe is that you can tailor it to your preferences.
- **Make-Ahead Magic**: These pears are actually better made 1-2 days ahead! They continue to absorb flavors and develop deeper color as they sit in the refrigerator. Store them in an airtight container in their poaching liquid for up to 5 days. You can also freeze them in their poaching liquid for up to 3 months.
- **Serving Suggestions**: Serve warm with vanilla ice cream for an elegant contrast, or chilled with whipped cream for a lighter presentation. They’re stunning on their own, but also gorgeous served over pound cake, alongside soft cheeses, or with dark chocolate sauce drizzled over top.
- **Syrup Uses**: Don’t waste that gorgeous poaching liquid! Use it to sweeten tea, drizzle over pancakes, swirl into yogurt, or even use it as a base for poaching more fruit. It’s liquid gold in your kitchen.
- **Troubleshooting**: If your pears are cooking too fast and falling apart, lower the heat further – you want the gentlest simmer possible. If they’re taking much longer than 30 minutes, they may have been too firm; give them more time but be patient. If the skin splits during peeling, don’t worry – it adds character and the pears will still be delicious!
- **Vanilla Bean**: If you can’t find vanilla beans or prefer to avoid them, use 1-2 teaspoons of pure vanilla extract added at the end of cooking. Fresh vanilla beans add incredible depth, but extract is a wonderful substitute.
- **Scaling the Recipe**: This recipe doubles beautifully if you’re entertaining a larger crowd. Simply multiply all ingredients by the number of servings you need. The cooking time remains approximately the same as long as you maintain a gentle simmer.