
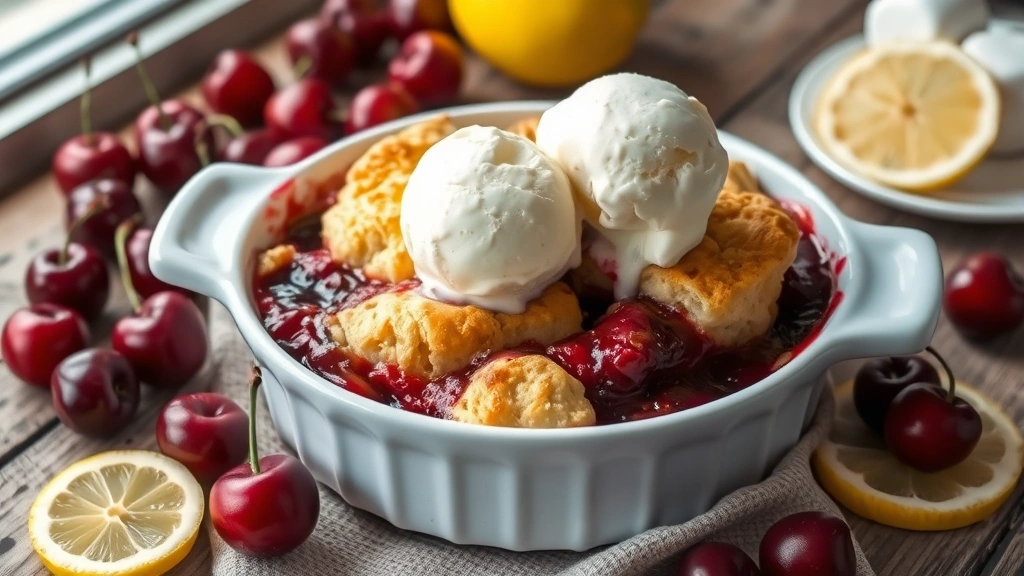
Cherry cobbler is the ultimate summer dessert—warm, bubbly, and absolutely irresistible with a scoop of vanilla ice cream melting on top. This recipe is refreshingly simple, requiring just fresh cherries, basic pantry staples, and about 15 minutes of prep work before the oven does all the magic. What makes this cherry cobbler so special is the balance between tart, juicy fruit filling and a buttery, tender topping that becomes golden and crispy as it bakes. Whether you’re using fresh cherries from the farmers market or high-quality frozen ones, this dessert delivers restaurant-quality results every single time.
I’ve been making this cobbler for years, and it never fails to impress guests at summer gatherings, picnics, and family dinners. The beauty of a cobbler lies in its rustic charm—it doesn’t need to look perfect because it’s meant to be homey and comforting. The fruit filling is naturally sweetened with just enough sugar to balance the cherries’ natural tartness, while a hint of almond extract and fresh lemon juice elevate the flavor profile in the most delightful way. Learn more about classic fruit cobbler variations to customize this recipe to your taste preferences.
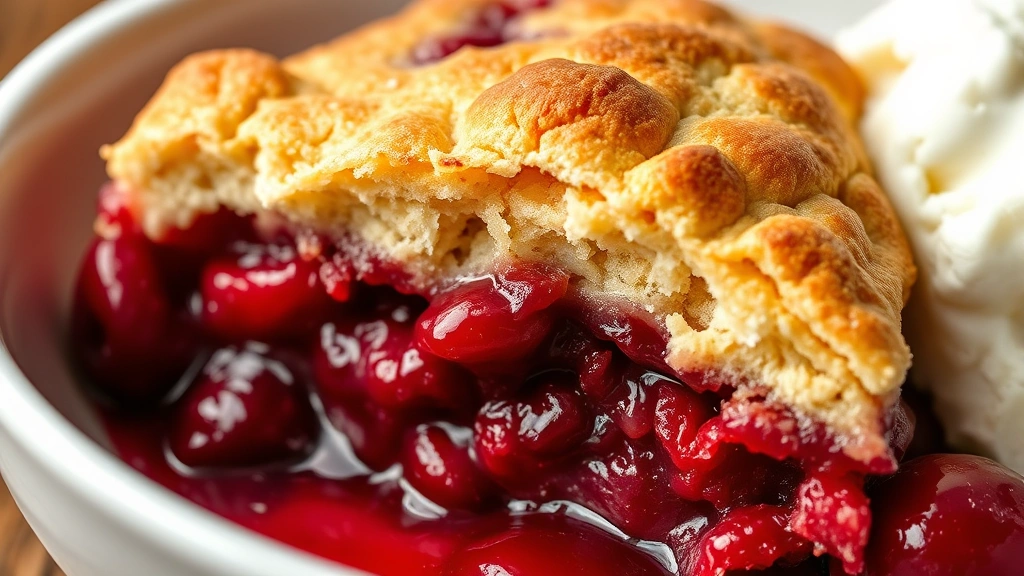
The topping is where this recipe truly shines. Instead of a traditional pie crust or biscuit topping, we’re using a simple drop-biscuit style topping made with flour, sugar, baking powder, salt, cold butter, and milk. When you dollop these biscuits over the cherry filling, they bake up golden brown with a tender crumb and slightly crispy edges. The contrast between the warm, jammy cherries and the buttery biscuits is absolutely heavenly. Discover more cherry baking techniques here to expand your dessert repertoire.
What I love most about this recipe is its flexibility. You can make it in a standard 9×13 baking dish for a crowd, or divide it into individual ramekins for an elegant single-serve presentation. You can prepare it ahead of time and bake it right before serving, or bake it in advance and reheat it gently before dessert time. The cobbler actually tastes even better the next day as the flavors meld together and the filling becomes even more concentrated. Master cobbler-making with our complete guide for foolproof results every time.
This cherry cobbler recipe serves 8-10 people generously, making it perfect for summer entertaining. The prep time is minimal—mostly pitting cherries—and once everything goes into the oven, you’re free to set the table, prepare other dishes, or simply relax knowing dessert is taken care of. The aroma that fills your kitchen as it bakes is absolutely intoxicating and will have everyone eagerly anticipating the final product.
For the best results, use fresh, ripe cherries when they’re in season (June through August), though frozen cherries work beautifully too and eliminate the tedious pitting process. Some people prefer tart cherries for their pronounced flavor, while others like a mix of sweet and tart varieties. If you can only find sweet cherries, simply add a tablespoon or two of fresh lemon juice to brighten the filling. Bon Appétit’s take on cherry cobbler techniques offers additional professional tips.
The spice profile here is intentionally subtle—we’re letting the cherries be the star. A tiny pinch of nutmeg and the warmth of almond extract complement the fruit without overpowering it. If you prefer more spiced flavors, feel free to add a touch of cinnamon or cardamom to suit your preferences. Some bakers like to add a cornstarch slurry to thicken the filling, but I find that fresh cherries release enough juice naturally to create the perfect consistency without any thickening agents.
Serving suggestions are endless. Vanilla ice cream is the classic pairing, but you could also serve it with freshly whipped cream, crème fraîche, or even a dollop of Greek yogurt for a lighter option. A warm cherry cobbler with cold ice cream is the perfect temperature contrast and flavor combination. For entertaining, I often prepare the cherry filling the morning of, keep it refrigerated, and add the biscuit topping just before baking so everything is warm and fresh from the oven.
Explore more summer berry dessert options when you want to ring changes on this classic. This recipe proves that some of the best desserts don’t require complicated techniques or hard-to-find ingredients—just quality fruit, simple components, and a little bit of love. Whether this is your first cobbler or your hundredth, this recipe will deliver consistent, delicious results that feel special and homemade. The combination of juicy cherries, buttery biscuit topping, and pure joy in every bite makes this the best cherry cobbler recipe you’ll ever make.
Serious Eats’ cherry cobbler recipe offers a scientific approach to cobbler-making. The New York Times cherry cobbler provides another trusted perspective on this classic dessert.
Ingredients
- 4 pounds fresh cherries, pitted (or 4 cups frozen cherries, thawed)
- ¾ cup granulated sugar
- 2 tablespoons fresh lemon juice
- ½ teaspoon almond extract
- ¼ teaspoon freshly grated nutmeg
- Pinch of salt
- 1½ cups all-purpose flour
- ¼ cup granulated sugar (for topping)
- 2 teaspoons baking powder
- ½ teaspoon salt
- 6 tablespoons cold unsalted butter, cubed
- ½ cup whole milk
- 1 tablespoon coarse sugar for sprinkling (optional)
Instructions
- Preheat your oven to 375°F (190°C). Lightly butter a 9×13-inch baking dish and set aside.
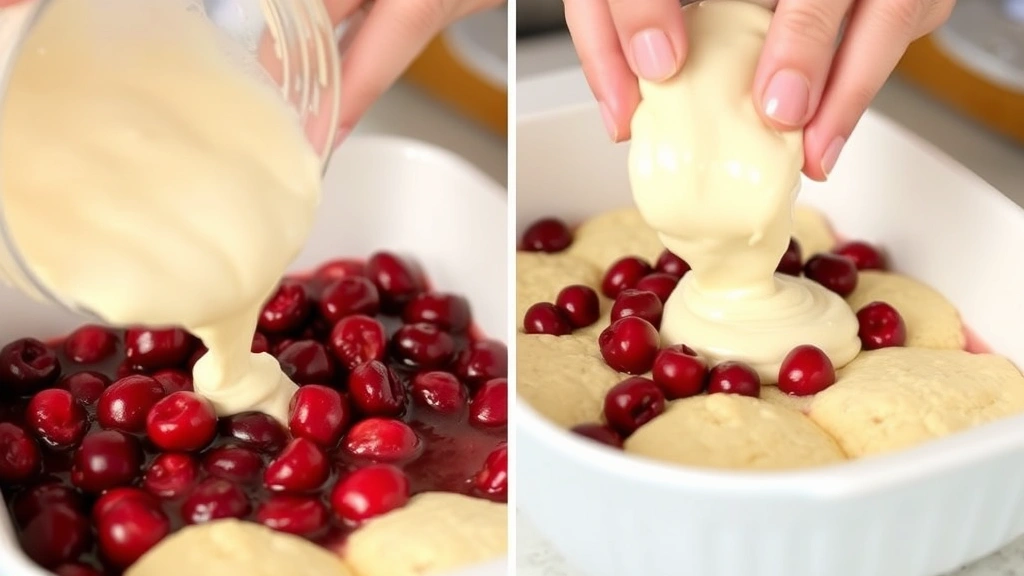
- In a large bowl, combine the pitted cherries, ¾ cup granulated sugar, lemon juice, almond extract, nutmeg, and a pinch of salt. Gently toss until the cherries are evenly coated and let sit for 5 minutes to allow the juices to release.
- Pour the cherry mixture into the prepared baking dish, spreading it in an even layer. If the filling seems very wet, you can drain off some liquid, though this is typically not necessary.
- In a medium bowl, whisk together the flour, ¼ cup sugar, baking powder, and ½ teaspoon salt until well combined.
- Add the cold cubed butter to the flour mixture and use a pastry cutter, two knives, or your fingertips to work the butter into the flour until the mixture resembles coarse breadcrumbs with some pea-sized pieces of butter remaining.
- Pour the milk into the flour-butter mixture and stir with a fork until just combined—the batter should be slightly lumpy and thick, not smooth.
- Using a spoon or small ice cream scoop, drop dollops of the biscuit batter over the cherry filling, spacing them about 1 inch apart. You don’t need to cover every spot of fruit—the cobbler topping should have some gaps to allow steam to escape.
- If desired, sprinkle the coarse sugar over the biscuit topping for added texture and visual appeal.
- Bake for 35-40 minutes, until the biscuit topping is golden brown and the cherry filling is bubbling around the edges of the dish.
- Remove from the oven and let the cobbler rest for 10-15 minutes before serving. This allows the filling to set slightly and makes serving easier.
- Scoop the warm cobbler into bowls and serve with vanilla ice cream, whipped cream, or your favorite topping.
Pro Tips
- **Cherry Selection**: Fresh cherries are ideal during peak season (June-August), but frozen cherries work beautifully year-round. If using frozen cherries, thaw them completely and drain any excess liquid before proceeding.
- **Pitting Cherries**: Use a cherry pitter tool to make quick work of removing the pits. Alternatively, you can use a small knife or even a chopstick to push the pit out, though this method is more time-consuming.
- **Make-Ahead Option**: Prepare the cherry filling up to 4 hours ahead and refrigerate. Make the biscuit topping just before baking for the best texture, or prepare it separately and drop it over the cold filling right before putting the cobbler in the oven.
- **Frozen Preparation**: This cobbler can be assembled completely (without baking) and frozen for up to 2 months. Bake directly from frozen, adding 10-15 minutes to the baking time.
- **Spice Variations**: Add ¼ teaspoon ground cinnamon or a pinch of cardamom to the cherry filling for warm spice notes, or stick with the subtle almond extract for a more delicate flavor profile.
- **Filling Consistency**: Fresh cherries naturally release enough juice to create a jammy filling. If your filling seems too thick after baking, it’s because the cherries didn’t release as much liquid as expected—this is actually fine and results in a thicker, more concentrated filling.
- **Topping Variations**: For a different topping, use drop-biscuit batter mixed with cornmeal for added texture, or substitute the milk with buttermilk for a tangier flavor and more tender crumb.
- **Individual Servings**: Divide the cherry mixture among 8-10 ramekins (about ½ cup each) and top with a small dollop of biscuit batter. Bake for 20-25 minutes until golden brown.
- **Serving Temperature**: Serve the cobbler warm or at room temperature with ice cream, whipped cream, crème fraîche, or plain Greek yogurt for a lighter option.
- **Storage**: Cover leftovers loosely and store at room temperature for up to 2 days, or refrigerate for up to 4 days. Reheat gently in a 300°F oven for about 15 minutes before serving.