
There’s something absolutely magical about halloumi skewers – they’re crispy on the outside, gloriously melty on the inside, and utterly irresistible! I’m obsessed with this recipe because it’s so simple yet delivers restaurant-quality results every single time.
Halloumi is one of my favorite cheeses to cook with because of its high melting point, which means it holds its shape beautifully whether you’re grilling, pan-searing, or broiling it. These skewers are the perfect appetizer for entertaining, and honestly, they’re so delicious that they often don’t even make it to the table before everyone’s sneaking bites straight from the pan!
I love pairing these with pickled red onions for a pop of color and tang, or serving them alongside a fresh Greek salad. You can also get creative with your skewer combinations – I’ve done halloumi with shishito peppers and cherry tomatoes for a gorgeous presentation.
The key to the BEST halloumi skewers is getting that beautiful golden crust while keeping the cheese creamy inside. According to Serious Eats, the secret is using high heat and not moving the skewers around too much – let that cheese develop that gorgeous caramelization! For more inspiration on Mediterranean appetizers, check out Bon Appétit‘s collection of Greek and Mediterranean recipes. New York Times Cooking also has some fantastic variations on cheese skewers that are worth exploring.
These skewers are perfect for summer entertaining, game day gatherings, or even a sophisticated appetizer course. They’re naturally gluten-free, vegetarian, and absolutely crowd-pleasing. Whether you’re grilling outdoors or cooking indoors on a grill pan, this recipe will become your go-to!
Ingredients
- 1 pound halloumi cheese, cut into ¾-inch thick slices
- 8 wooden or metal skewers (if using wooden, soak in water for 30 minutes)
- 2 tablespoons olive oil
- 1 tablespoon fresh lemon juice
- 2 cloves garlic, minced
- 1 teaspoon dried oregano
- ½ teaspoon red pepper flakes
- ¼ teaspoon sea salt
- ¼ teaspoon black pepper
- Fresh cherry tomatoes for skewering (optional)
- Fresh bell peppers, cut into chunks (optional)
- Fresh red onion, cut into chunks (optional)
- Fresh mint leaves for garnish
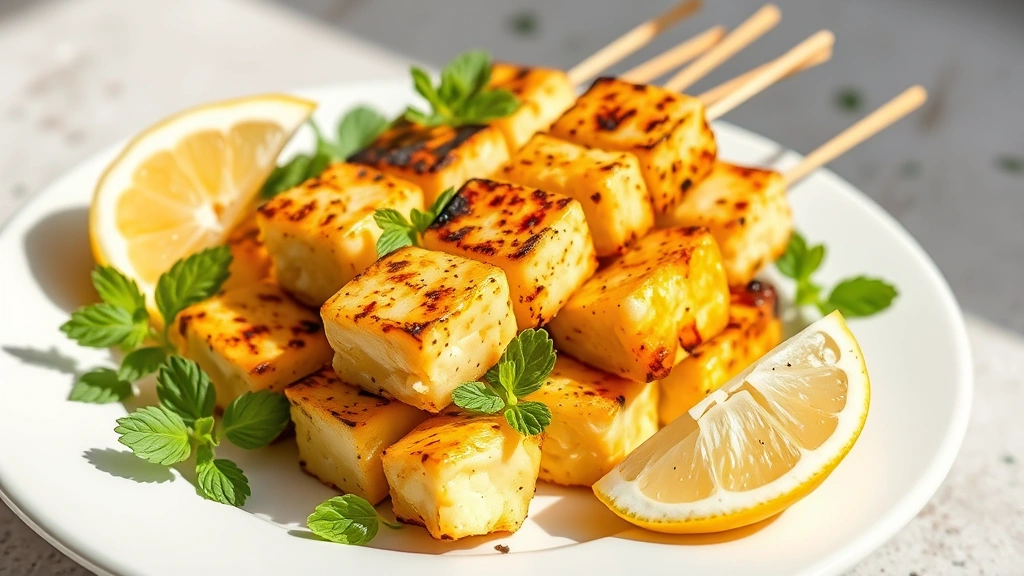
- Lemon wedges for serving

Instructions
- Prepare your skewers: If using wooden skewers, submerge them in water and let soak for at least 30 minutes to prevent burning during cooking.
- Cut the halloumi cheese into ¾-inch thick slices, then cut each slice in half to create rectangular pieces that are perfect for skewering.
- In a small bowl, whisk together olive oil, fresh lemon juice, minced garlic, dried oregano, red pepper flakes, sea salt, and black pepper to create your marinade.
- Thread the halloumi pieces onto your skewers, alternating with any optional vegetables like cherry tomatoes, bell peppers, or red onion chunks if desired – I typically do 2-3 pieces of halloumi per skewer.
- Using a pastry brush, generously coat all sides of the halloumi and vegetables with the prepared marinade, making sure to get into all the crevices.
- Heat a grill pan or cast-iron skillet over medium-high heat until it’s smoking hot – this is crucial for getting that beautiful golden crust on your halloumi.
- Carefully place the skewers on the hot grill pan, working in batches if necessary to avoid overcrowding.
- Cook for 2-3 minutes on the first side without moving them around – let them develop that gorgeous caramelized crust.
- Flip the skewers carefully using tongs and cook for another 2-3 minutes on the second side until the halloumi is golden brown and has started to soften slightly.
- Transfer the cooked skewers to a serving platter and garnish with fresh mint leaves and serve immediately with lemon wedges on the side.

Pro Tips
- Halloumi has a much higher melting point than most cheeses (around 400°F or 200°C), which is why it’s perfect for cooking – it will soften and become creamy inside but won’t completely melt and run all over your pan
- If you can’t find halloumi, you can substitute with saganaki (Greek fried cheese) or even thick slices of fresh mozzarella, though the texture won’t be quite the same
- Don’t skip the soaking step for wooden skewers – it really does make a difference in preventing them from catching fire on the grill
- The marinade can be made up to 2 hours in advance and stored in the refrigerator, making this a great make-ahead appetizer
- For extra flavor, try adding fresh herbs like thyme or rosemary to your marinade
- These skewers are best served immediately while the cheese is still warm and creamy inside – they firm up as they cool
- If grilling outdoors, use a grill basket or place the skewers perpendicular to the grates to prevent them from falling through
- Leftovers can be stored in an airtight container in the refrigerator for up to 3 days and reheated gently in a skillet, though they’re honestly best enjoyed fresh
- For a Mediterranean twist, serve alongside tzatziki sauce or a simple yogurt-based dipping sauce
- You can prepare the skewers up to 4 hours in advance, cover them with plastic wrap, and store in the refrigerator until ready to cook
- These are naturally vegetarian and can easily be adapted for dairy-free diets by using dairy-free halloumi alternatives
- The wooden skewers should be soaked for at least 30 minutes, though overnight soaking is even better for maximum hydration