
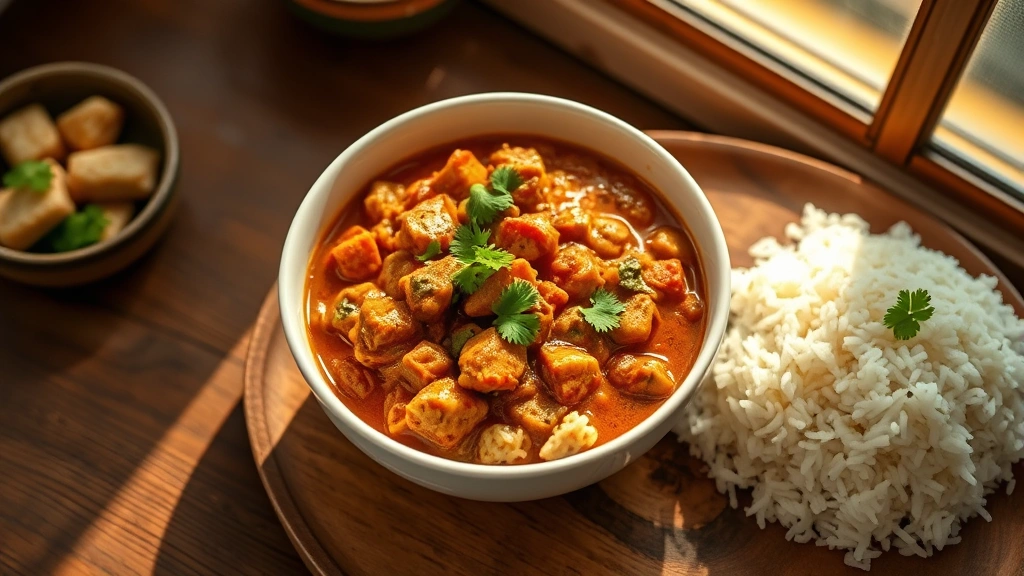
There’s something absolutely magical about a steaming bowl of chole chana masala—that perfect blend of warm spices, tender chickpeas, and a rich, aromatic tomato-based sauce that just makes you feel cozy from the inside out. This beloved Indian classic has been a staple in households for generations, and honestly, once you master this recipe, you’ll be making it on repeat.
I grew up watching my grandmother make this dish, and the secret she always shared was patience with the spices and quality ingredients. The beauty of chole chana masala is that it’s naturally vegetarian, protein-packed, and incredibly satisfying—whether you’re serving it for a weeknight dinner or impressing guests at a dinner party.
What makes the BEST chole chana masala is the layering of flavors. It’s not just about dumping ingredients into a pot; it’s about building complexity with each step. You’re going to toast your spices, caramelize your onions, and let everything simmer together until the flavors meld into something absolutely spectacular. This recipe serves 4-6 people and is perfect served with fluffy basmati rice or warm naan bread.
If you love this recipe, you might also enjoy making Best Chickpea Salad Recipe for a lighter lunch option, or try Perfect Pickled Red Onions Recipe as a fresh topping. For more Indian-inspired comfort food, check out our collection of authentic spiced dishes.
Let me walk you through making restaurant-quality chole chana masala in your own kitchen. The key is not rushing the process—good food takes time, and this dish is worth every minute. Once you taste the difference that proper spice toasting and slow simmering makes, you’ll never go back to quick shortcuts. This is the kind of dish that gets better as it sits, so don’t hesitate to make it a day ahead.
For authentic flavor guidance, I recommend checking out Serious Eats for their deep dives into Indian cooking techniques, and Bon Appétit for contemporary takes on classic recipes. The New York Times Cooking section also has wonderful resources for understanding Indian spice profiles.
Ingredients
- 3 tablespoons ghee or vegetable oil
- 1 large yellow onion, finely diced
- 4 cloves garlic, minced
- 1 tablespoon fresh ginger, minced
- 2 teaspoons cumin seeds
- 1 teaspoon coriander seeds
- 1 teaspoon fennel seeds
- 1/2 teaspoon fenugreek seeds
- 2 dried red chilies, broken into pieces
- 1 teaspoon ground turmeric
- 2 teaspoons ground coriander
- 1 teaspoon ground cumin
- 1 tablespoon garam masala
- 1 teaspoon red chili powder (adjust to taste)
- 1 can (28 ounces) crushed tomatoes
- 2 cans (15 ounces each) chickpeas, drained and rinsed (or 3 cups cooked dried chickpeas)
- 1 cup vegetable broth or water
- 1 teaspoon salt, plus more to taste
- 1/2 teaspoon black pepper
- 1 teaspoon sugar (optional, to balance acidity)
- 1/2 cup heavy cream or coconut milk (optional, for richness)
- Fresh cilantro, chopped, for garnish
- Juice of 1/2 lime or lemon
- Additional ghee for finishing (optional)
Instructions
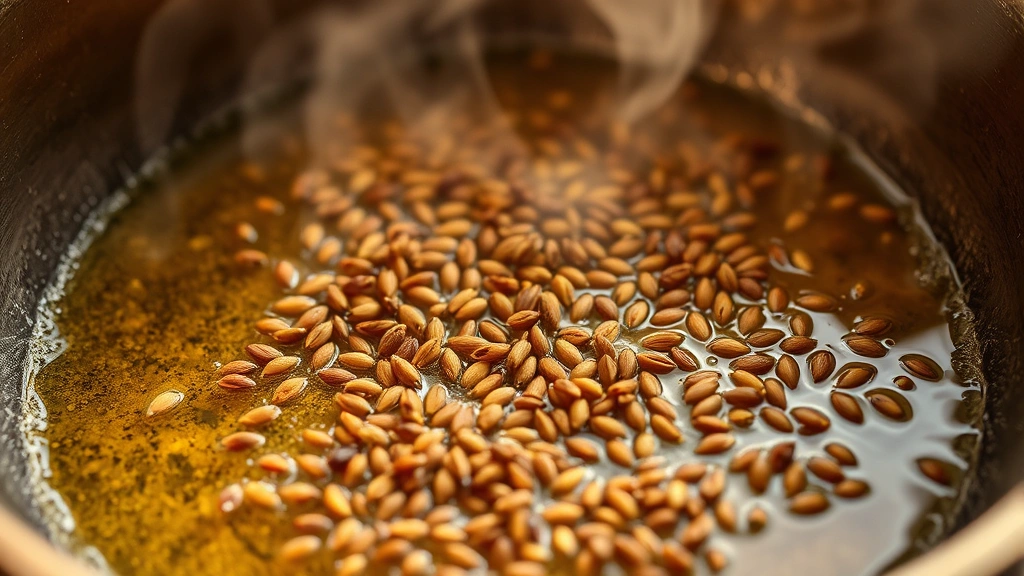
- Heat the ghee in a large, heavy-bottomed pot over medium heat. Allow it to shimmer but not smoke—we want the oil hot enough to bloom our spices but not so hot that it burns them.
- Add the cumin seeds, coriander seeds, fennel seeds, and fenugreek seeds to the hot ghee. Let them toast for about 1-2 minutes, stirring occasionally, until fragrant. You’ll know they’re ready when the aroma becomes intoxicating and the seeds begin to dance in the oil.
- Add the dried red chilies to the blooming seeds and toast for another 30 seconds, then immediately add the diced onion. This prevents the spices from burning and allows the onion to absorb all those toasted flavors.
- Cook the onion for 8-10 minutes, stirring frequently, until it becomes soft, translucent, and begins to caramelize at the edges. This step is crucial—don’t rush it. The caramelized onion forms the flavor base of your entire dish.
- Add the minced garlic and ginger to the onion mixture and cook for 2-3 minutes, stirring constantly, until fragrant. You should smell that beautiful garlic-ginger aroma that signals you’re on the right track.
- Reduce heat to medium-low and add the ground turmeric, ground coriander, ground cumin, and red chili powder. Stir constantly for about 1 minute to cook out the raw spice flavor and allow the spices to bloom in the oil. This ‘spice blooming’ step is what separates good curry from great curry.
- Pour in the crushed tomatoes and their juices, scraping the bottom of the pot to incorporate all those flavorful browned bits. Stir well to combine everything into a fragrant paste.
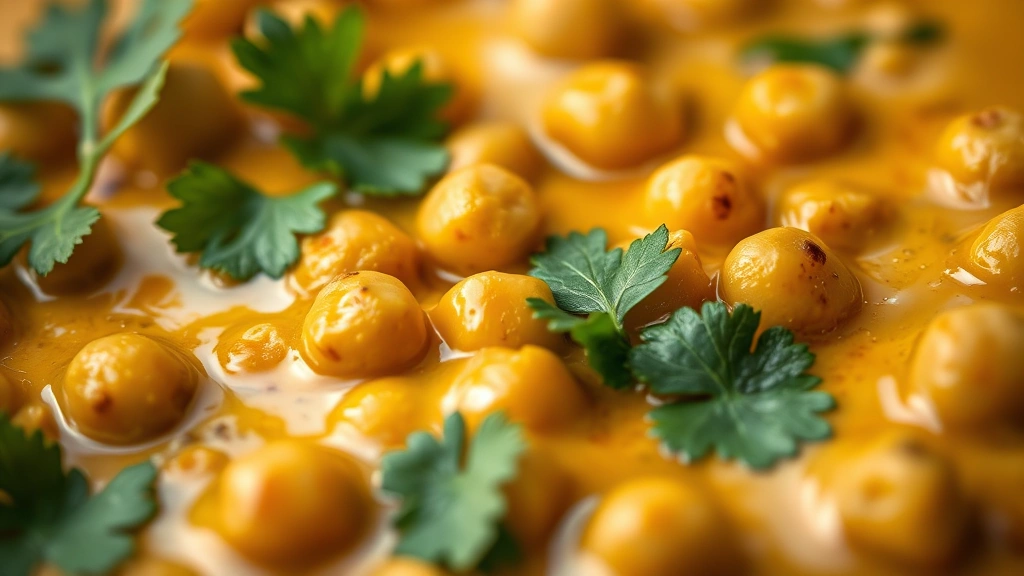
- Add the drained chickpeas and vegetable broth to the pot. Stir thoroughly to distribute the spices evenly throughout. Bring the mixture to a gentle simmer.
- Reduce heat to low and let the chana masala simmer uncovered for 20-25 minutes. During this time, the flavors will meld together, the sauce will thicken slightly, and the chickpeas will absorb all those delicious spices. Stir occasionally to prevent sticking.
- Taste the curry and adjust seasonings as needed. Add salt, black pepper, and additional chili powder if you prefer more heat. If the sauce seems too acidic, stir in the optional teaspoon of sugar to balance the flavors.
- If using cream or coconut milk, stir it in during the last 2 minutes of cooking. This adds richness and a beautiful creamy texture without overwhelming the spices.
- Add the garam masala and juice of lime or lemon, stirring well. These final additions brighten the dish and add complexity. Some people prefer adding these at the very end for maximum aromatic impact.
- Transfer the chole chana masala to a serving bowl or individual bowls. Garnish generously with fresh cilantro and a drizzle of ghee if desired. Serve immediately with basmati rice, naan, or roti.
- Any leftover curry keeps beautifully in the refrigerator for 3-4 days and actually tastes even better the next day as the flavors continue to develop. Reheat gently on the stovetop, adding a splash of water or broth if needed.
Pro Tips
- The most important step in making excellent chole chana masala is toasting your whole spices before adding ground spices. This releases their essential oils and creates a much more complex, authentic flavor profile.
- If you can’t find whole fenugreek seeds, you can skip them, but they add a subtle sweetness that’s characteristic of the best chole masala. Check Indian markets or online specialty retailers.
- Using homemade or high-quality vegetable broth makes a noticeable difference in the final flavor. Avoid overly salty broths, as the salt content can throw off your seasoning balance.
- Don’t skip the step of caramelizing the onions. This develops deep, complex sweetness that’s essential to the dish. It takes longer than you might think—aim for 8-10 minutes of cooking.
- For a more traditional preparation, soak dried chickpeas overnight and cook them from scratch. Canned chickpeas are convenient and work well, but dried chickpeas often have a better texture and absorb more flavor.
- The cream or coconut milk is optional but highly recommended if you want restaurant-quality richness. However, this dish is also delicious without it for a lighter version.
- Leftover chana masala is fantastic the next day. The flavors deepen and become more integrated overnight. Reheat gently to avoid breaking down the chickpeas further.
- This dish freezes beautifully for up to 3 months. Cool completely before transferring to freezer-safe containers. Thaw overnight in the refrigerator and reheat gently.
- Serve with warm basmati rice, naan, roti, or even with crusty bread to soak up every last bit of sauce. Some people enjoy it over baked sweet potatoes for extra nutrition.
- Customize the heat level by adjusting the red chili powder and fresh chilies. For a milder version, use less chili powder and remove the seeds from the dried chilies before toasting.
- Fresh lime juice at the end is non-negotiable—it brightens all the spices and prevents the dish from tasting flat or heavy.