

Making fresh mozzarella at home is easier than you’d think, and the results are absolutely divine! This simple recipe yields creamy, delicate cheese that’s perfect for a classic caprese salad. With just a few ingredients and about 30 minutes, you’ll have restaurant-quality fresh mozzarella that tastes infinitely better than store-bought versions.
Fresh mozzarella is a stretched-curd cheese that requires minimal aging and can be made in your own kitchen with stunning results. The process is almost meditative—heating, stretching, and shaping the curds into those gorgeous white orbs. What makes homemade mozzarella special is the ability to control the quality of ingredients and enjoy it at peak freshness, still warm from your hands if you’d like.
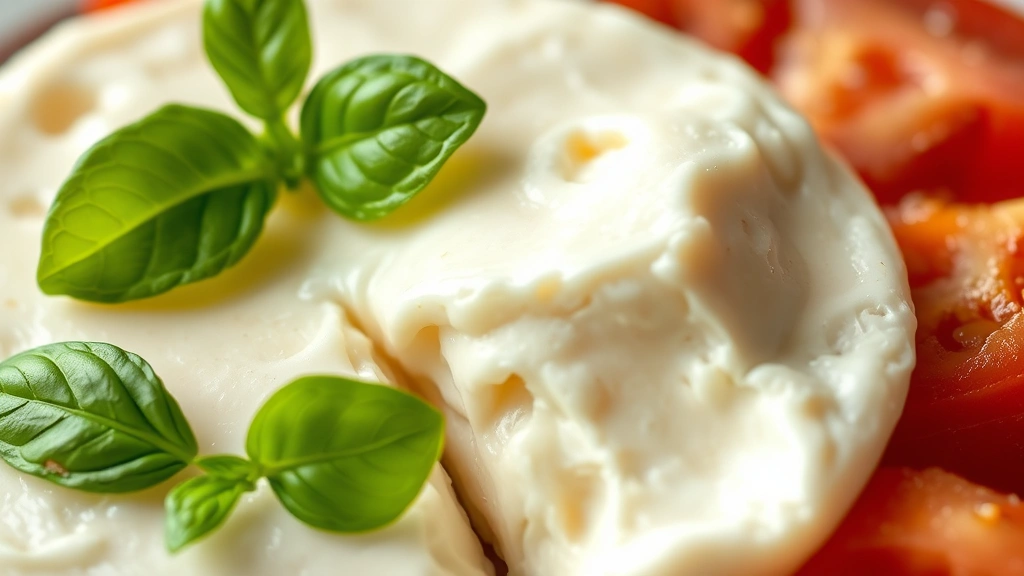
This fresh mozzarella recipe is perfect for summer entertaining. Pair it with vine-ripened tomatoes, fresh basil, and a drizzle of quality olive oil for an elegant appetizer that guests will absolutely adore. The beauty of homemade mozzarella is its delicate, milky flavor and tender texture—qualities that shine brightest when served simply and fresh.
Beyond caprese, fresh mozzarella is incredibly versatile. Try it on creamy pasta dishes, stuffed into roasted peppers, or simply enjoyed with crusty bread. You can even experiment with infusing it with herbs, garlic, or sun-dried tomatoes for custom variations. The satisfaction of creating this cheese from scratch is unmatched, and once you master the basic technique, you’ll be making it regularly.
According to Serious Eats’ comprehensive guide, the key to perfect mozzarella is maintaining proper temperature throughout the process. Bon Appétit’s mozzarella recipe emphasizes the importance of quality milk and patience with the stretching stage. For detailed technique refinement, The New York Times offers excellent troubleshooting tips. Whether you’re a cheese-making novice or experienced in the kitchen, this recipe will guide you to success with clear, manageable steps that produce consistently beautiful results every single time.
Ingredients
- 1 gallon whole milk (not ultra-pasteurized)
- 1½ teaspoons liquid rennet (or ½ teaspoon tablet rennet dissolved in cool water)
- ¼ teaspoon lipase powder dissolved in ¼ cup cool water (optional, for tangier flavor)
- 1½ teaspoons salt
- ¼ teaspoon white vinegar
- Water for heating and ice bath
Instructions
- Pour the milk into a large stainless steel pot and slowly heat to 90°F, stirring occasionally to distribute heat evenly. This should take about 10 minutes—use a reliable thermometer and be patient, as proper temperature is crucial for successful cheese making.
- Once the milk reaches 90°F, add the diluted lipase powder if using it, and stir gently for about one minute to combine thoroughly throughout the milk.
- Add the diluted rennet to the milk in an up-and-down motion for about one minute, stirring gently to distribute it evenly. Stop stirring and let the milk rest undisturbed for 5 minutes.
- Check for a clean break by inserting a knife at a 30-degree angle and lifting gently—the curds should break cleanly. If they’re still too soft, wait another minute and test again.
- Once you have a clean break, cut the curds into ¼-inch cubes using a long knife, making horizontal and vertical cuts. Work slowly and deliberately to create evenly-sized pieces.
- Let the cut curds rest for 5 minutes, then slowly heat them to 105°F over the course of 5 minutes, stirring gently every 30 seconds. Maintain this temperature for 5 more minutes, stirring occasionally.
- Line a colander with butter muslin and carefully pour the curds and whey through it, reserving the whey in a separate pot. Save at least 2 gallons of whey—you’ll need it for the next steps.
- Gather the corners of the muslin and hang the curds to drain for about 5-10 minutes, or until they form a cohesive mass and stop dripping.
- Cut the drained curds into ½-inch slices and place them in a microwave-safe bowl. Heat the reserved whey to 90°F in your separate pot.
- Microwave the curds for 1 minute at full power, then gently stir and drain off excess whey. Repeat this process two more times, microwaving for 1 minute each time and stirring gently.
- After the third microwave heating, the curds should be quite hot and beginning to hold together. Carefully pour off most of the whey, leaving just enough to keep the curds moist.
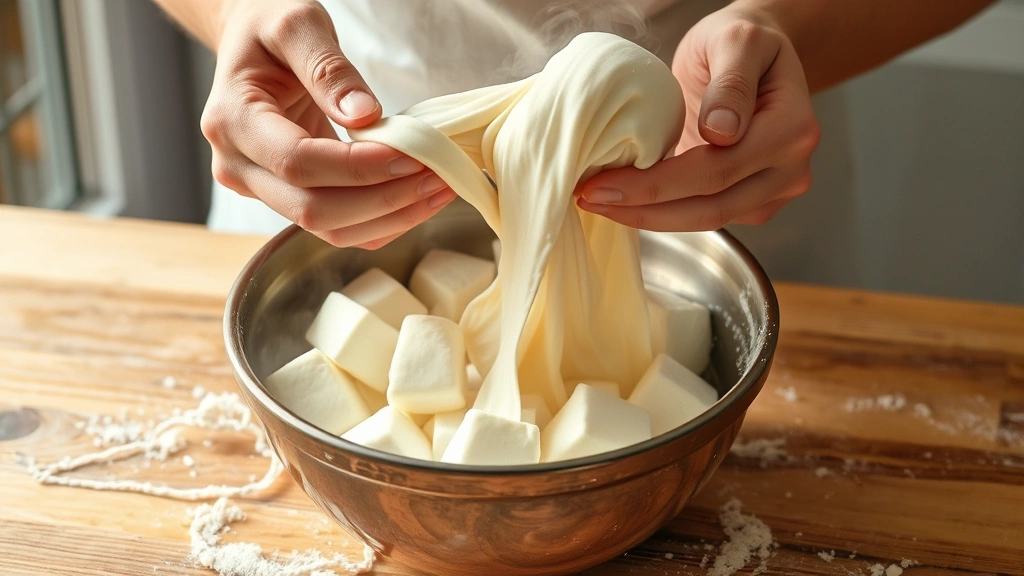
- Wearing food-grade gloves or using a slotted spoon, begin stretching the curds like taffy. If they break, return them to the bowl and microwave for 30 more seconds to increase temperature and elasticity.
- Continue stretching the curds, folding them back on themselves repeatedly, until they become smooth and shiny and stop breaking apart. This stretching process usually takes 2-3 minutes of consistent work.
- When the cheese reaches a smooth, glossy texture similar to taffy, shape it into a ball or log by stretching and folding until you achieve your desired form.
- Transfer the shaped mozzarella to an ice bath immediately to stop the cooking process and set the shape. Leave it in the ice bath for at least 5 minutes.
- Remove the finished mozzarella from the ice bath and place it on a clean towel to cool completely before storing or serving.
Pro Tips
- Ultra-pasteurized milk won’t work for cheese making because the high-heat treatment damages the protein structure needed for proper curd formation. Look for regular pasteurized milk from your local dairy or grocery store.
- Lipase powder adds a subtle tanginess reminiscent of traditional Italian mozzarella, but it’s completely optional. Omit it if you prefer a milder, creamier flavor.
- Temperature control is absolutely critical throughout this process. Invest in a reliable digital thermometer with a probe—it’s the single best tool for cheese-making success.
- If your curds won’t stretch smoothly, they’re likely too cool. Return them to the microwave for 15-30 second intervals until they reach the right temperature and elasticity.
- Fresh mozzarella is best enjoyed within 24 hours of making, while it’s still at peak freshness and creaminess. Store it in the refrigerator in a container of cool, salted water.
- You can make flavored mozzarella by adding fresh herbs, cracked black pepper, or sun-dried tomatoes during the final stretching stage—fold them in gently just before shaping.
- Don’t waste the whey! It’s excellent for cooking pasta, making ricotta, or feeding to your garden. Many resourceful cooks save it for various culinary applications.
- If your first batch isn’t perfect, don’t be discouraged. Cheese making is a skill that improves with practice. Each attempt teaches you something valuable about temperature, timing, and technique.
- For troubleshooting: broken curds during stretching means too-cold cheese; rubbery texture means overheating; grainy appearance means curds weren’t properly hydrated during cooking.
- This recipe scales beautifully. You can easily double or triple it if you’re making mozzarella for a group gathering or want to stock your freezer.
Pingback: How to Make the Easiest No Boil Lasagna Recipe! – Simple Recipe Finder
Pingback: How to make the Best Spaghetti Pasta Salad Recipe! – Simple Recipe Finder