
Making gluten-free bread at home doesn’t have to be intimidating, especially when you have a trusty bread maker to do the heavy lifting! This foolproof gluten-free bread recipe yields a soft, tender loaf with excellent crumb structure and that satisfying homemade flavor you’ve been craving. The secret lies in using the right blend of gluten-free flours, xanthan gum for structure, and understanding how to adjust your bread maker settings for this special dough.
I’ve been perfecting this recipe for years, testing different flour combinations and hydration levels to create the ultimate gluten-free bread. Unlike traditional wheat bread, gluten-free dough behaves quite differently—it’s more like a batter than a traditional dough, and that’s perfectly normal! The bread maker takes all the guesswork out of kneading and rising, giving you consistent, bakery-quality results every single time.
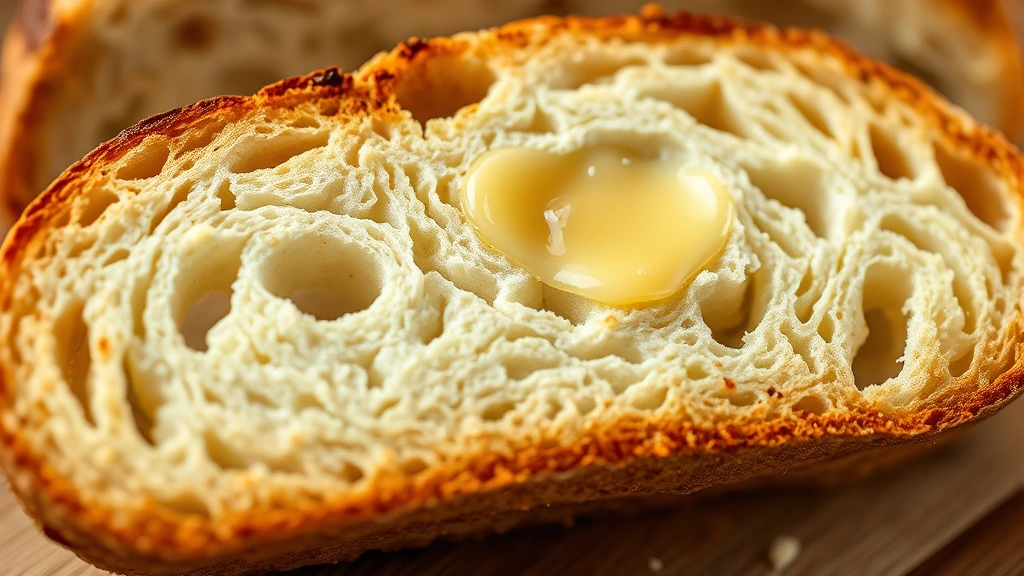
What makes this recipe truly special is the combination of brown rice flour, tapioca starch, and potato starch. These create a light, airy crumb while maintaining that wonderful bread texture. The addition of psyllium husk powder helps bind everything together and improves the overall structure. This isn’t a dense, crumbly loaf—this is real, honest gluten-free bread that your whole family will love.
Whether you’re newly gluten-free or have been managing celiac disease for years, this bread maker recipe will become your go-to solution for fresh homemade bread. Serve it warm with butter, use it for delicious sandwiches, or simply enjoy it alongside your favorite dinner. The best part? You can have fresh bread ready in just a few hours with minimal hands-on effort.
If you’re looking to expand your gluten-free baking repertoire, consider pairing this bread with complementary sides like pickled red onions for sandwiches or even a fresh chickpea salad on the side. For more inspiration on what to serve with your homemade bread, check out this guide on making creamy sauces that pair beautifully with fresh bread.
According to Serious Eats, understanding the science behind gluten-free baking is crucial for success. The main difference is that without gluten, we need other ingredients to provide elasticity and structure. That’s why this recipe relies heavily on the right flour blend and binders. Research from New York Times Cooking shows that home bakers are increasingly successful with gluten-free bread when they use proper ratios and quality ingredients.
For those interested in learning more about gluten-free baking techniques, Bon Appétit offers excellent tutorials on perfecting your bread-making skills. Remember, the first time you make this recipe, you might need to adjust based on your specific bread maker model and local humidity levels. That’s completely normal and part of the gluten-free baking journey!
Ingredients
- 1 1/2 cups warm water (110°F)
- 2 tablespoons honey or sugar
- 2 1/2 teaspoons active dry yeast
- 1 1/2 cups brown rice flour
- 1/2 cup tapioca starch
- 1/2 cup potato starch
- 1/4 cup psyllium husk powder
- 2 tablespoons ground flaxseed
- 2 teaspoons xanthan gum (omit if your GF flour blend contains it)
- 2 teaspoons salt
- 2 tablespoons olive oil
- 1 tablespoon apple cider vinegar
- 2 large eggs, room temperature
- 1 teaspoon honey or sugar for topping (optional)
Instructions
- Gather all ingredients and ensure your bread maker is clean and dry. Check that you have the correct bread pan and paddle for your machine.
- Pour the warm water into your bread maker pan. The water should be approximately 110°F—if it’s too hot, it will kill the yeast; if too cold, it won’t activate properly.
- Add the honey or sugar to the warm water, then sprinkle the active dry yeast evenly over the surface. Let this sit for about 5 minutes to bloom and become foamy. This ensures your yeast is alive and ready to work.
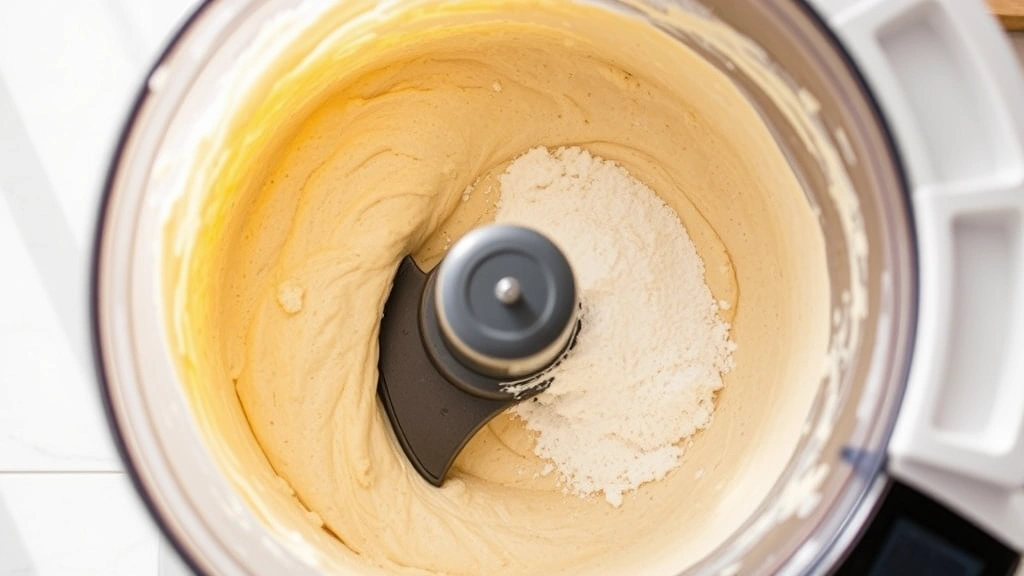
- In a medium bowl, whisk together the brown rice flour, tapioca starch, potato starch, psyllium husk powder, ground flaxseed, xanthan gum, and salt. Mix these dry ingredients thoroughly to ensure even distribution of the xanthan gum and leavening agents.
- Pour the dry flour mixture into the bread maker pan with the activated yeast mixture. Mix on the bread maker’s ‘mix’ or ‘knead’ cycle for 1-2 minutes until all dry ingredients are incorporated. This should resemble a thick batter rather than traditional dough.
- Add the olive oil, apple cider vinegar, and both eggs to the batter. The vinegar helps activate the baking soda and improves the rise, while eggs provide structure and richness.
- Select the ‘gluten-free’ cycle on your bread maker if available, or select a basic white bread cycle with a longer rising time. If your machine has adjustable settings, select a darker crust option for better browning.
- Allow the bread maker to complete its full cycle. The dough will rise and bake inside the machine, typically taking 2.5 to 3 hours depending on your specific model.
- Once the cycle is complete, carefully remove the bread pan from the machine using oven mitts, as it will be extremely hot.
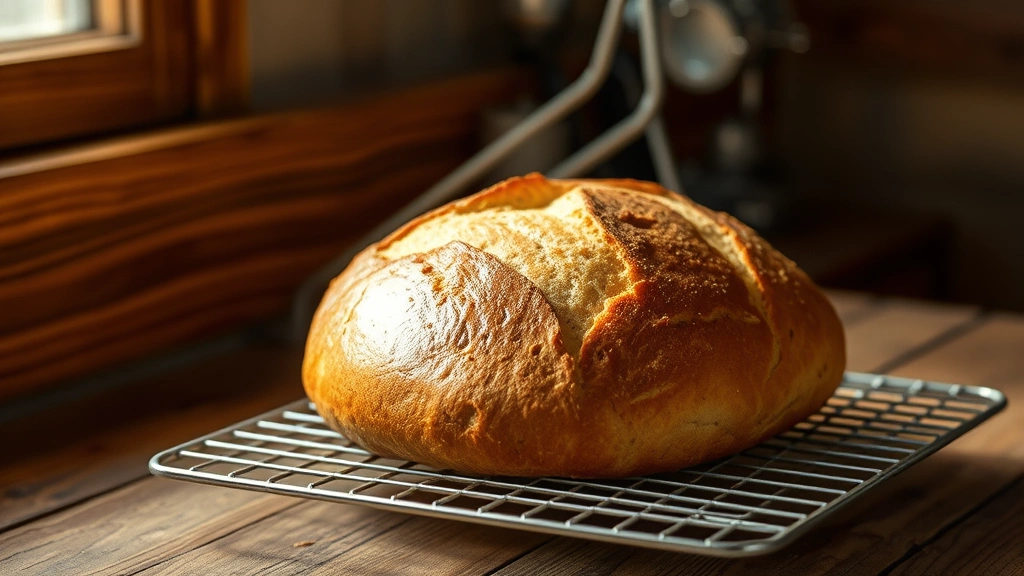
- Let the bread cool in the pan for 5 minutes, then gently turn it out onto a wire cooling rack.
- Allow the bread to cool completely on the rack for at least 1-2 hours before slicing. This cooling time is crucial as it allows the crumb structure to set properly.
Pro Tips
- **Bread Maker Model Matters**: Different bread maker brands and models have varying cycle times and temperatures. Your first loaf might require adjustments. If the bread is too dense, try increasing the water by 2-3 tablespoons next time. If it’s too crumbly, reduce water slightly.
- **Xanthan Gum Essential**: If your gluten-free flour blend doesn’t already contain xanthan gum, don’t skip it. This ingredient is critical for binding and structure in gluten-free baking. Most commercial GF flour blends do include it, so check your package.
- **Room Temperature Ingredients**: Cold eggs and water can interfere with yeast activation. Let eggs sit on the counter for 30 minutes before using, and ensure water is properly warmed to 110°F.
- **Psyllium Husk Powder**: This ingredient is a game-changer for gluten-free bread. It improves hydration, texture, and creates a more authentic bread crumb. You can find it in health food stores or online.
- **Storage Instructions**: Store cooled bread in an airtight container at room temperature for up to 3 days. For longer storage, slice the bread and freeze it in freezer bags for up to 3 months. Toast frozen slices for best results.
- **Slicing Tips**: Use a serrated bread knife and a gentle sawing motion rather than pressing down. For the cleanest slices, wait until bread is completely cool, or warm it slightly before slicing.
- **Humidity Considerations**: High humidity affects gluten-free dough more dramatically than traditional dough. On humid days, you may need to reduce water by 1-2 tablespoons. In dry climates, you might need to add extra water.
- **Yeast Freshness**: Expired yeast won’t rise properly. Check your yeast expiration date and store it in the refrigerator after opening for maximum longevity.
- **Cycle Selection**: Some bread makers have specific ‘gluten-free’ cycles that adjust kneading and rising times. These are ideal, but a basic white bread cycle works well too. Avoid ‘whole wheat’ cycles as they typically have shorter rising times.
- **Crust Preference**: If you prefer a softer crust, remove bread immediately after the cycle ends. For a crispier crust, let it sit in the machine for an additional 10 minutes after baking.
- **Troubleshooting Dense Bread**: If your bread turns out dense, the likely culprits are insufficient yeast, water that’s too hot or cold, or old yeast. Always proof your yeast in the warm water first to ensure viability.