

Making the best calzone dough at home is easier than you might think! This foolproof recipe creates a perfectly chewy, crispy crust that rivals any Italian pizzeria. The secret lies in using high-quality flour, proper hydration, and allowing enough time for the dough to develop flavor through a slow rise.
Calzone, the Italian half-moon shaped pastry, deserves a dough that’s just as impressive as its fillings. Whether you’re planning to stuff yours with creamy ricotta and mozzarella, or going the savory route with meats and vegetables, this dough will deliver restaurant-quality results every single time.
What makes this calzone dough recipe so special is its simplicity combined with technique. You don’t need fancy equipment or years of experience—just patience and attention to a few key details. The dough uses a combination of all-purpose and bread flour for the perfect balance of structure and tenderness, while a long, cool fermentation develops complex flavors that make all the difference.
Many home cooks worry about working with dough, but I promise this recipe will build your confidence. The instructions are straightforward, and the results are absolutely worth the minimal effort involved. Plus, you can make this dough ahead of time and refrigerate it, making weeknight calzone dinners incredibly convenient.
I’ve tested this recipe dozens of times to ensure it works perfectly for home bakers at any skill level. The proportions are forgiving, the technique is accessible, and the outcome is consistently delicious. Pair this with your favorite fillings—think creamy chicken alfredo inspired flavors or traditional Italian combinations—and you’ll have dinner that impresses family and friends alike.
The beauty of homemade calzone dough is that it’s far superior to store-bought alternatives. When you make it yourself, you control every ingredient, and you get that authentic Italian texture that’s crispy on the outside and wonderfully tender within. This recipe has become my go-to for casual entertaining, and I’m excited to share it with you.
For best results, invest in a good kitchen scale for measuring your ingredients by weight rather than volume. This small step ensures consistency and removes guesswork from the equation. You’ll also want a sturdy mixing bowl and a bench scraper, which are inexpensive tools that make working with dough so much easier.
Once you master this basic dough, you can experiment with different hydration levels, fermentation times, and even whole grain additions. But start with this recipe—it’s the perfect foundation for becoming a calzone master. Your homemade pizzeria nights are about to get a serious upgrade, and your guests will never believe you made this dough from scratch. Let’s get started on creating calzone magic in your own kitchen!
Ingredients
- 500g all-purpose flour
- 50g bread flour
- 325ml warm water (around 90°F)
- 10g salt
- 7g instant yeast
- 15ml extra virgin olive oil
- 2g sugar
- Additional olive oil for coating and brushing
Instructions
- Combine warm water, yeast, and sugar in a small bowl. Let sit for 5 minutes until foamy to activate the yeast.
- In a large mixing bowl, whisk together all-purpose flour, bread flour, and salt until well combined.
- Pour the yeast mixture into the flour bowl, then add the 15ml olive oil.
- Mix with a wooden spoon or your hands until all flour is incorporated and you have a shaggy dough with no dry flour remaining.
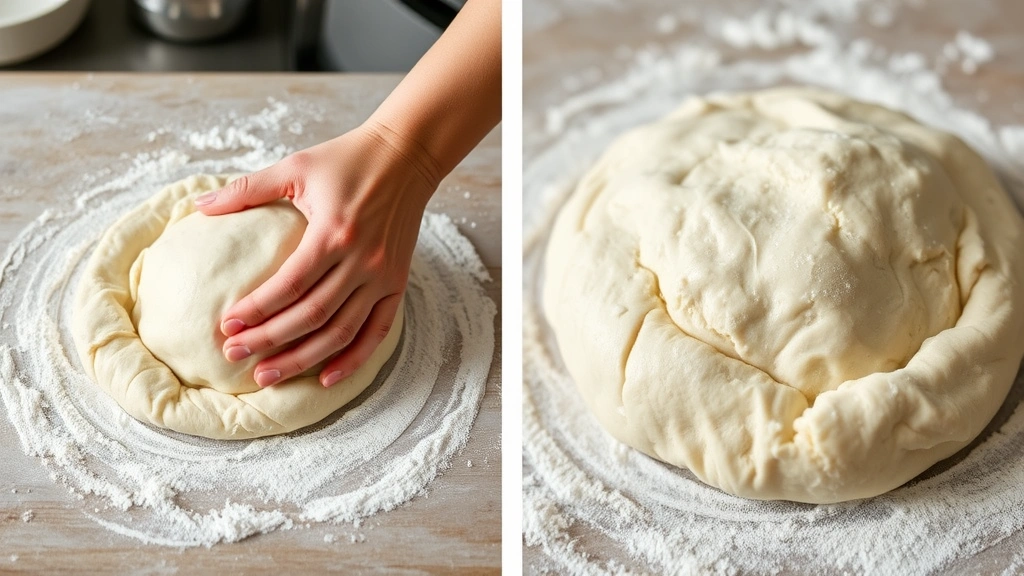
- Transfer dough to a clean work surface and knead for 8-10 minutes until smooth and elastic. The dough should feel slightly sticky but manageable.
- Shape the dough into a tight ball and place it in a lightly oiled bowl, turning to coat all sides with oil.
- Cover the bowl with plastic wrap or a damp kitchen towel and let rise at room temperature for 2 hours until roughly doubled in size.
- After the first rise, gently press down the dough to release gases and fold it over itself a few times to strengthen the gluten.
- Re-cover the bowl and refrigerate the dough for at least 16 hours, or up to 48 hours for enhanced flavor development.
- Remove dough from refrigerator 30 minutes before use to allow it to come to room temperature slightly.
- Divide the dough into 4 equal portions by weight, roughly 200g each.
- Shape each portion into a tight ball by folding the edges toward the center and rolling it against the work surface with your hands cupped around it.
- Let the shaped balls rest on a lightly floured surface for 15-20 minutes before shaping into calzones.
- When ready to fill and shape, gently stretch each dough ball into a thin circle about 8-10 inches in diameter, working from the center outward.
- Add your desired fillings to one half of the circle, leaving a ½-inch border around the edges.
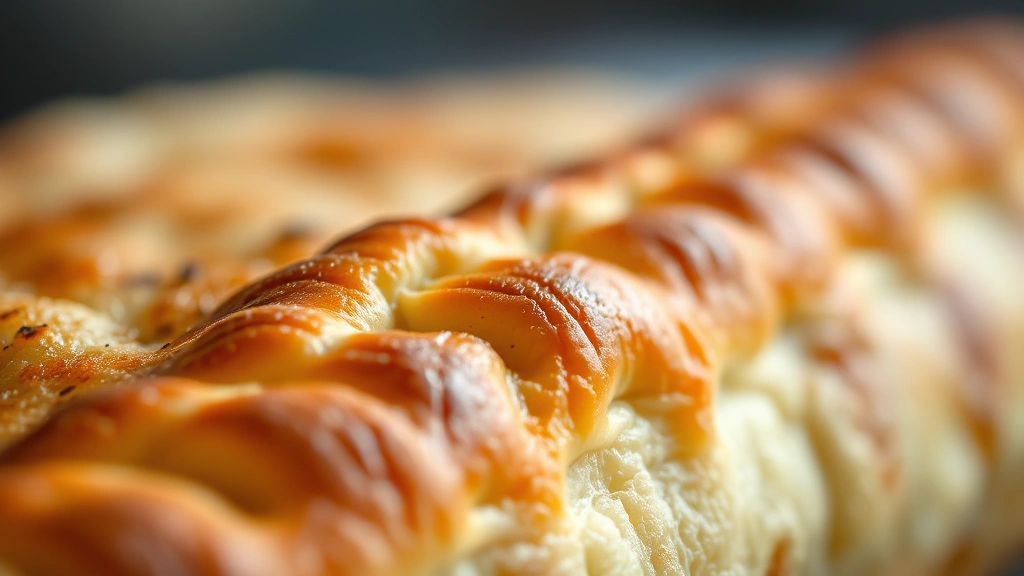
- Fold the dough in half over the filling to create a half-moon shape, then press and seal the edges firmly by crimping with your fingers or a fork.
- Place shaped calzones on a parchment-lined baking sheet and let proof for 30-45 minutes at room temperature until puffy.
- Preheat your oven to 475°F (245°C) about 15 minutes before baking.
- Brush each calzone lightly with olive oil and make 2-3 small steam vents in the top with a sharp knife.
- Bake for 18-22 minutes until the crust is golden brown and crispy, rotating the baking sheet halfway through cooking.
- Remove from oven and let cool for 3-5 minutes before serving to allow the filling to set slightly.
Pro Tips
- This dough is best when made at least 16 hours ahead, as the long, cool fermentation develops superior flavor and improves workability
- Always use a kitchen scale for measuring flour and other dry ingredients by weight rather than volume—this ensures consistency and removes variables that can affect dough hydration
- The water temperature is crucial: if too hot it will kill the yeast, if too cold it will slow fermentation. Aim for around 90°F (32°C)
- After the initial rise, the folding step (called a stretch and fold) strengthens the gluten network without additional kneading, resulting in a more extensible dough
- You can use this dough for traditional pizza as well—simply press into your preferred pan shape instead of folding into calzones
- For filling ideas, consider ricotta mixed with mozzarella and spinach, or ground Italian sausage with peppers and onions, or roasted vegetables with fontina cheese
- Store leftover dough portions in an airtight container in the refrigerator for up to 5 days, or freeze for up to 3 months. Thaw frozen dough in the refrigerator overnight before using
- If you don’t have bread flour, you can use all-purpose flour exclusively, though the bread flour creates slightly better texture and crumb structure
- The dough is ready to shape when it feels soft and slightly sticky but holds together. If it’s too sticky to work with, dust lightly with flour
- Make small steam vents in the top of each calzone before baking to prevent them from bursting and to allow excess steam to escape
- These calzones are delicious served with warm marinara sauce for dipping, or a simple garlic oil for brushing
- Properly sealed edges are essential—any gaps will allow filling to leak out during baking, so press firmly around the perimeter
- For crispier crusts, place a pizza stone in the oven during preheating and transfer calzones directly onto it (use parchment paper to prevent sticking)
- Leftover baked calzones can be wrapped and refrigerated for 3 days, then reheated in a 350°F oven for 10-12 minutes until warmed through