
Making borax slime at home is such a fun and rewarding activity that brings back nostalgic memories of childhood crafts! This quick and easy borax slime recipe is perfect for rainy afternoons, birthday parties, or just a creative break from daily routines. Unlike store-bought slime that can be pricey and sometimes disappointing, homemade borax slime gives you complete control over the texture, color, and consistency.
Borax slime has been a beloved craft staple for decades, and it’s easy to see why. The science behind it is absolutely fascinating—when borax mixes with glue, it creates long polymer chains that give slime its signature stretchy, satisfying texture. The best part? You probably already have most of the ingredients in your home right now! This recipe is incredibly forgiving, making it perfect for first-time slime makers and experienced crafters alike.
What makes this particular borax slime recipe stand out is the perfect balance we’ve achieved between stretchiness and sturdiness. Too many recipes result in slime that’s either too runny or too stiff, but this formula hits that sweet spot every single time. Whether you’re making this for fun snack time activities or looking for an engaging craft project, this recipe delivers consistently excellent results.
The beauty of making your own slime is that you can customize it in countless ways. Add glitter for sparkle, use food coloring for vibrant hues, or mix in foam beads for texture variation. Kids absolutely love the sensory experience of playing with homemade slime, and the simple science lesson about polymers makes it educational too. Plus, it’s an incredibly budget-friendly craft that costs just a few dollars to make enough slime for the whole family.
This borax slime recipe is also wonderfully quick—you can have stretchy, perfect slime ready to play with in less than ten minutes! There’s no waiting around for complicated processes or hard-to-find ingredients. Just gather your supplies, follow these straightforward steps, and you’ll be enjoying satisfying slime in no time. Many people compare the stress-relieving qualities of playing with slime to other sensory activities, and we completely agree that it’s a wonderful way to unwind.
Before you start, I want to mention that while borax is a common household cleaner and craft ingredient, it’s important to keep slime away from very young children who might put it in their mouths, and always wash hands after playing. Adult supervision is recommended for young crafters. If you’re concerned about borax safety, there are alternative slime recipes available using contact lens solution or other ingredients, but this traditional borax method remains popular and effective when used properly.
For the best results, make sure all your ingredients are at room temperature before you begin. Cold glue can make the slime thicker and harder to work with, so if your glue has been sitting in a cool room, let it warm up a bit. Similarly, having everything measured and ready before you start mixing will make the process smoother and more enjoyable. This recipe makes enough slime for several people to enjoy, making it perfect for family craft time or sharing with friends.
I’m thrilled to share this tested, reliable borax slime recipe that never fails to impress. Whether this is your first time making slime or you’re a seasoned slime maker looking for the perfect base recipe, you’re going to love how easy and satisfying this process is. The texture, the smell of the fresh slime, and that amazing stretchy sensation never get old. Let’s dive into creating some magical, gooey slime together!
Ingredients
- 1 cup white school glue (like Elmer’s)
- ½ teaspoon borax powder
- ½ cup warm water
- ½ cup additional warm water (for mixing with borax)
- 1-2 tablespoons liquid food coloring (optional)
- 1 tablespoon glitter or mix-ins (optional)
- 2 bowls for mixing
- 1 spoon or popsicle stick for stirring
- 1 measuring cup
- 1 measuring spoon
Instructions
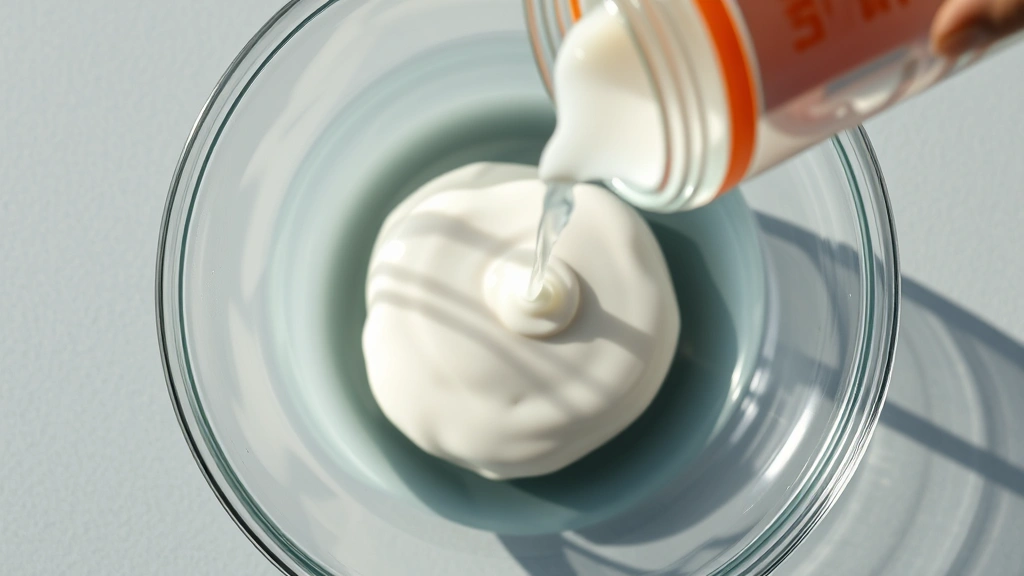
- Pour the white school glue into your first bowl. If you’re using food coloring, add 1-2 tablespoons now and stir until the color is evenly distributed throughout the glue.
- In a separate bowl, mix together ½ cup of warm water with the ½ teaspoon of borax powder. Stir well until the borax dissolves completely—this is your slime activator solution.
- Slowly pour the borax solution into the bowl of colored glue while stirring constantly. You’ll immediately notice the mixture starting to come together and thicken.
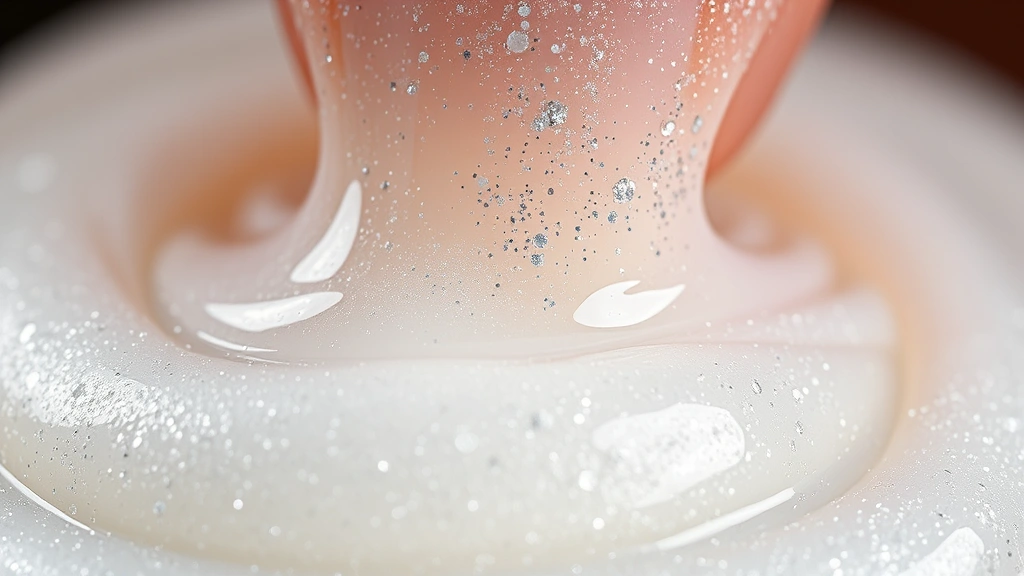
- Continue stirring as the slime begins to form and pull away from the sides of the bowl. This should take about 1-2 minutes of consistent stirring.
- Once the slime is thick enough, remove it from the bowl with your hands or a spoon. The slime will still feel slightly wet at this stage.
- Knead the slime with your hands for about 2-3 minutes. It will gradually become less sticky and more stretchy as you work it. If it’s too sticky, dip your fingers in the borax solution and continue kneading.
- If you want to add glitter, foam beads, or other decorative mix-ins, fold them into the slime now while it’s still warm and pliable.
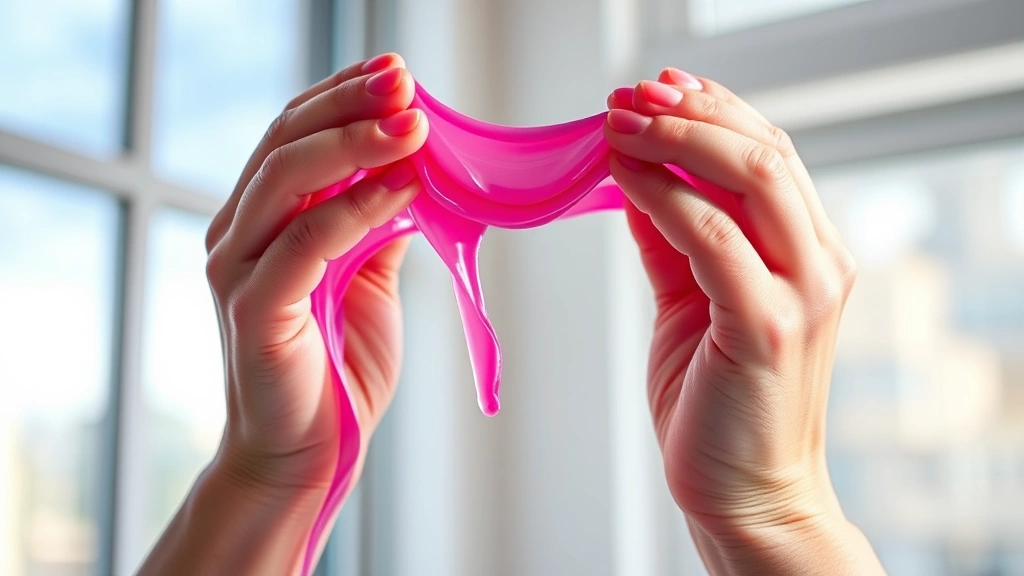
- Play and stretch your slime to test the consistency. It should be stretchy but not overly sticky or stiff.
- Store your finished slime in an airtight container or plastic bag to keep it fresh and ready for your next play session.
- Always wash your hands thoroughly after playing with slime, especially before eating or touching your face.
Pro Tips
- **Borax Safety Tips**: While borax is a common household ingredient found in laundry aisles, it’s important to handle it with care. Keep it away from very young children who might ingest slime, and ensure proper hand washing after play. Adult supervision is recommended for children under eight years old.
- **Texture Troubleshooting**: If your slime is too sticky, add a tiny bit more borax solution (just a few drops at a time). If it’s too stiff and hard to stretch, try kneading in a few drops of the extra warm water until you reach the desired consistency.
- **Color Customization**: Use gel food coloring for more vibrant, deeper colors compared to liquid food coloring. You can also mix colors to create custom shades—try combining blue and yellow for green, or red and blue for purple slime.
- **Add-In Ideas**: Beyond glitter, consider adding foam beads, sequins, confetti, small plastic beads, or even essential oils for scent. Glow-in-the-dark paint mixed into the glue creates amazing light-up slime that kids absolutely love.
- **Storage Instructions**: Keep your slime in an airtight container, zip-lock bag, or sealed plastic container to prevent it from drying out. Properly stored slime can last for several weeks, making multiple batches perfect for parties or extended play.
- **Batch Scaling**: This recipe can easily be doubled or tripled if you need larger quantities for parties or group activities. Simply multiply all ingredients proportionally.
- **Glue Selection**: Use white school glue for the best results—clear glue can work but produces less opaque slime. Avoid using glue that’s already thickened or old, as it may not activate properly.
- **Water Temperature**: Warm (not hot) water works best for dissolving the borax and activating the slime. Very cold water may result in slower activation or less satisfying texture.
- **Borax Alternatives**: If you prefer not to use borax, you can make slime using contact lens solution (with boric acid as an ingredient) and baking soda instead, though the texture may differ slightly.
- **Cleanup Tips**: Slime sticks to carpet and fabric easily, so it’s best to play on hard surfaces like tables, tile, or wooden floors. Clean up any spills immediately with warm water before they dry.