

Making cream cheese at home is easier than you might think, and the results are absolutely divine! This luxurious, tangy spread rivals any store-bought version and tastes incredibly fresh. The process involves just a few simple ingredients and some patience as cultures work their magic. Once you master this technique, you’ll never go back to commercial cream cheese again.
Homemade cream cheese has a delicate, rich flavor that’s perfect for everything from bagels to baking. The beauty of making it yourself is controlling the texture and tang level to your exact preferences. Whether you’re spreading it on bacon carbonara or using it as a base for creamy Alfredo sauce, homemade cream cheese elevates every dish.
The secret to achieving that perfect consistency lies in the straining process and the quality of your milk and cream. You’ll want to use the freshest dairy you can find, ideally from a local dairy or high-quality source. The fermentation time is crucial too—it develops that signature tangy flavor we all love in cream cheese.
This recipe requires some special ingredients like lipase powder and liquid rennet, which give authentic cream cheese its characteristic tang and texture. Don’t worry if you can’t find these locally; they’re readily available online and last for years when stored properly. With just one batch, you’ll understand why artisanal cream cheese is worth the effort.
Once you’ve made homemade cream cheese, try it in heavy cream pasta dishes or spread generously on pickled red onions for an elegant appetizer. The possibilities are truly endless with this versatile ingredient at your fingertips.
Ingredients
- 1 gallon whole milk (not ultra-pasteurized)
- 1 cup heavy cream
- 1/4 teaspoon liquid rennet diluted in 1/4 cup cool non-chlorinated water
- 1/4 teaspoon lipase powder (dissolved in 1/4 cup cool water 10 minutes before use)
- 1 teaspoon salt
- 1/2 teaspoon white vinegar
- Cheesecloth (several layers)
- A large stainless steel pot
- A long knife for cutting curds
- A thermometer (crucial for accuracy)
Instructions
- Pour the milk and heavy cream into your large stainless steel pot. Slowly heat to 86°F (30°C), stirring occasionally to ensure even heating. Use your thermometer to monitor the temperature carefully—this step takes about 30 minutes.
- Once the milk reaches 86°F, add the diluted lipase powder and stir gently for about 1 minute to distribute evenly throughout the milk. Let it rest for 5 minutes without stirring.
- Add the diluted liquid rennet using an up-and-down motion with a long spoon for about 1 minute to incorporate it thoroughly. Stop stirring and let the milk rest undisturbed for 10 minutes.
- Test the curd by making a clean cut with a long knife at a 30-degree angle. If it breaks cleanly, you’re ready to cut. If it’s too soft, wait another 2-3 minutes.
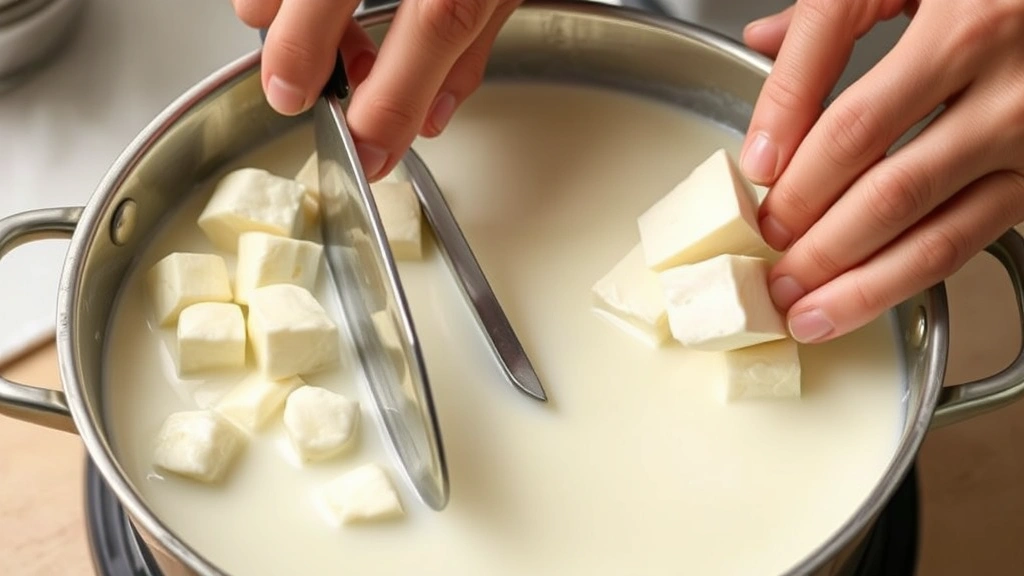
- Cut the curds into 1/4-inch cubes using a long knife, making vertical cuts first, then horizontal cuts, working slowly and deliberately. Let the curds rest for 5 minutes after cutting.
- Slowly increase the temperature to 104°F (40°C) over the next 30 minutes, stirring gently every few minutes. This process, called ‘cooking the curds,’ helps them firm up and expel whey.
- Once you reach 104°F, maintain that temperature for an additional 30 minutes while stirring occasionally. The curds should feel firm but still slightly soft when squeezed gently.
- Line a colander with several layers of cheesecloth. Slowly pour the curds and whey through the cheesecloth, reserving the whey in a separate bowl—you’ll need this later.
- Gather the corners of the cheesecloth and hang it to drain for 30 minutes. You want the curds to drain but remain slightly moist, not completely dry.
- Place the drained curds (still in the cheesecloth) into a bowl and let them rest at room temperature for 8-12 hours. This fermentation period develops the characteristic tang of cream cheese.
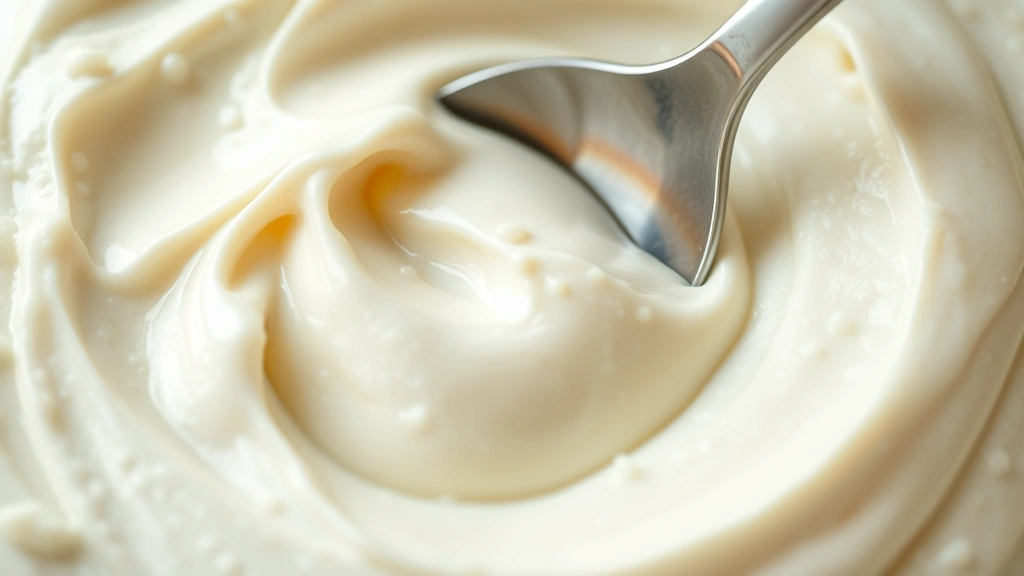
- After fermentation, place the curds in a blender or food processor and add salt, white vinegar, and 2-3 tablespoons of the reserved whey. Blend until completely smooth and creamy, adding more whey as needed to achieve the perfect spreadable consistency.
- Transfer the blended cream cheese to a clean jar and refrigerate. It will continue to thicken slightly as it cools. Store in an airtight container for up to 2 weeks.
Pro Tips
- Temperature control is absolutely essential—invest in a good thermometer and check frequently. Even 2-3 degrees off can affect your final product dramatically.
- Non-ultra-pasteurized milk is crucial because ultra-pasteurization damages the protein structures that help curds form properly. Check your milk label carefully before purchasing.
- Lipase powder and liquid rennet can be ordered online from cheese-making supply companies. Store them in the refrigerator between uses to maintain potency for several years.
- If your first batch isn’t perfect, don’t be discouraged! Cheese-making is both art and science. Each attempt teaches you something valuable about the process.
- You can customize your cream cheese by adding fresh herbs, vanilla extract, lemon zest, or honey after blending for flavored varieties.
- The whey left over from making cream cheese is valuable—use it in soups, baking, or feed it to garden plants. Nothing goes to waste!
- For a tangier cream cheese, extend the fermentation time to 16-18 hours. For milder flavor, reduce it to 6-8 hours.
- If your cream cheese is too thin, strain it longer through cheesecloth. If it’s too thick, blend in a bit more whey until you reach the desired consistency.
- This recipe makes approximately 2 cups of finished cream cheese from 1 gallon of milk, accounting for whey loss during the process.
- Non-chlorinated water is important because chlorine can interfere with the culturing process. Filter your tap water or use bottled water if needed.
- Keep all equipment scrupulously clean but avoid antibacterial soaps, which can inhibit the beneficial cultures needed for proper fermentation.
Pingback: How to make the BEST Mushroom Swiss Burger Recipe! – Simple Recipe Finder
Pingback: How to Make the BEST Shredded Chicken Taco Recipe! – Simple Recipe Finder