
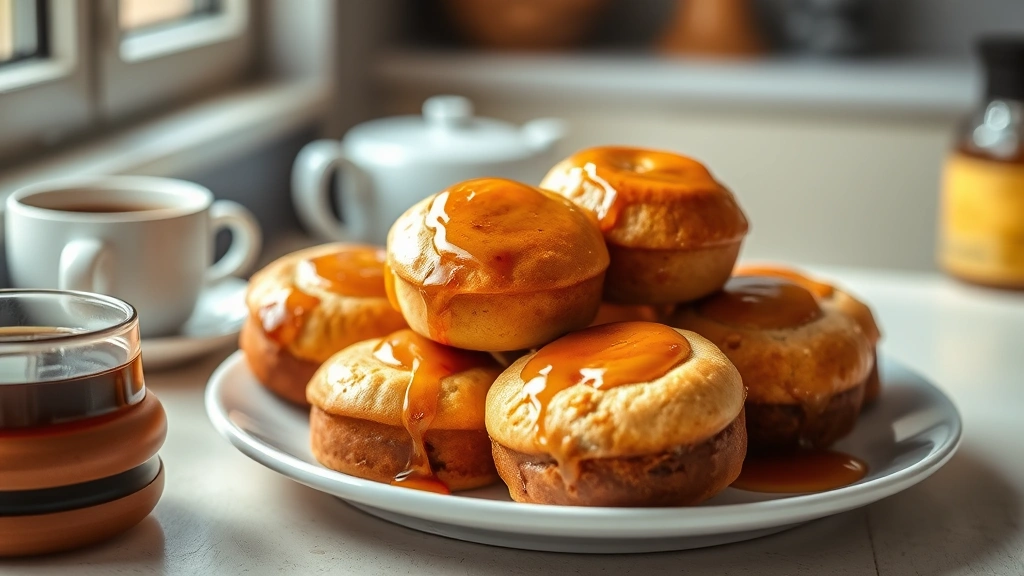
There’s something utterly magical about a homemade honey bun—that perfect combination of soft, pillowy dough swirled with cinnamon-sugar and drizzled with a sweet honey glaze. While store-bought versions have their charm, nothing compares to the warmth and aroma of freshly baked honey buns straight from your oven. This recipe delivers bakery-quality results that will have your family asking for seconds (and thirds!).
These honey buns are perfect for lazy Sunday mornings, special breakfasts, or whenever you need a little extra sweetness in your life. The dough is enriched with butter, eggs, and a touch of vanilla, creating that tender crumb we all crave. The cinnamon-sugar filling provides just the right amount of spice and sweetness, while the honey glaze ties everything together beautifully.
What makes this recipe truly special is how approachable it is. Even if you’re new to yeast baking, you’ll find the process straightforward and rewarding. The dough comes together quickly, and the overnight rise option makes it perfect for planning ahead. You can even prepare these the night before and bake them fresh in the morning—imagine waking up to that incredible aroma!
I love pairing these with a strong cup of coffee or hot cocoa, though they’re equally delicious as a grab-and-go breakfast option. The honey buns stay soft and fresh for days (if they last that long!), and they freeze beautifully too. Whether you’re hosting a brunch, looking for a homemade gift, or simply craving something spectacular, this honey bun recipe is your answer.
For more delicious breakfast inspiration, check out our Easy Chicken Alfredo Recipe for a savory brunch option. If you’re looking to build a complete breakfast spread, our Best Chickpea Salad Recipe adds wonderful protein and nutrition to your table.
For baking techniques and inspiration, check out Bon Appétit’s baking section for additional tips. You might also enjoy Serious Eats’ comprehensive baking guides for deeper dough knowledge. The New York Times Cooking section also features wonderful breakfast recipes and techniques to elevate your baking game.
Ingredients
- 3 1/4 cups all-purpose flour
- 1 packet (2 1/4 teaspoons) instant yeast
- 1/2 cup granulated sugar
- 1 teaspoon salt
- 1 cup whole milk, warmed
- 4 tablespoons unsalted butter, melted
- 1 large egg
- 1 teaspoon vanilla extract
- 6 tablespoons unsalted butter, softened (for filling)
- 1 cup light brown sugar, packed
- 2 1/2 tablespoons ground cinnamon
- 1/2 cup honey
- 2 tablespoons unsalted butter
- 1 tablespoon milk
- 1/4 teaspoon vanilla extract
- 1/2 cup powdered sugar
- Pinch of salt
Instructions
- In a large mixing bowl, combine flour, yeast, granulated sugar, and salt. Whisk these dry ingredients together until well combined.
- In a separate bowl, whisk together warm milk, melted butter, egg, and vanilla extract until smooth.
- Pour the wet ingredients into the dry ingredients and stir with a wooden spoon until a shaggy dough forms.
- Transfer the dough to a lightly floured surface and knead for 8-10 minutes until smooth and elastic. The dough should be soft but not sticky; add flour one tablespoon at a time if needed.
- Place the dough in a lightly greased bowl, turning to coat all sides. Cover with a damp kitchen towel and let rise in a warm place for 1 hour, or until doubled in size.
- While the dough rises, prepare the filling by combining softened butter, brown sugar, and cinnamon in a small bowl. Mix until you have a spreadable paste. Set aside.
- Once the dough has risen, punch it down gently and transfer to a lightly floured surface.
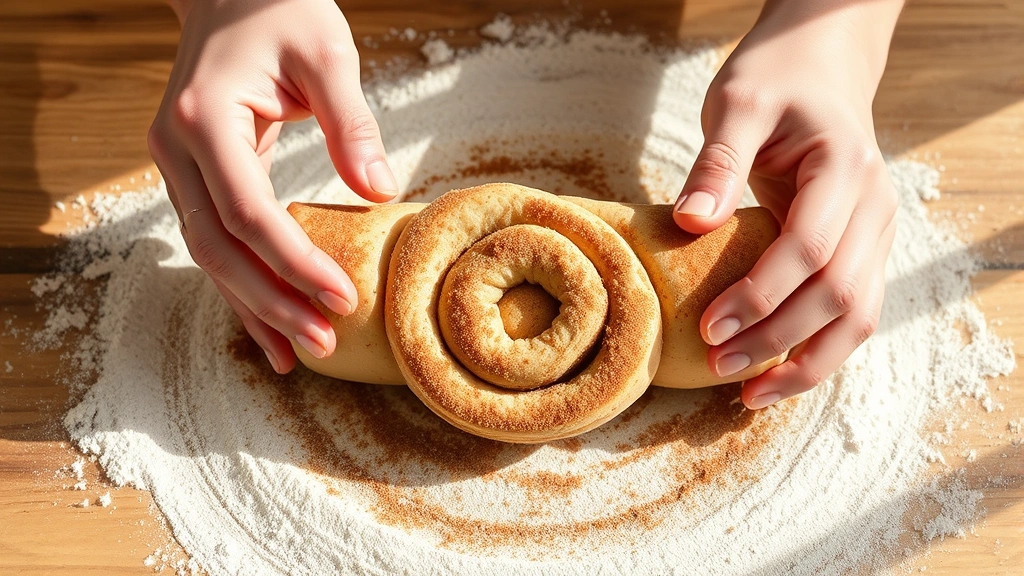
- Using a rolling pin, roll the dough into a 16×12 inch rectangle, with a long side facing you.
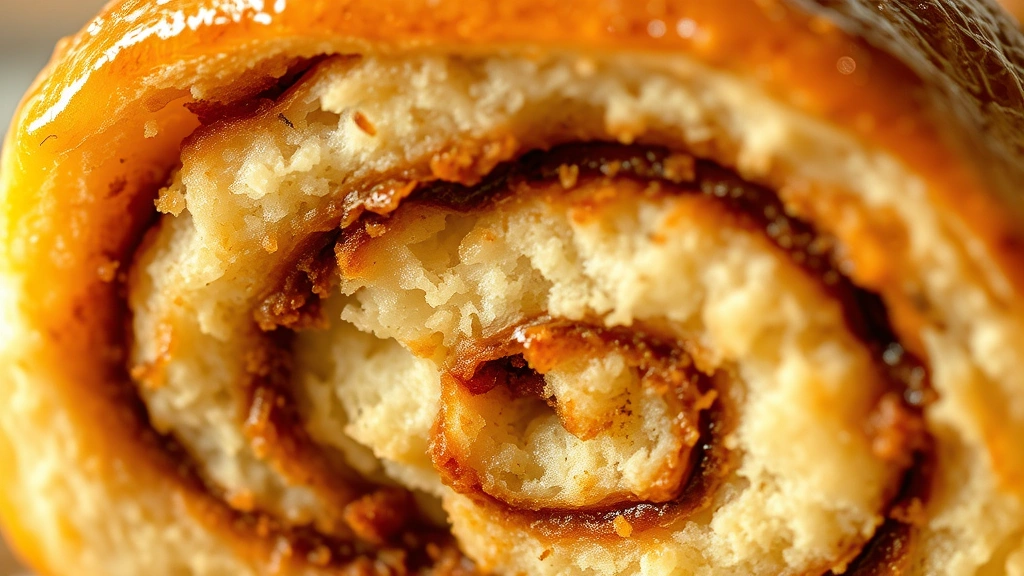
- Spread the cinnamon-butter mixture evenly over the entire surface of the dough, leaving a 1/2 inch border on all sides.
- Starting from the long side closest to you, roll the dough tightly into a log, pinching the seam closed as you go.
- Using a sharp knife or dental floss, cut the log into 12 equal pieces, each about 1 1/3 inches thick.
- Place each piece cut-side up in a lightly greased 9×13 inch baking pan, arranging them in 3 rows of 4.
- Cover the pan with a damp kitchen towel and let the buns rise for 45 minutes to 1 hour, until puffy and touching each other. (Alternatively, cover and refrigerate overnight, then let come to room temperature for 30-45 minutes before baking.)
- Preheat your oven to 350°F (175°C) about 15 minutes before you’re ready to bake.
- Bake the honey buns for 16-18 minutes, until the tops are light golden brown. The buns should be just set but still tender.
- While the buns bake, prepare the honey glaze by combining honey, butter, milk, vanilla extract, powdered sugar, and salt in a small saucepan over low heat.
- Whisk the glaze ingredients together until smooth and well combined. Keep warm over low heat, stirring occasionally.
- Remove the buns from the oven and immediately drizzle the warm honey glaze over the top, allowing it to drip down the sides.
- Let the buns cool in the pan for 5 minutes before serving warm, or transfer to a wire rack to cool completely.
Pro Tips
- **Yeast Matters**: Use instant yeast for best results, as it activates quickly and reliably. Active dry yeast works too but may require slightly longer rising times. Always check that your yeast is fresh—expired yeast won’t rise properly.
- **Milk Temperature**: Warm milk (around 110°F) is crucial for activating the yeast without killing it. If the milk is too hot, it will kill the yeast; if too cold, activation will be slow. Use a thermometer if you’re unsure.
- **Make-Ahead Magic**: These honey buns are perfect for overnight preparation. After shaping, cover and refrigerate overnight. In the morning, let them come to room temperature for 30-45 minutes, then bake as directed. You can also freeze unbaked buns for up to 3 months—thaw at room temperature before baking.
- **The Glaze Ratio**: The honey glaze should be pourable but not runny. If it’s too thick, add milk one teaspoon at a time. If too thin, add more powdered sugar. The glaze will thicken slightly as it cools.
- **Dough Consistency**: The dough should be soft and slightly sticky but manageable. If it’s too sticky to work with, dust with flour as needed. Over-flouring will result in dense, dry buns, so add flour sparingly.
- **Rising Times**: Rising times vary based on room temperature. In a warm kitchen (75-80°F), dough rises faster. In cooler conditions, it may take longer. The dough is ready when it has roughly doubled in volume.
- **Preventing Sticking**: When rolling out the dough, use just enough flour to prevent sticking without adding too much. A silicone baking mat works wonderfully for this step.
- **Customization Ideas**: Add a 1/2 teaspoon of nutmeg to the filling for warm spice notes, or drizzle melted chocolate over the glaze for chocolate-honey buns. A sprinkle of sea salt on top contrasts beautifully with the sweetness.
- **Storage**: Keep cooled honey buns in an airtight container at room temperature for up to 3 days. They can be frozen for up to 2 months—wrap individually in plastic wrap and freeze in a freezer bag. Thaw at room temperature and refresh in a 300°F oven for 5 minutes.
- **Oven Variations**: If your oven runs hot, start checking at 14 minutes. Buns are done when the tops are light golden and the edges are set but the centers still have a bit of give—they’ll continue to cook slightly as they cool.
- **Pan Size**: A 9×13 inch baking pan is ideal for this recipe. If using a different size, arrange buns so they’re touching and have room to rise without overflowing.
- **Breakfast Pairing**: Serve these honey buns warm with strong coffee, fresh-squeezed orange juice, or hot cocoa for the ultimate breakfast experience. They’re also delicious with a spread of whipped cream cheese or butter.