
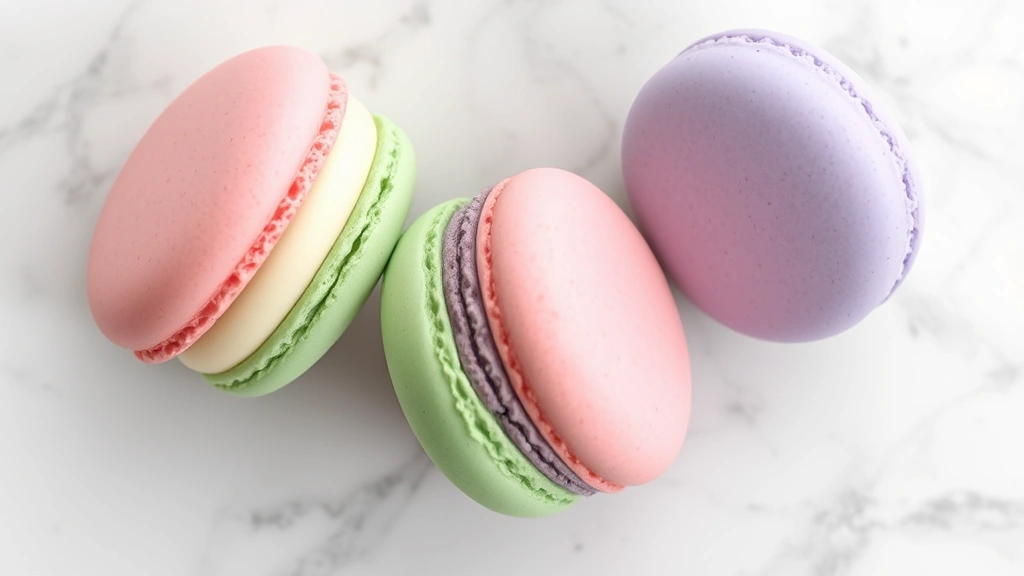
Macarons are those delicate, colorful French almond meringue cookies that look impossibly elegant—but here’s the secret: the filling is where the real magic happens! A perfect macaron filling can transform your homemade macarons from pretty to absolutely show-stopping. Whether you’re planning an elegant tea party or want to impress guests with your baking skills, mastering macaron fillings is essential.
I’ve tested dozens of filling recipes over the years, and I’m sharing my absolute favorite techniques with you today. The key to the best macaron filling is balancing flavor, texture, and stability. You want something that’s smooth enough to pipe beautifully between those delicate shells, flavorful enough to stand out, but sturdy enough to hold everything together.
There are several classic options: silky buttercream, rich ganache, tangy cream cheese frosting, or even jam-based fillings. Each has its own charm and application. The beauty of macaron fillings is that they’re incredibly versatile—you can customize them with virtually any flavor profile you love.
What makes a filling truly exceptional is attention to detail. Temperature matters. Texture matters. The ratio of ingredients matters. I’m going to walk you through my foolproof method for creating professional-quality macaron fillings right in your own kitchen.
These fillings work beautifully with creamy sauces in terms of emulsification technique, though obviously applied differently. The principles of combining butter, liquid, and flavorings smoothly apply here too. Once you master this filling, you’ll find yourself making macarons constantly—they’re addictive!
I recommend starting with my classic French buttercream version, then experimenting with the variations I’ve included. Each one is foolproof and produces stunning results. The technique of incorporating cream smoothly is similar to what you’ll do here. Your guests will be absolutely amazed when you tell them you made these beautiful macarons from scratch.
Ready to create bakery-quality macarons at home? Let’s dive into the best filling recipes and techniques!
Ingredients
- 6 ounces unsalted butter, softened to room temperature
- 1½ cups powdered sugar, sifted
- 2-3 tablespoons heavy cream or milk
- 1 teaspoon vanilla extract or ½ teaspoon almond extract
- ¼ teaspoon salt
- Food coloring (gel or powder, optional)
- Additional flavorings: 2 tablespoons cocoa powder, 2 tablespoons fruit puree, 1 tablespoon espresso powder, or 2 tablespoons jam (depending on variation)
Instructions
- Start with butter that’s been at room temperature for 30-45 minutes. Cold butter won’t incorporate properly and will result in a grainy texture. If you’re short on time, cut the butter into small cubes—it will soften faster. The butter should be soft enough to leave a slight indent when you press it with your finger, but not so soft that it’s greasy.
- Add the softened butter to the bowl of your stand mixer (or use a hand mixer). Beat on medium speed for 2-3 minutes until the butter is pale, fluffy, and creamy. This step is crucial because it incorporates air into the butter, which creates a light, spreadable consistency. You should see the color lighten noticeably.
- While the mixer is running on low speed, gradually add the sifted powdered sugar in three additions. Sifting is important—it removes lumps and ensures a smooth final texture. Add about one-third of the sugar, let it incorporate for about 30 seconds, then add the next portion. This prevents the mixer from sending powdered sugar flying everywhere.
- Once all the powdered sugar is incorporated and the mixture looks dry and crumbly, add the heavy cream or milk one tablespoon at a time while mixing on low speed. The cream adds moisture and helps achieve a smooth, pipeable consistency. Start with 2 tablespoons and add the third only if needed. You want the filling to be spreadable but not runny.
- Add the vanilla extract (or almond extract for a more delicate flavor) and salt. Mix on low speed for another 30 seconds to fully incorporate. The salt enhances all the other flavors and prevents the filling from tasting overly sweet. Don’t skip this step—it makes a surprising difference!
- If you’re making a flavored variation, add your chosen flavoring now. For chocolate, sift 2 tablespoons of quality cocoa powder into the mixture before adding the cream, then proceed as normal. For fruit flavors, substitute 2 tablespoons of fruit puree (raspberry, strawberry, or passion fruit work beautifully) for some of the cream. For espresso, dissolve 1 tablespoon espresso powder in 1 tablespoon hot water, let it cool, then add it to the filling.
- Mix on medium speed for 1-2 minutes until the filling is completely smooth, fluffy, and uniform in color. If using food coloring, add it now—gel colors work best as they don’t add extra liquid. Start with just a tiny amount; you can always add more, but you can’t remove it. Mix until the color is evenly distributed with no streaks.
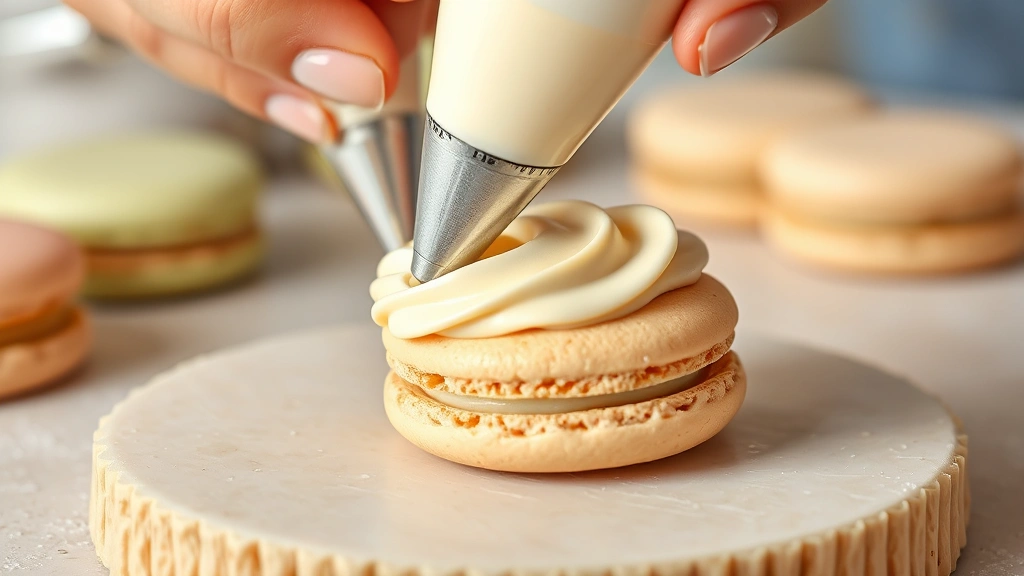
- Transfer the filling to a piping bag fitted with a round or star tip. For a classic presentation, use a ½-inch round tip. Let the filled piping bag sit at room temperature for 5 minutes to ensure the filling is at the optimal consistency for piping. If the filling seems too soft, refrigerate the piping bag for 10-15 minutes.
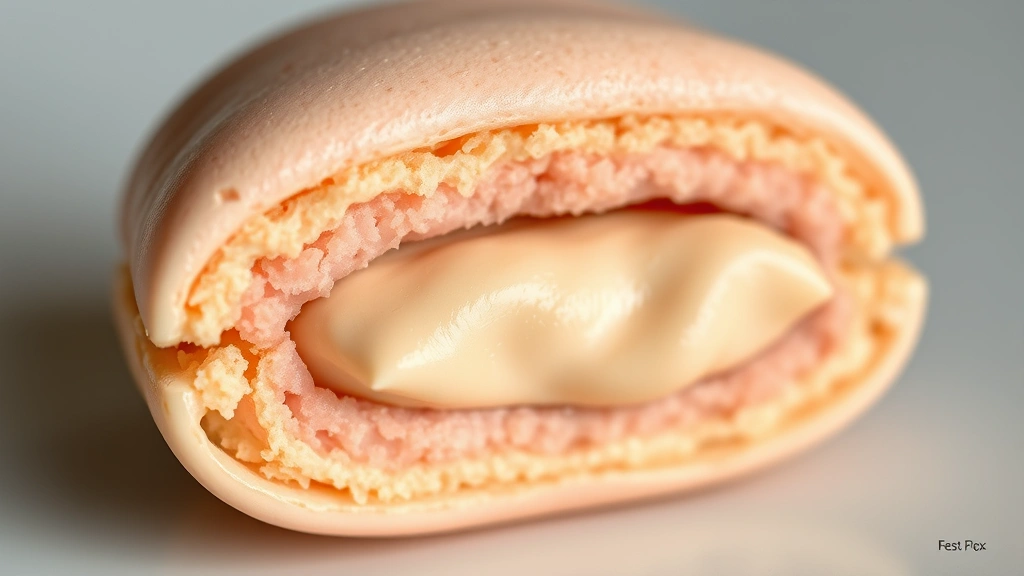
- Place a macaron shell flat-side-up on a work surface. Pipe a small mound of filling (about the size of a hazelnut or walnut, depending on your macaron size) onto the center of the shell. The filling should be slightly raised, not flat against the shell.
- Take a second macaron shell and gently press it down onto the filling, flat-side into the filling, creating a sandwich. Twist very slightly as you press to help the filling distribute evenly. Don’t press too hard, or the filling will squeeze out the sides and the delicate shells might crack.
- Place the filled macarons on a parchment-lined baking sheet. Refrigerate for at least 2 hours, or ideally overnight, before serving. This allows the filling to set and the flavors to meld beautifully. The macarons will be sturdier and easier to handle once chilled.
- Store filled macarons in an airtight container in the refrigerator for up to 5 days, or freeze for up to 3 months. Bring them to room temperature for 15 minutes before serving for the best flavor and texture.
Pro Tips
- **Buttercream Variations**: The base buttercream recipe is incredibly versatile. Try adding 2 tablespoons of lemon zest and 1 tablespoon of lemon juice for a bright citrus filling. For a pistachio version, substitute 2 tablespoons of pistachio butter for some of the cream. For a lavender filling, add ½ teaspoon of dried lavender extract or infuse the cream with lavender buds before adding it.
- **Ganache Alternative**: For a richer filling, make a simple chocolate ganache by heating ½ cup heavy cream until steaming, pouring it over 4 ounces of chopped dark chocolate, letting it sit for 1 minute, then stirring until smooth. Let it cool to room temperature before piping. This creates a more sophisticated, less sweet filling.
- **Cream Cheese Frosting Option**: For tang and depth, use 3 ounces softened cream cheese and 3 ounces softened butter instead of 6 ounces butter alone. Add the powdered sugar and flavorings as directed. This filling is particularly lovely with berry or citrus flavors.
- **Temperature is Critical**: Butter that’s too cold won’t mix properly and will create a grainy texture. Butter that’s too warm will result in a greasy, unstable filling that won’t hold its shape. The ideal temperature is around 65-70°F. If your kitchen is very warm, work quickly and refrigerate between steps.
- **Consistency Matters**: Your filling should be thick enough to hold its shape when piped but soft enough to pipe smoothly without excessive pressure. If it’s too stiff, the shells can crack when you press them together. If it’s too soft, the filling will squish out and the macarons will slide around.
- **Flavor Intensity**: Macarons have delicate shells, so the filling flavor should be prominent but not overwhelming. Start with less flavoring than you think you need—you can always add more next time. Remember that flavors intensify after refrigeration as they meld together.
- **Piping Tips**: Use a piping bag with a coupler so you can easily change tips without emptying the bag. Practice piping on parchment paper first to get a feel for the pressure needed. Consistent piping creates more even macarons and a more professional appearance.
- **Make-Ahead Magic**: You can prepare macaron filling up to 2 days in advance. Store it in an airtight container in the refrigerator, then bring it to room temperature and re-whip for 30 seconds before piping. This is perfect for holiday baking or party preparation.
- **Professional Touch**: For restaurant-quality presentation, pipe a small amount of filling onto the flat side of one shell, then pipe a thin ring of filling around the edge. This technique, called “kissing the shells,” creates a beautiful effect when the macarons are pressed together.
- **Troubleshooting**: If your filling breaks or becomes grainy, it’s usually because the butter was too cold or too warm, or the ingredients weren’t at the same temperature. Start over with properly room-temperature butter and ingredients. If the filling is too thin, add more powdered sugar a tablespoon at a time. If it’s too thick, add cream one teaspoon at a time.