
Making homemade tortillas from masa harina is easier than you might think, and the results are absolutely divine! There’s nothing quite like a warm, fresh tortilla straight off the griddle – it’s a game-changer for any meal. Whether you’re serving them alongside your favorite proteins or using them as the base for tacos, enchiladas, or pupusas, mastering this simple technique will elevate your cooking game.
Masa harina is a finely ground flour made from corn that has been treated with calcium hydroxide (also called nixtamalized corn). This process gives the corn a nutty flavor and makes the nutrients more bioavailable. You can find masa harina in most grocery stores in the international aisle, and it’s incredibly affordable. Once you understand the basic ratio and technique, you’ll be making perfect tortillas every single time.
The beauty of making tortillas from scratch is that you need just three ingredients: masa harina, water, and a pinch of salt. No fancy equipment required – though a tortilla press makes life easier, you can absolutely use a rolling pin or even the bottom of a heavy skillet. The key to perfect tortillas is getting the dough consistency just right and cooking them on a hot surface until they’re slightly charred and pliable.
I love serving these alongside pickled red onions for a bright, tangy contrast, or with charred shishito peppers for a more sophisticated presentation. You can also use them to scoop up your favorite dips, wrap around grilled meats, or even make them into crispy chips. The versatility of homemade tortillas means they’re perfect for any occasion, from casual weeknight dinners to impressive dinner parties.
Once you master this basic technique, you’ll wonder why you ever bought store-bought tortillas again. Fresh tortillas have a completely different texture and flavor – they’re softer, more pliable, and have that wonderful corn flavor that commercial tortillas simply can’t replicate. Plus, making them at home means you control exactly what goes into them, and they’re naturally gluten-free if that’s a concern for you or your family.
The process takes just about 20-30 minutes from start to finish, making it perfect for a quick weeknight side dish or a fun cooking project with kids. There’s something magical about watching a simple dough transform into a perfectly cooked tortilla right before your eyes. Once you get the hang of it, you’ll be making these regularly, and your family will absolutely love the homemade touch. For more inspiration on complementary sides, check out this chickpea salad recipe that pairs beautifully with warm tortillas.
For more detailed information on masa and corn preparation techniques, I recommend checking out Serious Eats for their comprehensive guides on Mexican cooking. You can also find great inspiration at Bon Appétit for creative ways to use homemade tortillas, and NYT Cooking has wonderful recipe collections featuring tortillas as a star ingredient.
Ingredients
- 2 cups masa harina (corn flour)
- 1½ cups warm water (plus more as needed)
- ½ teaspoon salt
- 1 tablespoon vegetable oil (optional, for added softness)
Instructions
- In a large mixing bowl, combine the masa harina and salt, whisking together to distribute the salt evenly throughout the flour.
- Create a well in the center of the masa harina mixture and slowly pour in the warm water while mixing with your hands or a wooden spoon.
- Mix the dough until it comes together, adding water one tablespoon at a time if the mixture is too dry. The dough should have a consistency similar to Play-Doh – moist but not sticky, and it should hold together when squeezed.
- Knead the dough in the bowl for 2-3 minutes until it becomes smooth and slightly elastic. If it’s too crumbly, add a bit more water; if it’s too sticky, dust with a little more masa harina.
- Let the dough rest for 5 minutes, covered with a damp kitchen towel. This helps the flour hydrate fully and makes the dough easier to work with.
- While the dough rests, heat a cast iron skillet, griddle, or comal over medium-high heat until it’s very hot but not smoking. You should be able to hold your hand about 2 inches above the surface for only 2-3 seconds.
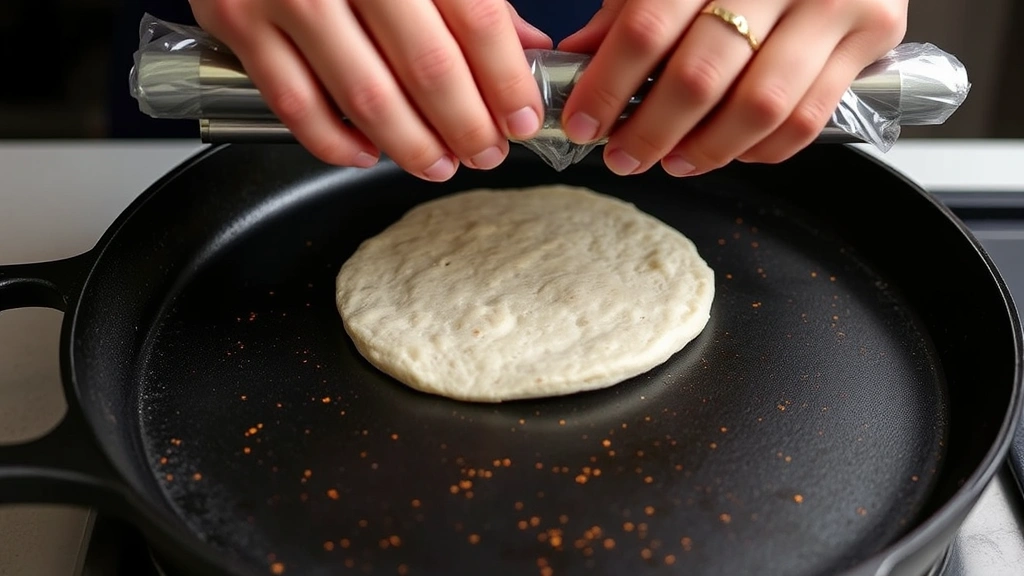
- Cut two pieces of plastic or parchment paper (approximately 6×6 inches each) – these will go on either side of your dough in the tortilla press or under your rolling pin.
- Take a piece of dough about the size of a golf ball and place it between the two pieces of plastic or parchment.
- Using a tortilla press (or a rolling pin if you don’t have a press), press the dough into a thin, even circle about ⅛-inch thick. If using a rolling pin, work gently and evenly from the center outward.
- Carefully peel away the top piece of plastic and flip the tortilla onto your hand, then peel away the second piece of plastic.
- Immediately place the tortilla on the hot skillet and cook for about 30-45 seconds until the bottom is lightly speckled with brown spots and the dough begins to look slightly dry around the edges.
- Flip the tortilla and cook for another 30-45 seconds on the second side until it’s also lightly browned and the tortilla puffs up slightly (this is a sign it’s cooking properly and steam is creating air pockets inside).
- Flip once more and cook for a final 10-15 seconds, pressing gently with a kitchen towel if it’s not puffing, to help create the characteristic air pocket.
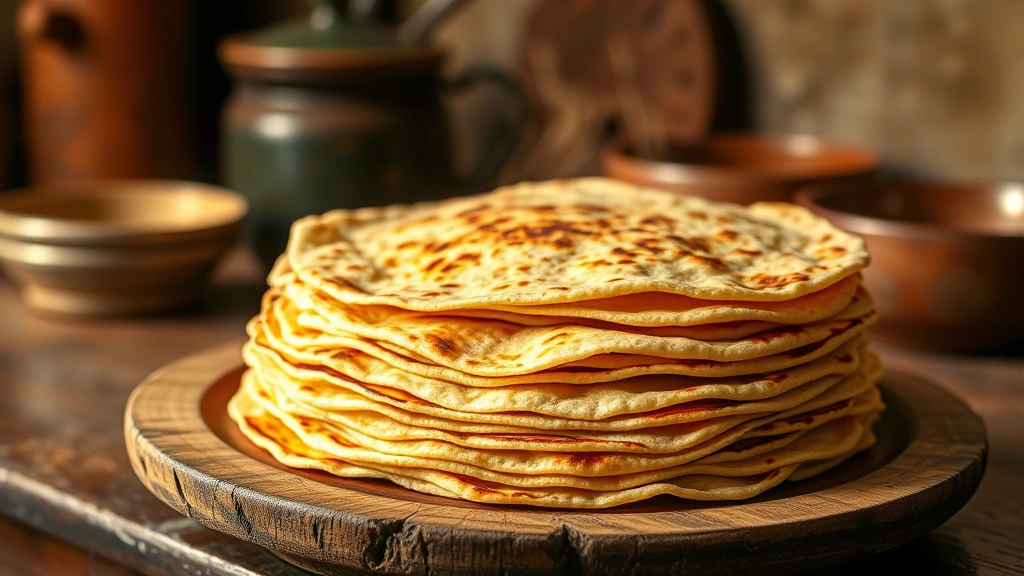
- Transfer the cooked tortilla to a clean kitchen towel or tortilla warmer to keep it warm and soft.
- Repeat the pressing and cooking process with the remaining dough, working quickly so that each tortilla is cooked while the skillet remains hot.
- Once all tortillas are cooked, stack them in a tortilla warmer, clean kitchen towel, or inside a covered container to retain warmth and moisture.
- Serve the tortillas warm with your favorite fillings, toppings, or alongside your favorite dishes.

Pro Tips
- **Dough Consistency is Key**: The most common mistake people make is either too dry or too wet dough. The dough should feel slightly tacky but not sticky – think of the texture of clay or Play-Doh. If it’s crumbly, add water one tablespoon at a time; if it’s too wet, dust with more masa harina.
- **Tortilla Press vs. Rolling Pin**: While a tortilla press (available at any kitchen store or online for $15-30) makes the job easier and more consistent, you can absolutely use a rolling pin. The key is to work gently and keep the plastic or parchment on both sides to prevent sticking. A heavy skillet can also work in a pinch.
- **Temperature Matters**: Your cooking surface needs to be quite hot – this is what creates those beautiful brown spots and helps the tortilla puff up. If it’s not hot enough, the tortillas will be tough and dense. If it’s too hot, they’ll brown too quickly before cooking through.
- **The Puff is Magic**: When a tortilla puffs up during cooking, it means steam is building inside and creating those air pockets that make for tender, pliable tortillas. Don’t worry if not all of them puff – they’ll still taste great, but puffed ones have the best texture.
- **Storage and Reheating**: Leftover tortillas can be stored in an airtight container in the refrigerator for up to 5 days or frozen for up to 3 months. To reheat, warm them directly over a gas flame for a few seconds per side, or wrap them in foil and heat in a 350°F oven for 10 minutes.
- **Make-Ahead Tip**: You can prepare the dough up to 1 hour in advance and keep it covered with a damp towel. The dough actually improves slightly with a longer resting time as the masa continues to hydrate.
- **Oil Option**: Adding a tablespoon of vegetable oil to the dough creates slightly softer, more pliable tortillas – especially helpful if you’re new to making them. The oil isn’t essential but does improve the final texture.
- **Size and Thickness**: Aim for tortillas about 6-7 inches in diameter and roughly ⅛-inch thick. Thinner tortillas are more prone to tearing, while thicker ones won’t cook through properly and will be gummy in the center.
- **Flavor Variations**: Once you master the basic recipe, try adding roasted corn kernels, fresh cilantro, jalapeño slices, or even a bit of cheese to the dough for fun variations.
- **Cast Iron is Best**: While any flat cooking surface works, cast iron skillets and traditional comals (Mexican griddles) retain heat best and give the most consistent results. Stainless steel works too but heats less evenly.