
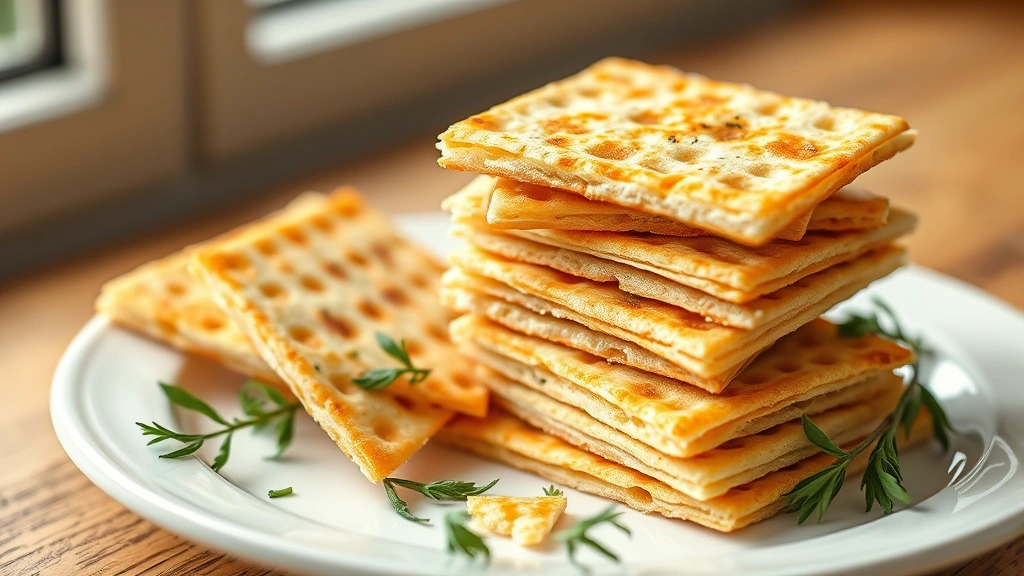
Making matzah at home is easier than you might think, and the results are absolutely delicious! This quick and easy matzah recipe produces perfectly crispy, golden crackers that are ideal for Passover or any time you want a wholesome, unleavened bread. The beauty of homemade matzah lies in its simplicity—just a few basic ingredients and about 30 minutes of your time transform into something truly special.
Matzah has been a staple of Jewish cuisine for thousands of years, representing the unleavened bread eaten during the exodus from Egypt. While store-bought versions are convenient, there’s something truly magical about making it yourself. The aroma of freshly baked matzah filling your kitchen, the satisfying crunch as you break it apart, and the knowledge that you created it from scratch—these are experiences that store-bought simply cannot replicate.
What makes this recipe so perfect is its incredible versatility. You can enjoy it plain with a schmear of butter and jam, pair it with creamy sauces, or use it as the foundation for composed dishes. It’s also wonderfully neutral, making it an excellent companion to soups, stews, and dips. Whether you’re observing Passover, exploring Jewish culinary traditions, or simply seeking a rewarding baking project, this matzah recipe delivers every single time.
The key to success lies in three things: proper hydration of your dough, adequate resting time, and a very hot oven. When you follow these guidelines, you’ll achieve that characteristic crispy texture with just the right amount of char marks. The entire process is surprisingly quick—no long fermentation required—making this an ideal recipe for busy weeknights or last-minute Passover preparations.
I’ve made this recipe dozens of times, and each batch turns out beautifully. My family loves helping with the rolling and stretching process, making it a wonderful activity to share with children. The recipe scales easily, so whether you’re making enough for one meal or preparing for a week of Passover seders, you can adjust quantities accordingly.
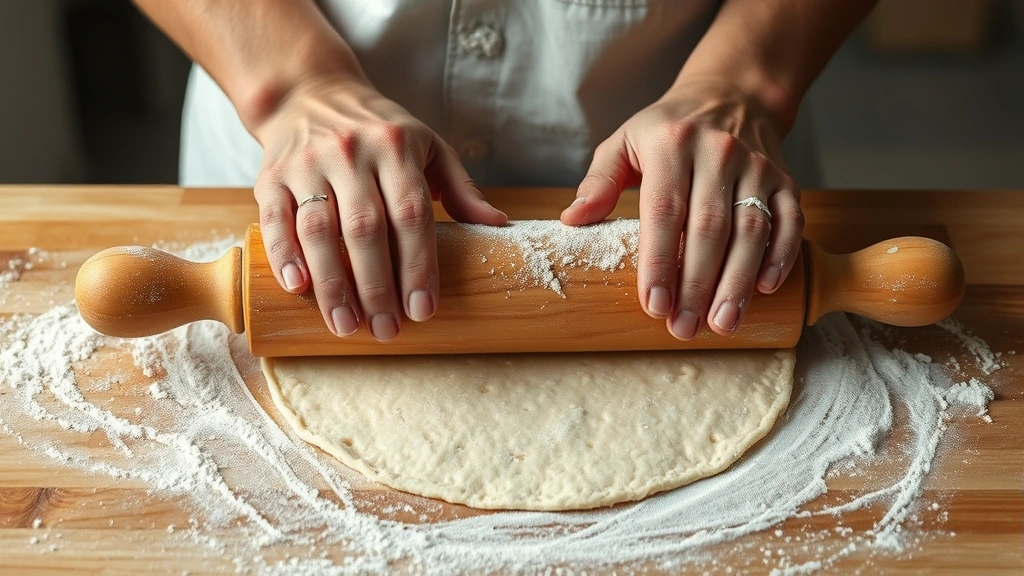
For best results, invest in a good rolling pin and have parchment paper ready. A kitchen scale ensures accuracy, though measuring cups work perfectly fine too. Keep your work surface lightly floured but not too generously—you want just enough to prevent sticking. The dough should be relatively stiff, almost like pizza dough, which helps it puff slightly in the oven.
One of the beautiful aspects of homemade matzah is how you can customize it. Add sesame seeds, za’atar, or sea salt to the surface before baking for extra flavor. Some people prefer thinner, more delicate crackers, while others enjoy a chewier texture—simply adjust your rolling thickness and baking time accordingly.
This recipe pairs wonderfully with creamy dishes or hearty soups. For a Mediterranean twist, serve with fresh salads and hummus. You can also break it into pieces and use it as a base for layered appetizers.
For more detailed information on unleavened bread techniques, check out Serious Eats, which offers excellent guidance on bread-making fundamentals. Bon Appétit features numerous Passover-specific recipes and variations. For classic baking techniques and troubleshooting, New York Times Cooking provides comprehensive resources. Additionally, Serious Eats Passover collection offers creative takes on traditional recipes.
Once you master this basic recipe, you’ll find yourself making matzah regularly. It’s that simple, that satisfying, and that delicious. Your guests will be amazed that you made it yourself, and you’ll love the pride of serving homemade, freshly baked matzah at your table.
Ingredients
- 2 cups all-purpose flour (or potato starch for Passover)
- ¾ cup water, plus more as needed
- ½ teaspoon sea salt
- 1 tablespoon olive oil or melted butter
- Extra flour for dusting
Instructions
- In a large mixing bowl, combine the flour and sea salt, whisking together to distribute the salt evenly throughout the flour.
- Create a well in the center of the dry ingredients and add the water and olive oil.
- Using a wooden spoon or your hands, gradually incorporate the dry ingredients into the wet ingredients, mixing until a shaggy dough forms.
- Transfer the dough to a lightly floured work surface and knead for 3-4 minutes until the dough becomes smooth and slightly elastic. Add more water one teaspoon at a time if the dough feels too dry, or more flour if it’s too sticky.
- Divide the dough into 8 equal pieces and shape each piece into a ball. Place the balls on a lightly floured baking sheet and let them rest for 5 minutes.
- Preheat your oven to 475°F (245°C). If you have a baking stone or cast-iron skillet, place it in the oven to preheat as well.
- Working with one dough ball at a time, place it on a floured surface and flatten it slightly with your palm.
- Using a rolling pin, roll the dough ball into a very thin, almost transparent round, approximately ⅛-inch thick. This is the key to achieving crispy matzah.
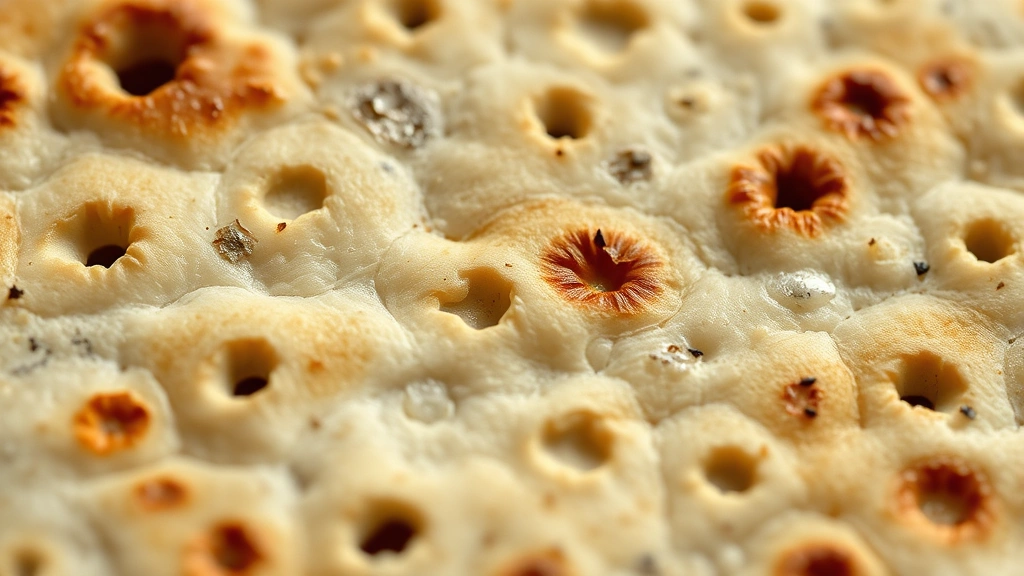
- Using a fork or docking tool, prick the entire surface of the rolled dough to prevent large air pockets from forming during baking.
- Carefully transfer the rolled dough to the preheated baking stone or a baking sheet lined with parchment paper.
- Bake for 2-3 minutes until the matzah begins to puff and the edges start to brown.
- Using tongs or a spatula, carefully flip the matzah over and bake for an additional 1-2 minutes on the other side until it achieves a light golden-brown color with some darker spots for character.
- Remove the matzah from the oven and place it on a cooling rack. It will continue to crisp up as it cools.
- Repeat the rolling, pricking, and baking process with the remaining dough balls.
- Once completely cooled and crispy, store the matzah in an airtight container for up to one week.
Pro Tips
- Dough Consistency: The dough should be slightly stiffer than pizza dough but still workable. If it’s too dry, the matzah will crack during rolling; if too wet, it won’t crisp properly. Adjust water gradually.
- Rolling Technique: Roll the dough as thin as possible—this is crucial for achieving that signature crispy texture. Thinner matzah crisps more effectively than thicker versions.
- Pricking: Docking the surface with a fork prevents large bubbles from forming, which would create an uneven texture. Don’t skip this step!
- Oven Temperature: A very hot oven is essential. If your oven tends to run cool, increase the temperature by 25°F. Conversely, if it runs hot, reduce by 25°F to prevent burning.
- Baking Stone vs. Baking Sheet: A preheated baking stone creates the crispiest results because it provides intense, even heat from below. However, a regular baking sheet works well too—just preheat it if possible.
- Flour Options: For Passover, use potato starch, matzah meal, or a Passover-approved flour blend instead of all-purpose flour. The texture will be slightly different but equally delicious.
- Customization: Before baking, brush the surface with water and sprinkle with sesame seeds, za’atar, coarse sea salt, or everything bagel seasoning for added flavor and visual appeal.
- Batch Baking: Work quickly and efficiently to keep your workspace organized. Have all pieces rolled and ready to go before you begin baking to maintain a consistent rhythm.
- Storage: Store completely cooled matzah in an airtight container at room temperature for up to one week. For longer storage, freeze in an airtight container for up to three months.
- Troubleshooting Thick Spots: If some matzah pieces are thicker than others, they’ll bake at different rates. Keep a close eye during baking and remove thinner pieces earlier if needed.
- Make-Ahead Option: You can prepare and roll all the dough balls several hours in advance, covering them with plastic wrap. Bake them fresh when ready to serve for the best texture.