
Making gluten-free bread at home has never been easier than with a bread maker! This foolproof gluten-free bread maker recipe delivers a soft, fluffy loaf with the perfect crust every single time. Whether you’re newly gluten-free or a seasoned pro, this recipe is an absolute game-changer for busy weeknights and weekend baking.
I absolutely love my bread maker because it takes all the guesswork out of bread baking. No more kneading, no more monitoring rise times—just dump your ingredients in and let the machine do the work! This gluten-free bread is incredibly versatile and pairs beautifully with everything from a simple Quick Tasty Bacon Carbonara Recipe to a comforting bowl of soup.
The secret to the best gluten-free bread is using the right blend of flours and adding ingredients that mimic the structure gluten naturally provides. I use a combination of brown rice flour, tapioca starch, and potato starch along with xanthan gum to create that tender crumb we all crave. The addition of eggs and a touch of honey helps create lift and adds richness to every slice.
What makes this recipe so special is how reliable it is in a bread maker. The machine handles all the heavy lifting—literally! You get professional-quality results without any of the stress. Plus, your kitchen will smell absolutely amazing while it bakes. This bread is perfect for everything from morning toast with butter and jam to building the ultimate sandwich. It also makes an excellent accompaniment to Best Heavy Cream Alfredo Sauce Recipe or a warm pasta dish.
I recommend using a bread maker with a gluten-free setting if yours has one, as these machines often have gentler mixing and longer rise times that work better with gluten-free doughs. If you don’t have this setting, don’t worry—the basic bread or white bread cycle works beautifully too. For even more cooking inspiration, check out Serious Eats for additional baking techniques.
One important tip: always measure your flours by weight if possible. Gluten-free baking is incredibly precise, and volume measurements can vary significantly. If you don’t have a scale, spoon your flour into a measuring cup and level it off gently—don’t scoop directly from the bag, as this compacts the flour and throws off your measurements.
This bread freezes beautifully, so feel free to make a double batch and store extras in the freezer for up to three months. Just wrap cooled loaves tightly in plastic wrap and then foil before freezing. Thaw at room temperature before serving. You can also find more gluten-free inspiration at Bon Appétit for additional recipe ideas.
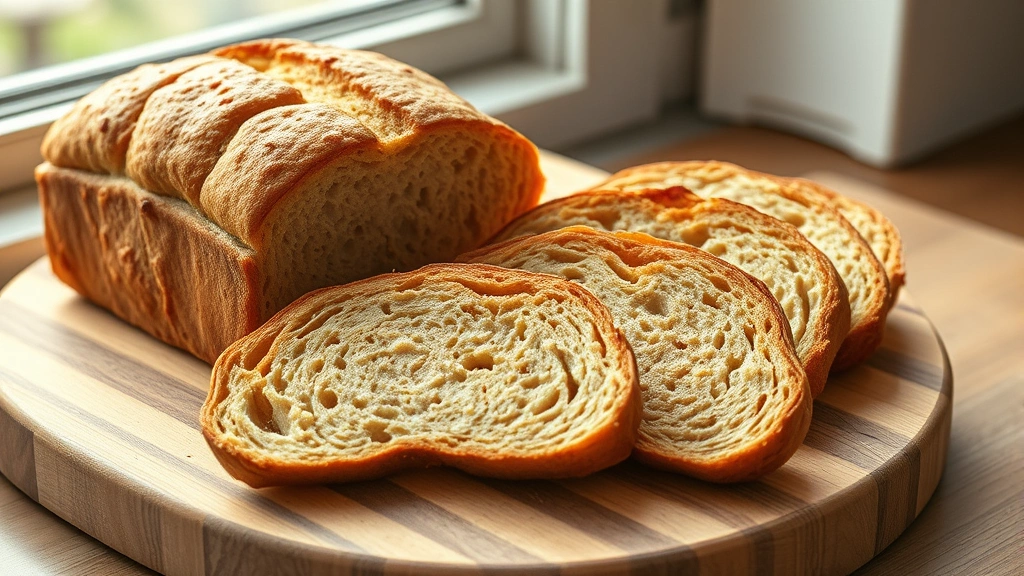
The texture of this bread is honestly restaurant-quality. It’s soft enough for sandwiches but sturdy enough to hold up to toasting without falling apart. The crust develops a beautiful golden-brown color, and the inside has that perfect tender crumb that gluten-free bread sometimes lacks. Once you master this basic recipe, you can experiment with add-ins like seeds, nuts, or dried herbs.
For those interested in expanding their gluten-free cooking repertoire, this bread pairs wonderfully with Delicious Heavy Cream Pasta Recipe or Easy Chicken Alfredo Recipe. You’ll love having fresh homemade bread to go with all your favorite meals.
I’m so excited to share this recipe with you because I know how challenging gluten-free baking can be. This bread maker recipe removes so much of that challenge while delivering consistently delicious results. Your family will be amazed that you made this gorgeous loaf right at home, and honestly, it’s so easy they might not believe you didn’t cheat and buy it from a bakery!
For additional cooking guidance, visit New York Times Cooking for expert tips and techniques. Now let’s make some beautiful gluten-free bread!
Ingredients
- 1 cup warm water (110°F)
- 2 tablespoons honey
- 2 tablespoons vegetable oil or melted butter
- 2 large eggs, room temperature
- 1 teaspoon salt
- ¾ cup brown rice flour
- ½ cup tapioca starch
- ⅓ cup potato starch
- ¼ cup cornstarch
- 2 tablespoons ground flaxseed
- 1½ teaspoons xanthan gum (omit if your gluten-free flour blend already contains it)
- 2¼ teaspoons instant yeast (one packet)
- 1 tablespoon sugar
- ½ teaspoon cider vinegar (helps with rise and texture)
Instructions
- Pour the warm water into your bread maker pan first. Add the honey, vegetable oil, and eggs to the water and gently whisk together until combined.
- In a separate bowl, whisk together the brown rice flour, tapioca starch, potato starch, cornstarch, ground flaxseed, and xanthan gum until fully blended with no lumps.
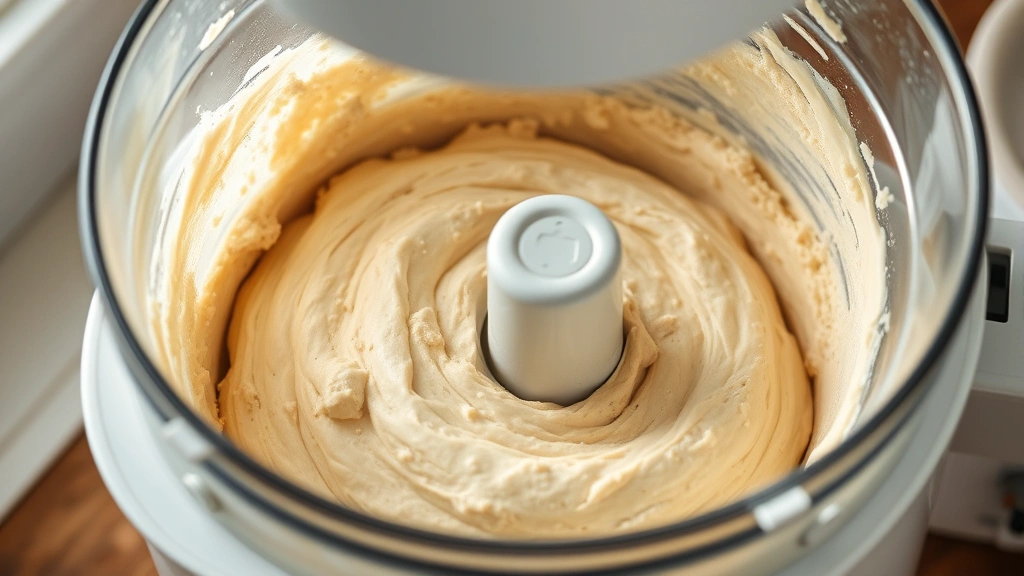
- Add the flour mixture to the bread maker pan with the wet ingredients. Mix on low speed for about 1-2 minutes until you have a thick, wet batter. The dough should look more like thick cake batter than traditional bread dough.
- Add the salt, sugar, and cider vinegar to the dough. Mix again for 30 seconds to incorporate these ingredients evenly throughout.
- Create a small well in the top of the dough and sprinkle the instant yeast into it. This helps activate the yeast properly and prevents it from coming into direct contact with salt, which can inhibit rising.
- Close the bread maker lid and select the “Gluten-Free” setting if your machine has one. If not, select the “Basic” or “White Bread” setting. Choose a medium crust color setting.
- Step back and let your bread maker work its magic for the entire cycle. Do not open the lid during baking, as this can cause the bread to collapse.
- When the cycle completes, you’ll hear a beep. Carefully remove the bread maker pan using oven mitts, as it will be very hot.
- Turn the pan upside down onto a wire cooling rack and gently tap the bottom to release the loaf. The bread should slide out easily.
- Let the bread cool on the wire rack for at least 30-45 minutes before slicing. This allows the interior to set properly and makes slicing much easier and cleaner.
- Once completely cooled, slice your bread with a serrated bread knife using a gentle sawing motion rather than pressing down hard. Store in an airtight bread box or bag at room temperature for up to 4 days.
- For longer storage, wrap cooled bread tightly in plastic wrap and then aluminum foil before freezing for up to 3 months. Thaw at room temperature before serving.
Pro Tips
- **Bread Maker Selection**: Different bread makers have varying cycle times and temperatures. If your machine has a gluten-free setting, use it—these cycles are specifically designed with longer rise times and gentler mixing that work better for gluten-free doughs. Check your bread maker’s manual for specific gluten-free instructions.
- **Flour Measurements**: This is crucial for gluten-free baking success. By weight, use: 120g brown rice flour, 80g tapioca starch, 53g potato starch, and 32g cornstarch. If measuring by volume, spoon flour into measuring cups and level off gently without compacting. Avoid scooping directly from bags.
- **Xanthan Gum**: This ingredient is essential in gluten-free baking as it provides the binding structure that gluten normally provides. If your gluten-free flour blend already contains xanthan gum, omit the extra amount called for in this recipe to avoid making the bread gummy.
- **Water Temperature**: Warm water (around 110°F) helps activate the yeast properly. Water that’s too hot will kill the yeast, while water that’s too cold won’t activate it sufficiently. Use a thermometer if you have one.
- **Egg Temperature**: Room temperature eggs incorporate more smoothly into the dough. If your eggs are cold, place them in warm water for 5 minutes before adding to the bread maker.
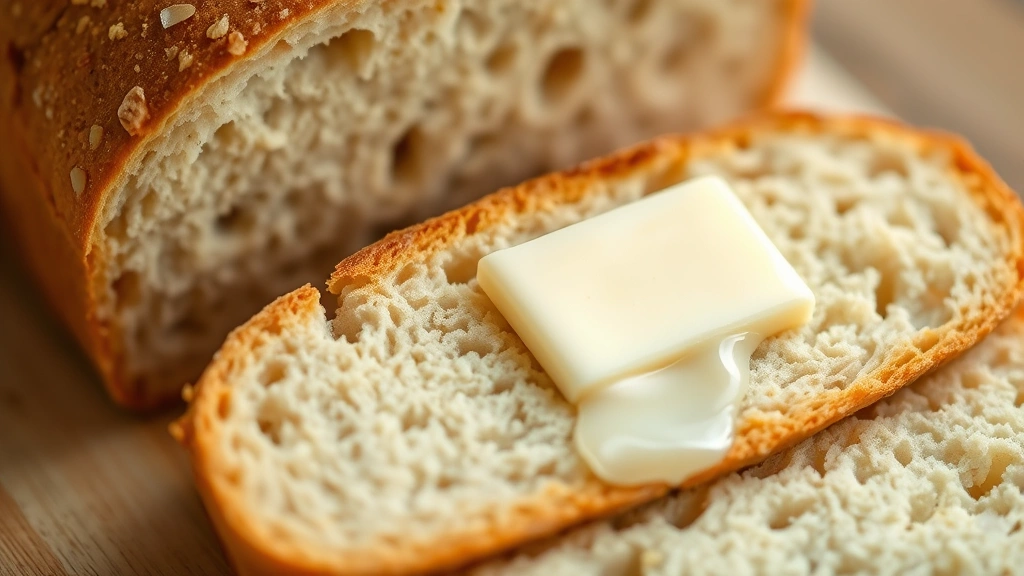
- **Crust Preferences**: If you prefer a crispier crust, select a darker crust setting. For a softer crust, choose a lighter setting. You can also brush the warm loaf with melted butter immediately after removing from the machine for extra softness.
- **Texture Troubleshooting**: If your bread is too dense, you may have overworked the dough during mixing, used too much flour, or your yeast may be expired. If it’s too crumbly, you may need to add 1-2 tablespoons more water. Gluten-free doughs are naturally wetter than wheat doughs.
- **Add-In Ideas**: Once you master this basic recipe, experiment with additions like sunflower seeds, sesame seeds, pumpkin seeds, chopped nuts, or dried herbs. Add these during the final 5 minutes of mixing for best results.
- **Yeast Freshness**: Active dry or instant yeast should be stored in an airtight container in the refrigerator or freezer to maintain potency. Old yeast won’t rise properly. Check the expiration date before baking.
- **Cooling Important**: Resist the urge to slice into warm bread! The interior continues to set as it cools. Slicing too early results in a gummy, dense texture. The 30-45 minute cooling period is essential for proper texture development.
- **Storage Tips**: This bread stays fresh at room temperature in an airtight bread box for 3-4 days. For longer storage, freeze individual slices wrapped in plastic wrap for convenient single-serve thawing. Thaw at room temperature or toast directly from frozen.
- **Dietary Modifications**: This recipe is naturally gluten-free and can be made dairy-free by substituting the butter with vegetable oil. For vegan baking, replace eggs with flax eggs (1 tablespoon ground flaxseed mixed with 3 tablespoons water per egg) and use oil instead of butter.