
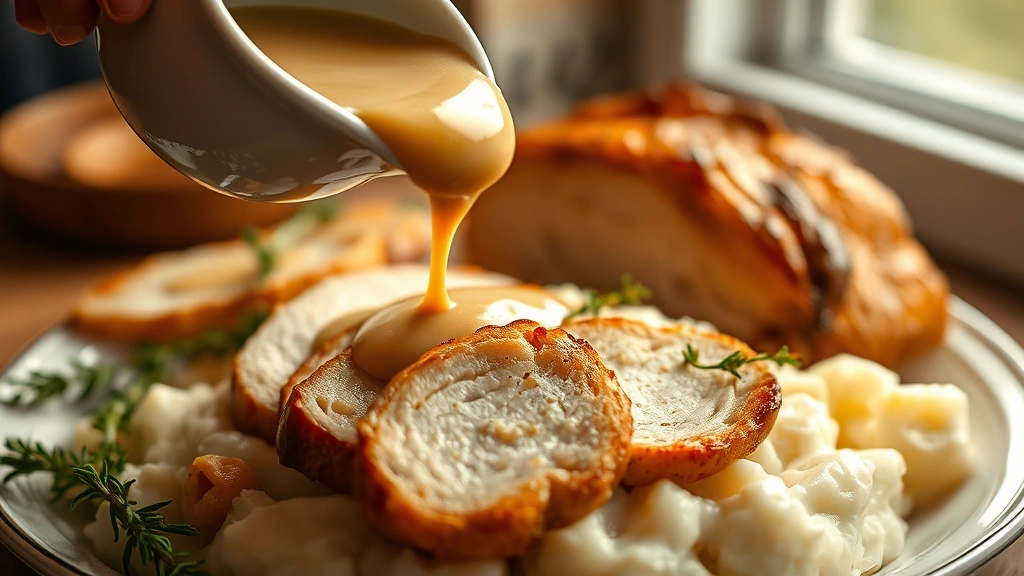
Making gluten-free gravy doesn’t mean sacrificing that rich, velvety texture and deep flavor you love! This foolproof recipe creates a silky smooth sauce that’s perfect for holiday dinners and everyday meals alike. The secret is using the right thickening agent and quality broth to build a gravy that rivals any traditional version.
Whether you’re cooking for a gluten-free household or simply looking to expand your cooking repertoire, this gravy is an absolute game-changer. I’ve been perfecting this recipe for years, and I’m thrilled to share my tried-and-true method with you. The beauty of this approach is its versatility—you can make it with turkey drippings, chicken stock, beef broth, or vegetable stock depending on what you’re serving it with.
What makes this recipe truly special is how it comes together in just minutes. No lumps, no watery texture, just pure gravy perfection. I love serving this alongside creamy pasta dishes or roasted chicken. The technique I’m sharing works beautifully with both pan drippings and homemade broth, giving you complete flexibility in the kitchen.
The key to success is understanding your thickening agent. Cornstarch and arrowroot powder are my go-to gluten-free options because they create that silky mouthfeel without any grittiness. I’ll walk you through exactly how to incorporate them to avoid lumps. This method has been tested countless times, and I’m confident it will become your new favorite creamy sauce recipe.
If you’re planning a holiday meal or simply want to elevate your weeknight dinner, this gluten-free gravy recipe is essential. Pair it with your favorite proteins, mashed potatoes, or chicken alfredo for a restaurant-quality meal. For more sauce inspiration, check out this creamy pasta guide, which uses similar techniques to build flavor.
This recipe is also naturally dairy-free adaptable and can be customized with fresh herbs, mushrooms, or caramelized onions. I love the flexibility of this approach because it means you can make it exactly how your family loves it. The method is foolproof, the results are consistently excellent, and cleanup is minimal. Let me show you how to make restaurant-quality gravy at home!
For additional side dish inspiration to complement your gravy, consider making fresh salads or pickled vegetables for brightness and balance. External resources like Serious Eats’ gluten-free guide and Bon Appétit’s gravy recipes offer additional inspiration. For more technical baking and cooking guidance, The New York Times cooking section has excellent tutorials on sauce-making techniques that apply beautifully to gluten-free cooking.
Ingredients
- 4 tablespoons butter or pan drippings
- 1/4 cup cornstarch or arrowroot powder
- 2 cups beef, chicken, turkey, or vegetable broth
- 1/2 cup heavy cream or milk (optional for extra richness)
- 2 tablespoons red wine or marsala (optional)
- 1 teaspoon fresh thyme or sage
- 1/2 teaspoon garlic powder
- Salt and black pepper to taste
- 1/2 teaspoon onion powder
- Pinch of nutmeg (optional)
- Fresh herbs for garnish (optional)
Instructions
- If using pan drippings, pour them into a measuring cup and remove any large pieces of meat or debris. Skim off excess fat if desired, leaving about 4 tablespoons for richness. If starting from scratch, melt 4 tablespoons of butter in a medium saucepan over medium heat until it’s foamy and fragrant.
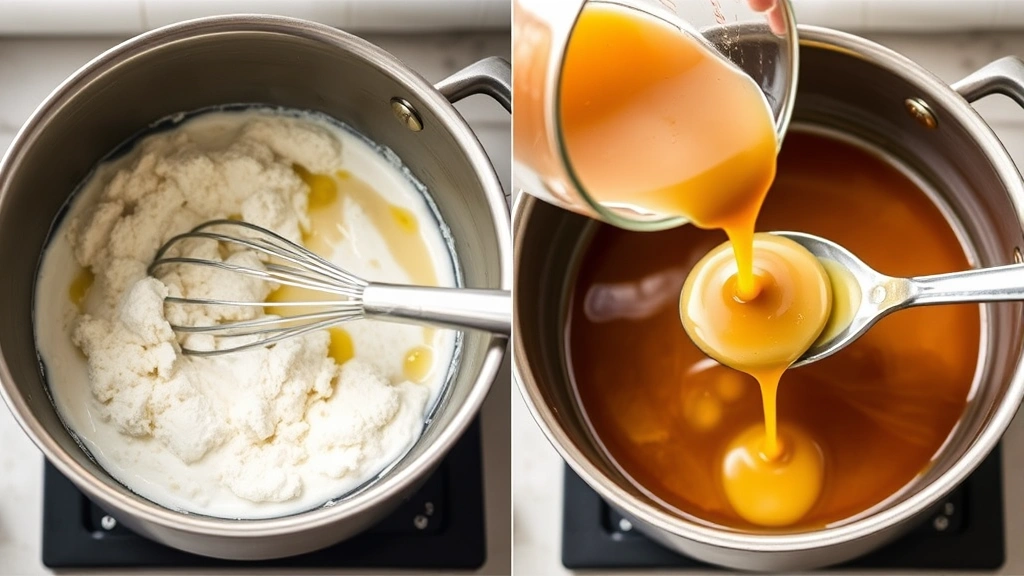
- In a small bowl, whisk together the cornstarch or arrowroot powder with 1/4 cup of cold broth until completely smooth with no lumps. This is the most important step—any lumps in this mixture will end up in your finished gravy, so take your time to whisk thoroughly.
- Once your butter or pan drippings are hot and ready, add the cornstarch slurry to the pan while whisking constantly. The cornstarch will begin to cook immediately, creating a roux-like base that will thicken your gravy.
- Continue whisking for about 1-2 minutes until the mixture becomes slightly thickened and takes on a light brown color. This cooking process removes the raw cornstarch taste and allows the thickening agent to activate properly.
- Slowly pour in the remaining 1.75 cups of broth while whisking continuously. This gradual addition prevents lumps from forming and ensures a silky smooth texture throughout. Keep whisking as you pour to incorporate the broth evenly.
- Increase the heat to medium-high and continue cooking while stirring frequently. The gravy will begin to thicken noticeably after about 2-3 minutes. You’ll see it coat the back of a spoon when it reaches the perfect consistency.
- Add the fresh thyme, garlic powder, onion powder, and a pinch of nutmeg if using. Stir well to combine all the seasonings evenly throughout the gravy. Taste as you go and adjust seasonings to your preference.
- If using wine or marsala, add it now and let it simmer for about 1 minute to cook off any harsh alcohol flavors while adding depth to the gravy. The acidity also helps balance the richness beautifully.
- For extra richness and creaminess, stir in the heavy cream or milk at this point. Do this off the heat to prevent the cream from breaking or curdling. Stir until fully incorporated and the gravy has a luxurious, velvety texture.
- Taste the gravy and season generously with salt and black pepper. Remember that the flavors will concentrate as the gravy sits, so you might want to season conservatively at first and adjust just before serving.
- If your gravy is too thick, thin it with additional broth, cream, or milk added a tablespoon at a time while whisking. If it’s too thin, make another cornstarch slurry and add it gradually while whisking until you reach the desired consistency.
- Transfer the finished gravy to a serving boat or bowl. If you’re making it ahead, pour it into a glass container and refrigerate for up to 4 days. Reheat gently over low heat on the stovetop, stirring frequently and adding a splash of broth if needed to restore the correct consistency.
- Serve warm over mashed potatoes, roasted vegetables, sliced meat, or biscuits. Garnish with fresh herbs if desired and enjoy your perfectly smooth, delicious gluten-free gravy!

Pro Tips
- Cornstarch vs. Arrowroot: Both work beautifully for this recipe. Cornstarch is more affordable and readily available, while arrowroot powder has a slightly cleaner taste and is completely flavorless. Choose based on your preference and dietary needs.
- Pan Drippings Magic: If you’re making this with pan drippings from roasted meat, save every drop! The browned bits and flavorful oils are liquid gold for gravy. Just strain out any large solids and proceed as directed.
- Make-Ahead Strategy: This gravy reheats beautifully. Make it up to 4 days in advance and store in an airtight container in the refrigerator. Reheat gently on the stovetop over low heat, whisking occasionally and adding broth as needed to reach the perfect consistency.
- Consistency Control: The beauty of cornstarch and arrowroot is that you have complete control over thickness. For thinner gravy, use less thickener. For thicker gravy, whisk together more cornstarch slurry and add it gradually while whisking.
- Flavor Variations: Add sautéed mushrooms, caramelized onions, fresh sage, rosemary, or a splash of balsamic vinegar for unique flavor profiles. Fresh herbs work best added at the very end to preserve their delicate flavors.
- Dairy-Free Option: Substitute the cream with coconut milk, oat milk, or cashew cream for a dairy-free version that’s equally delicious and creamy.
- Beef vs. Chicken: This recipe works with any type of broth. Beef creates a deeper, richer gravy perfect for beef dinners. Chicken broth creates a lighter gravy ideal for poultry. Vegetable broth works wonderfully for vegetarian meals.
- No Lumps Guarantee: The key to lump-free gravy is whisking the cornstarch with cold broth first, then adding it gradually to hot liquid while whisking constantly. This method is foolproof and delivers silky results every time.
- Storage Tips: Gluten-free gravy freezes beautifully for up to 3 months. Freeze in ice cube trays for perfect portions, then store in freezer bags. Thaw overnight in the refrigerator and reheat gently on the stovetop.