
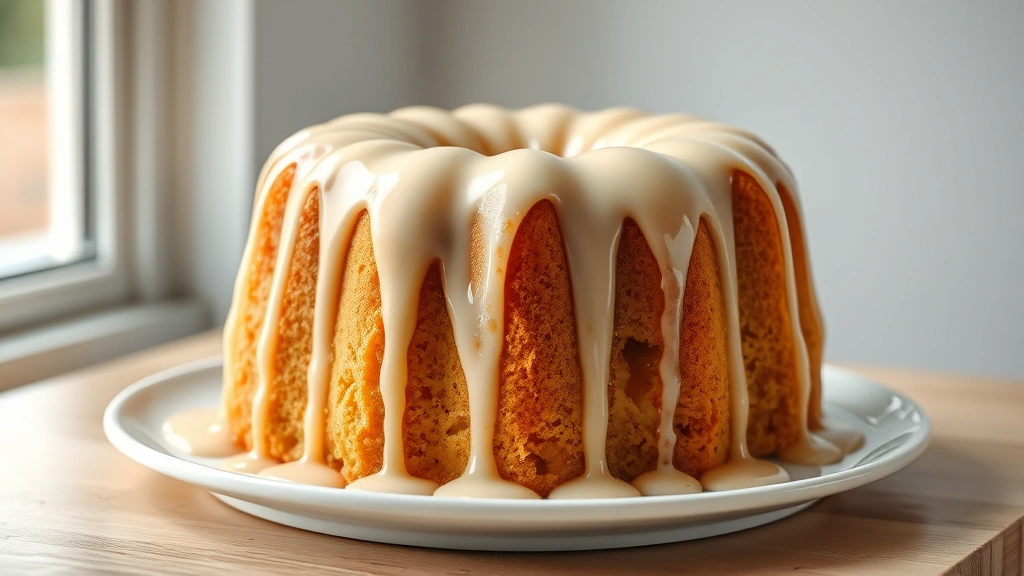
There’s nothing quite like the elegance of a perfectly poured glaze icing dripping down the sides of a freshly baked cake or donut. This simple glaze icing recipe is an absolute game-changer in the kitchen, and I’m thrilled to share my foolproof method with you today. Whether you’re a seasoned baker or just starting your culinary journey, this glaze icing is incredibly forgiving and delivers professional-looking results every single time.
I’ve been making this glaze for years, and it’s become my go-to for everything from cinnamon rolls to lemon pound cakes. The beauty of this recipe lies in its simplicity—just a handful of ingredients that you probably already have in your pantry. Unlike more complicated glazes that require tempering or special techniques, this version comes together in minutes and sets beautifully without any fuss. The texture is smooth, glossy, and absolutely luxurious.
What I love most about this glaze icing is its versatility. You can keep it classic with vanilla, or easily customize it with different extracts, citrus zests, or even food coloring to match any occasion. The consistency is perfectly balanced—thick enough to coat beautifully, yet thin enough to create those gorgeous, Instagram-worthy drips that everyone loves. I’ve shared this recipe with countless friends and family members, and it never fails to impress.
The secret to achieving that perfect glaze consistency is all about the ratio of powdered sugar to liquid. Too much liquid and you’ll end up with a runny mess that won’t set properly. Too little and you’ll have a thick paste that’s difficult to work with. This recipe hits that sweet spot every single time. I also love that you can make it ahead of time and store it in an airtight container, making it perfect for busy baking days.
Before we dive into the recipe, let me share a few pro tips that will elevate your glaze-making game. First, always sift your powdered sugar before mixing—this eliminates lumps and creates a silky-smooth texture. Second, use room temperature ingredients for the best results. And third, if you’re adding any flavorings, start with a small amount and adjust to taste. You can always add more, but you can’t take it out!
This glaze icing pairs beautifully with my Heavy Cream Alfredo Sauce Recipe techniques for achieving silky smooth textures in glazes. If you’re interested in exploring more versatile kitchen staples, check out my Heavy Cream Pasta Recipe for understanding how to work with dairy-based sauces. For those looking to create elegant desserts for entertaining, my Chicken Alfredo Recipe demonstrates how to balance flavors beautifully. You might also enjoy pairing glazed baked goods with fresh sides like my Chickpea Salad Recipe for a complete meal experience.
For more inspiration on glazing techniques, I recommend checking out Bon Appétit for their expert tips on pastry work. Serious Eats also has fantastic resources on baking science and glaze consistency. The New York Times Cooking section features wonderful glazed dessert recipes that complement this basic technique perfectly. Now, let’s get to making the most beautiful glaze icing you’ve ever created!
Ingredients
- 2 cups powdered sugar, sifted
- 3 tablespoons butter, softened to room temperature
- 1/2 teaspoon vanilla extract
- 3-4 tablespoons whole milk or heavy cream
- Pinch of sea salt
Instructions
- Sift your powdered sugar into a medium mixing bowl, pressing out any lumps with the back of a spoon or a sifter to ensure a smooth, lump-free glaze.
- Add the softened butter to the sifted powdered sugar and cream together using an electric mixer on low speed or by hand with a wooden spoon until the mixture resembles wet sand.
- Pour in the vanilla extract and a pinch of sea salt, mixing well to incorporate these flavor elements throughout the butter and sugar mixture.
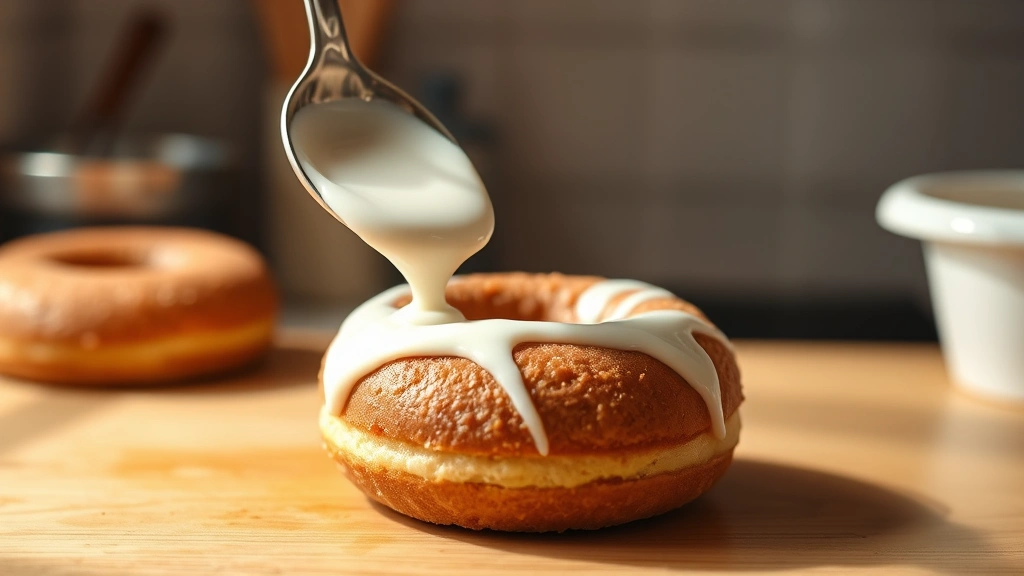
- Slowly add the milk or heavy cream, one tablespoon at a time, stirring constantly until you reach your desired consistency—the glaze should be smooth and pourable but still thick enough to coat the back of a spoon.
- Continue whisking by hand for 30-45 seconds until the glaze becomes glossy and completely smooth, ensuring there are no streaks or lumps remaining.
- Taste the glaze and adjust the vanilla extract or salt if needed—you want a subtle vanilla flavor that doesn’t overpower your baked good.
- If the glaze is too thick, add milk by the teaspoon until it reaches the perfect pourable consistency; if it’s too thin, whisk in a bit more powdered sugar.
- Use the glaze immediately while it’s fresh and at the perfect temperature, pouring it over your cooled baked goods in a thin, even stream for beautiful coverage.
- Allow the glazed baked goods to set for 15-30 minutes at room temperature before serving, which allows the glaze to firm up slightly and achieve that beautiful matte finish.
Pro Tips
- This glaze icing can be made up to 24 hours in advance and stored in an airtight container in the refrigerator—simply let it come to room temperature and give it a gentle stir before using.
- For a lighter glaze, substitute the milk with almond milk or oat milk, which creates a more delicate texture perfect for delicate pastries and petit fours.
- Heavy cream creates a richer, more luxurious glaze than regular milk—use it when you want a more decadent finish on special occasion baked goods.
- To create colored glazes, add 1-2 drops of gel food coloring (liquid food coloring can make the glaze too thin) and mix thoroughly until the color is evenly distributed.
- Flavor variations are endless: replace vanilla with almond extract for a classic combination, add 1-2 tablespoons of fresh lemon juice for a bright citrus glaze, or incorporate melted white chocolate for a sweeter version.
- For a cream cheese glaze, replace the butter with 2 ounces of softened cream cheese and reduce the milk to 2-3 tablespoons—this creates a tangier, more complex flavor.
- If your glaze begins to set while you’re working with it, microwave it for 5-10 seconds at 50% power to loosen it back up without breaking the emulsion.
- This glaze works beautifully on donuts, cinnamon rolls, pound cakes, sugar cookies, scones, and even brownies—the possibilities are truly endless.
- For a thicker glaze suitable for piping or more structured decoration, increase the powdered sugar to 2.5 cups and reduce the milk to 2-3 tablespoons.
- The glaze will continue to thicken slightly as it cools, so if you like a thinner, more pourable consistency, make it slightly looser than your target texture.
- Make sure all your ingredients are at room temperature for the smoothest, most emulsified glaze—cold ingredients can create a lumpy or grainy texture.
- Store any leftover glaze in an airtight container in the refrigerator for up to one week, though it’s best used within the first few days for optimal texture and flavor.
Pingback: How to make Tasty Healthy Steak Recipe (Quick & Easy!) – Simple Recipe Finder
Pingback: How to make the BEST Jerk Chicken Seasoning Recipe! – Simple Recipe Finder
Pingback: How to make the Best Lemon Chicken Orzo Recipe! – Simple Recipe Finder
Pingback: How to make the Perfect Oil and Vinegar Salad Dressing Recipe! – Simple Recipe Finder
Pingback: How to make the Tasty Thai Cucumber Salad Recipe! – Simple Recipe Finder