

There’s nothing quite like the magic of building a gingerbread house during the holiday season, and the secret to a picture-perfect creation lies in mastering the right icing recipe. Royal icing is the traditional choice for gingerbread house construction—it dries hard and creates a strong adhesive that holds your edible masterpiece together while also providing a beautiful canvas for decoration.
This comprehensive guide will walk you through creating the perfect gingerbread house icing that’s sturdy enough to support your structure yet smooth enough to pipe delicate details. Whether you’re a seasoned baker or tackling your first gingerbread house, understanding the science behind royal icing will set you up for success. The key is finding the right balance of ingredients and technique to achieve the ideal consistency for both construction and decoration.
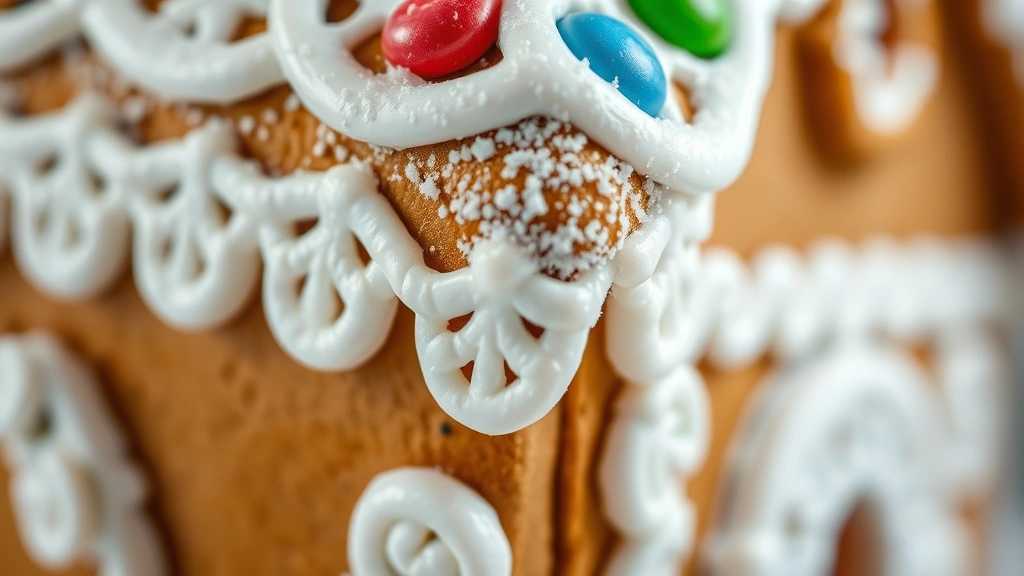
Royal icing has been used in decorative baking for centuries, originating from Victorian-era cake decorating traditions. When made correctly, it becomes rock-hard, making it the gold standard for structural piping work. Unlike other decorative icings, royal icing doesn’t require baking after application—it simply air-dries to perfection.
The traditional recipe uses egg whites, which create a glossy finish and excellent structural integrity. However, if you prefer to avoid raw eggs, meringue powder or pasteurized egg whites are excellent substitutes that provide the same results with added peace of mind. The ratio of powdered sugar to liquid is crucial; too much liquid and your icing won’t set properly, too little and it becomes unworkable and chalky.
Before you begin, gather all your materials and prepare your workspace. Having everything ready—from piping bags to gingerbread pieces—will make the construction process flow smoothly. This icing recipe makes enough to assemble and decorate a standard gingerbread house with room to spare for mistakes or extra decorative touches.
Many bakers find that preparing their icing the day before construction allows it to rest and achieve optimal consistency. This also gives you time to make any adjustments to thickness before you need it. The beauty of royal icing is its versatility; you can make it thicker for piping borders and architectural details, or thinner for flooding and creating smooth surfaces.
When decorating your gingerbread creation, remember that patience is your greatest tool. Allow each section to dry completely before moving on to the next, preventing structural collapse and ensuring clean lines. Professional gingerbread house decorators often use a heat gun on low setting to speed up drying times between applications.
For those interested in learning more advanced decorating techniques, exploring resources like Bon Appétit’s baking guides can provide inspiration and additional tips. Similarly, Serious Eats offers detailed breakdowns of baking science that illuminate why certain techniques work better than others.
This recipe yields enough icing to construct and fully decorate a two-story gingerbread house with decorative piping, candies, and royal icing details. If you’re planning a larger structure or multiple houses, simply double the recipe. Unused icing can be stored in an airtight container in the refrigerator for up to two weeks, making it perfect for ongoing projects or last-minute decorating sessions.
The satisfaction of creating a stunning gingerbread house that stands tall and proud is incomparable. With this foolproof icing recipe and proper technique, you’ll be well on your way to creating a holiday showstopper that’s not just beautiful but structurally sound. Your family and guests will marvel at your baking prowess, and you’ll have the confidence to tackle even more ambitious gingerbread creations in years to come. Whether you’re making this as a family activity, a personal challenge, or a gift, this icing recipe is your foundation for success.
Ingredients
- 3 large egg whites (room temperature) or 3 tablespoons meringue powder mixed with 6 tablespoons warm water
- 1 pound (4 cups) powdered sugar, sifted
- 1/2 teaspoon cream of tartar
- 1/2 teaspoon vanilla extract
- 2-3 tablespoons warm water (add gradually as needed)
- Pinch of salt
- Optional: 1-2 drops of gel food coloring for tinted icing

Instructions
- If using fresh egg whites, ensure they are completely free of yolk and at room temperature. Room temperature whites whip more efficiently and create better volume. If using meringue powder, whisk it together with warm water in your mixing bowl and let it sit for one minute before proceeding.
- Add the egg whites (or meringue powder mixture) and cream of tartar to the bowl of an electric mixer fitted with the paddle attachment.
- Begin mixing on low speed for about 30 seconds until combined, then increase speed to medium-high. Beat for approximately 2-3 minutes until the mixture becomes foamy and slightly thickened, but not yet stiff peaks.
- Gradually add the sifted powdered sugar, one cup at a time, while continuing to beat on medium speed. Make sure each addition is fully incorporated before adding the next cup. This gradual process prevents lumps and ensures smooth, lump-free icing.
- Once all the powdered sugar has been incorporated, add the vanilla extract and salt. Continue beating for another 2-3 minutes on medium speed until the mixture reaches soft peaks.
- Begin adding the warm water, one tablespoon at a time, while beating on low speed. Watch the consistency carefully—you want the icing to transform from thick and chalky to smooth and spreadable. This is where the magic happens, and patience is essential.
- Continue adding water and beating until you achieve the desired consistency. For piping structural elements and borders, you want a thick consistency that holds stiff peaks. For flooding and smooth surfaces, you want a slightly thinner consistency that flows but still holds shape.
- If you’re planning to use different consistencies for different applications, divide your icing into separate bowls now. Keep one batch thick for structural piping and thin one batch with additional water (just a few drops at a time) for flooding details.
- If desired, add gel food coloring to tinted batches now, beating on low speed until the color is evenly distributed throughout the icing. Gel colors work better than liquid food coloring as they don’t thin the icing.
- Transfer your icing to piping bags fitted with appropriate tips. For structural work, use a round tip (size 4-6). For decorative details, use smaller round tips or specialty tips depending on your design.
- If not using immediately, cover your icing tightly with plastic wrap pressed directly onto the surface to prevent a crust from forming. Royal icing will keep in an airtight container for up to two weeks when properly stored.
- Before you begin construction, test your icing by piping a small amount onto a piece of parchment paper. It should hold its shape, not spread, and dry to a hard finish within 15-20 minutes. If it’s too thick, thin it slightly. If it’s too thin, let it rest for 5-10 minutes as it may thicken slightly as it sits.
- Begin your gingerbread house construction by piping a generous bead of icing along the edges of your gingerbread pieces. Press pieces together gently but firmly, holding them in place for 30 seconds to allow the icing to begin setting.
- Use small gingerbread scraps or candy to prop up walls while the icing dries if needed. Allow each structural element to dry for at least 30 minutes to an hour before adding additional weight or stress to the structure.
- Once your basic structure is complete and fully dried (which may take several hours or overnight), begin your decorative work. Pipe borders, details, and embellishments using your royal icing, allowing adequate drying time between applications.
Pro Tips
- Royal icing is uncooked and contains raw egg whites. If this is a concern, use pasteurized egg whites or meringue powder as substitutes—they work identically and are completely safe.
- The consistency of your icing is everything. Stiff-peak icing (used for structure) should hold sharp peaks when you lift the beater. Medium-consistency icing (used for decorative piping) should form peaks that curl slightly at the top. Thin-consistency icing (used for flooding) should flow smoothly but still hold its shape.
- Sifting your powdered sugar is not optional—it removes lumps and ensures smooth, beautiful icing. Lumpy icing will clog your piping tips and create frustration during decoration.
- Room temperature egg whites whip more efficiently than cold ones. Remove them from the refrigerator at least 30 minutes before starting.
- If your icing begins to crust over while you’re working, cover it tightly with plastic wrap. You can also use a damp paper towel to gently smooth over any rough patches.
- Gel food coloring is superior to liquid food coloring for royal icing because it doesn’t thin the consistency. Add color gradually—it’s easier to add more than to remove excess.
- For structural piping, work in a cool environment (below 70°F if possible). Heat can soften the icing and compromise your structure.
- If you’re making this icing ahead of time, store it in an airtight container with plastic wrap pressed directly onto the surface. It will keep for up to two weeks in the refrigerator.
- Royal icing dries harder when allowed to air-dry completely. Using a dehumidifier in your workspace can actually speed up drying times and create stronger structures.
- For a more stable structure, you can add a small amount of gum arabic (about 1/4 teaspoon per batch) to your icing. This creates an even stronger set, though it’s not necessary for most home bakers.
- Piping bags with couplers allow you to change tips without refilling the bag, saving time and icing during decoration.
- If your icing becomes too thick as it sits, add water one drop at a time and beat gently until it reaches the desired consistency again.
- Practice your piping technique on parchment paper before working on your actual gingerbread house. This builds confidence and ensures clean, professional-looking details.
- For extra stability on gingerbread houses, some bakers apply a thin layer of royal icing to the base before assembling walls. This creates a strong foundation.