
There’s nothing quite like a show-stopping 7 layer bean dip that has everyone reaching for another chip! This classic appetizer is an absolute party favorite, and honestly, it’s so easy to make that you’ll wonder why you haven’t been serving it at every gathering. The beauty of this recipe is in its stunning presentation – those gorgeous layers of creamy, savory, and fresh ingredients stacked high create such a gorgeous visual that your guests will be impressed before they even taste it.
I absolutely love making this dip because it comes together in about 15 minutes, requires zero cooking skills, and tastes incredibly delicious. The combination of seasoned refried beans, guacamole, sour cream, salsa, cheese, and fresh toppings creates the perfect balance of flavors and textures. It’s creamy, it’s fresh, it’s tangy, and it’s absolutely addictive. Whether you’re hosting a casual game night, a holiday party, or just want an impressive appetizer for a weeknight gathering, this 7 layer bean dip is your answer.
The key to making the BEST version is using quality ingredients and not being shy with the layers. Each component should be visible and distinct, creating those beautiful stripes of color. I also recommend making this dip no more than an hour or two before serving to keep everything fresh and prevent the layers from getting too soggy. You can prep your ingredients ahead of time, but assemble it closer to serving time for the best results.
This recipe is perfect for feeding a crowd – one dip easily serves 8-10 people as an appetizer, and it pairs beautifully with tortilla chips, pita chips, or fresh vegetables. It’s also incredibly versatile, so feel free to customize the layers based on your preferences or what you have on hand. Looking to expand your appetizer repertoire? Check out our Quick Tasty Bacon Carbonara Recipe for another crowd-pleaser, or try our Easy Pickled Red Onion Recipe as a fresh topping option.
For more dip inspiration and layered appetizer ideas, check out Bon Appétit’s layered dip collection or explore Serious Eats’ appetizer guide. You might also enjoy learning about different bean varieties at the New York Times cooking guide on beans. For even more bean-based recipes, our Best Chickpea Salad Recipe is another fantastic option that celebrates legumes in a fresh way.
Ingredients
- 1 (16 oz) can refried beans, or 1½ cups homemade refried beans
- 1 tablespoon taco seasoning or chili powder
- 2 ripe avocados, pitted and mashed
- 2 tablespoons fresh lime juice
- Salt and pepper to taste
- 1 cup sour cream or Greek yogurt
- 1 cup chunky salsa (mild or spicy, depending on preference)
- 2 cups shredded cheddar cheese or Mexican blend cheese
- 1 cup diced fresh tomatoes
- ½ cup diced red onion
- ¼ cup chopped fresh cilantro
- 1 (2.25 oz) can sliced black olives, drained
- 2 tablespoons sliced jalapeños (optional, for extra heat)
- Tortilla chips or pita chips for serving
Instructions
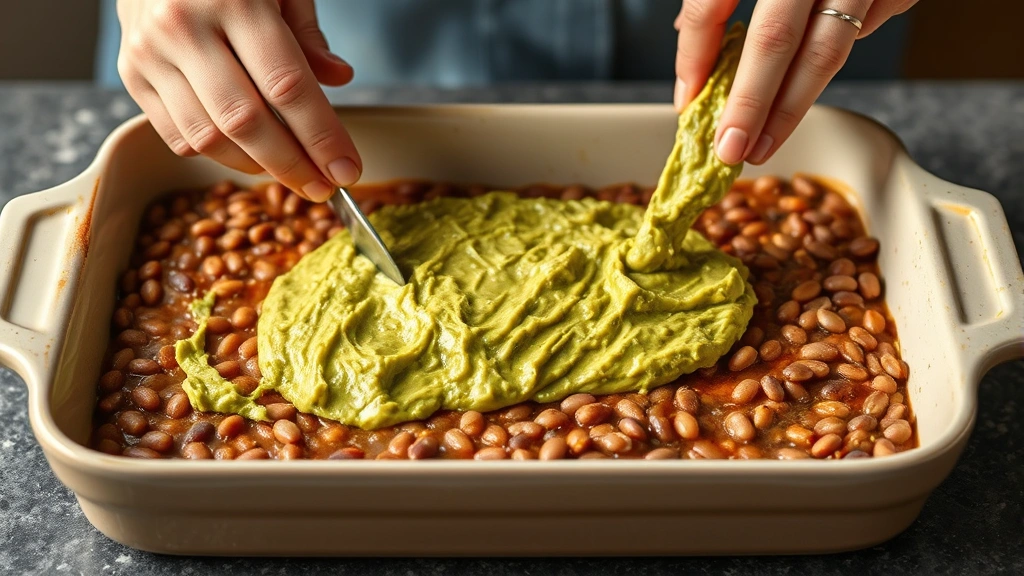
- Spread the refried beans evenly in the bottom of a 9×13 inch baking dish or large serving platter, creating the first layer. Mix the beans with taco seasoning or chili powder for extra flavor, then smooth with the back of a spoon.
- In a small bowl, combine the mashed avocados with fresh lime juice, salt, and pepper. This prevents the guacamole from browning. Spread the guacamole mixture as the second layer directly over the beans.
- Mix together the sour cream with a pinch of salt and pepper, then spread it evenly as the third layer over the guacamole.
- Spoon the salsa over the sour cream layer as the fourth layer, spreading it gently to avoid mixing the layers below.
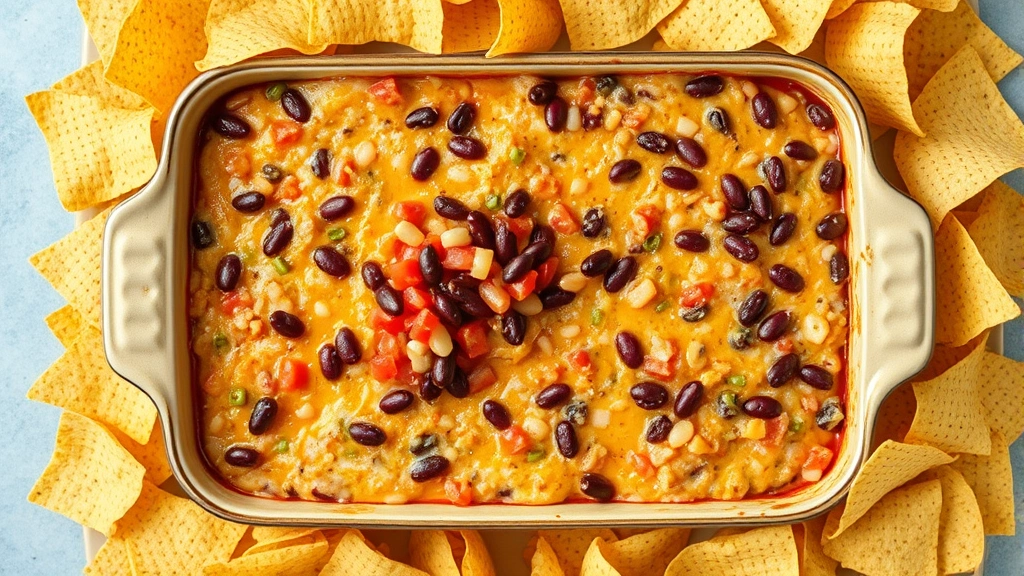
- Sprinkle the shredded cheese evenly over the salsa as the fifth layer, making sure to cover the entire surface for a beautiful presentation.
- Top with the diced fresh tomatoes as the sixth layer, distributing them evenly across the cheese.
- Sprinkle the diced red onion, chopped cilantro, and sliced black olives over the tomatoes as the final seventh layer. Add jalapeños at this point if you prefer extra heat and spice.
- Serve immediately with tortilla chips, pita chips, or fresh vegetable crudités on the side. If not serving right away, cover loosely with plastic wrap and refrigerate for up to 2 hours.
Pro Tips
- **Make-Ahead Tip**: You can prepare all your ingredients separately ahead of time and assemble the dip no more than 1-2 hours before serving. This keeps everything fresh and prevents the layers from getting soggy or the guacamole from browning.
- **Preventing Brown Guacamole**: Always toss your mashed avocados with fresh lime juice and salt immediately after mashing. The acid from the lime juice prevents oxidation and keeps the guacamole looking vibrant green.
- **Cheese Options**: Mexican blend cheese, Monterey Jack, or a combination of cheddar and Monterey Jack all work beautifully. Freshly shredded cheese melts better than pre-shredded varieties.
- **Salsa Selection**: Choose salsa based on your heat preference and how wet you want your dip. Chunky salsa works better than thin, runny varieties to maintain layer definition.
- **Vegetable Substitutions**: Feel free to substitute or add layers based on preferences – try corn, jalapeños, green onions, bell peppers, or radishes for different flavors and textures.
- **Serving Size**: One 9×13 inch pan serves approximately 8-10 people as an appetizer. For smaller gatherings, you can halve the recipe and use a smaller dish.
- **Keeping It Chilled**: If your party is during warm weather, set the dip on a bed of ice or in a larger bowl filled with ice to keep it at the perfect serving temperature.
- **Leftover Storage**: This dip is best enjoyed fresh, but any leftovers can be covered and refrigerated for up to 24 hours. The layers may blend together as it sits, but it still tastes delicious.
- **Vegan Adaptation**: Substitute sour cream with vegan sour cream, use vegan cheese, and ensure your beans are prepared without lard for a fully vegan version.
- **Spice Level**: Control the heat by choosing mild or hot salsa, adding or omitting jalapeños, and using hot or mild taco seasoning in the bean layer.
- **Party Planning**: This dip is perfect for potlucks – it’s easy to transport in a disposable aluminum pan, and it arrives looking impressive and ready to serve.