
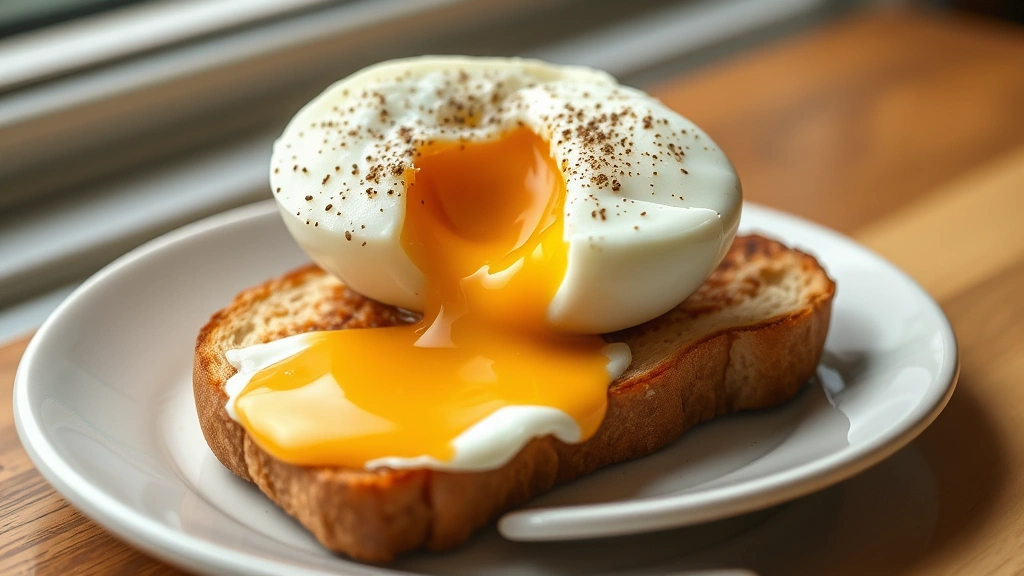
Jammy eggs are an absolute game-changer in the kitchen, and honestly, once you master this technique, you’ll be making them constantly. There’s something so incredibly satisfying about that perfectly runny yolk paired with a set white – it’s breakfast luxury without the fuss. These beauties are perfect served over toast, nestled into grain bowls, or simply enjoyed on their own with a sprinkle of fleur de sel and fresh cracked pepper.
The secret to achieving that coveted jammy egg consistency is all about timing and temperature control. Unlike a fully soft-boiled egg where the yolk is completely liquid, or a hard-boiled egg where everything is set, jammy eggs occupy that magical middle ground. The whites are completely cooked and firm, while the yolk remains gloriously runny with just the slightest set around the edges. This creates the most beautiful golden center that oozes onto whatever you’re serving it with.
I’ve tested this recipe countless times to get the timing just right, and I’m thrilled to share my foolproof method with you. Whether you’re a beginner in the kitchen or a seasoned home cook, this technique is surprisingly simple and incredibly rewarding. The best part? You can prep a batch of jammy eggs at the beginning of your week and enjoy them throughout the week in various ways.
What makes jammy eggs so special is their versatility. Serve them over creamy pasta for a luxurious dinner, or place them atop chickpea salad for a protein-packed lunch. They’re also stunning on avocado toast, over roasted vegetables, or paired with shishito peppers for a Spanish-inspired breakfast. The possibilities are truly endless.
I’ve also discovered that jammy eggs are perfect for meal prep. You can boil a dozen at a time, peel them, and store them in an airtight container in the refrigerator for up to five days. When you’re ready to eat them, simply reheat gently in warm water or enjoy them at room temperature. This makes weekday breakfasts and lunch bowls incredibly convenient.
For the best results, I recommend using eggs that are at least a week old – they peel much more easily than super fresh eggs. Room temperature eggs are also crucial, as they cook more evenly than cold eggs straight from the refrigerator. I also love adding a splash of vinegar to the water, which some say helps prevent the shells from cracking, though I mainly do it out of habit and tradition.
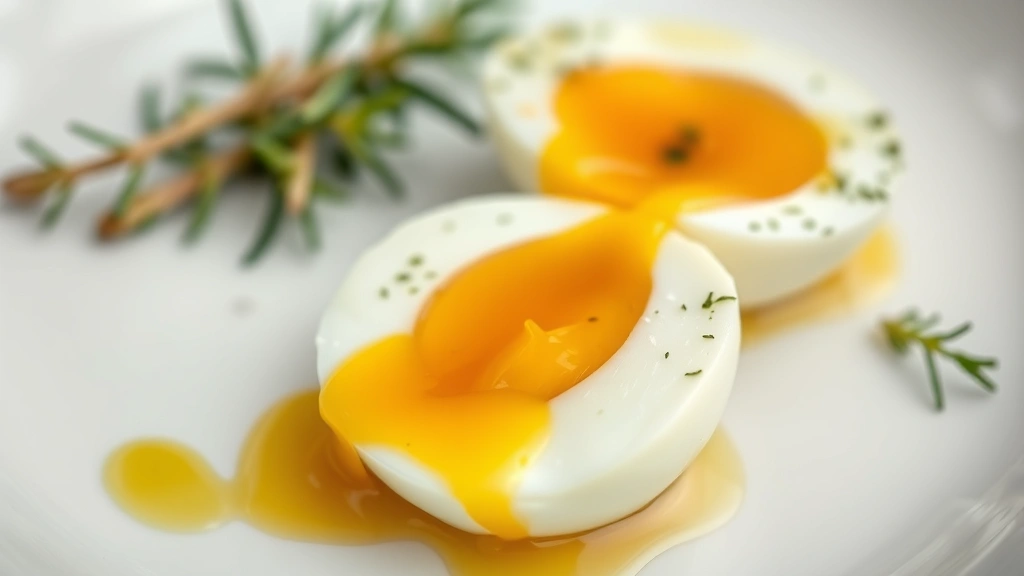
If you’re serving these for a special breakfast or brunch, presentation is everything. Arrange your jammy eggs on beautiful plates, drizzle with good quality olive oil, add microgreens or fresh herbs, and perhaps a sprinkle of fleur de sel. Your guests will be absolutely impressed by how elegant and restaurant-quality this simple dish looks. Check out this amazing Alfredo sauce recipe if you want to serve your jammy eggs with pasta, or this chicken Alfredo recipe for something more substantial.
For more detailed egg cooking techniques, I highly recommend checking out Serious Eats’ guide to soft-boiled eggs, which offers excellent scientific explanations. You might also enjoy Bon Appétit’s jammy egg recipe for additional inspiration. The New York Times cooking guide to eggs is also an invaluable resource for mastering various egg cooking methods.
Ingredients
- 4 large eggs, room temperature
- Water for boiling
- 1 tablespoon white vinegar
- Ice bath (ice and cold water)
- Salt and freshly ground black pepper to taste
- Fresh herbs for serving (optional)
- Fleur de sel for finishing
- Good quality olive oil for drizzling
Instructions
- Fill a medium pot with enough water to cover the eggs by about an inch. Add the vinegar and bring the water to a rolling boil over high heat.
- While waiting for the water to boil, prepare an ice bath by filling a bowl with ice and cold water. Set it aside near your stove for easy access.
- Once the water is at a rolling boil, gently lower the room temperature eggs into the pot using a spoon to prevent cracking.
- Set a timer for exactly 6 to 7 minutes, depending on how runny you like your yolks. Six minutes will give you a very runny center, while 7 minutes will have slightly more set yolk.
- While the eggs cook, you can prepare your serving vessel or toast if desired. This is also a good time to gather any toppings you plan to use.
- When the timer goes off, use a slotted spoon to carefully transfer the eggs directly into the ice bath. This immediately stops the cooking process and is essential for achieving the perfect jammy consistency.
- Let the eggs sit in the ice bath for at least 2 minutes, though 3 to 5 minutes is even better for easier peeling.
- Gently tap the wider end of the egg on a hard surface and carefully roll it to crack the shell all over, starting from the fatter end where the air pocket is located.
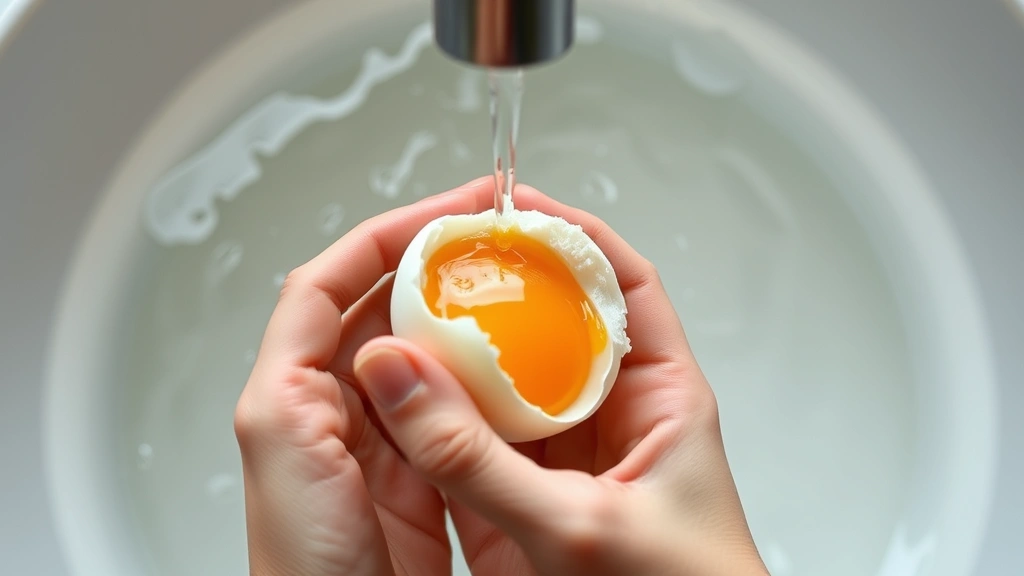
- Begin peeling under cool running water, gently lifting away the shell and the thin membrane underneath. Work slowly and carefully to avoid damaging the tender egg white.
- Once peeled, place your jammy egg on your prepared toast, salad, or serving plate and gently cut into it to reveal that gorgeous runny yolk.
- Season generously with fleur de sel and freshly ground black pepper, then drizzle with your favorite olive oil and any additional toppings.
- Serve immediately while the egg is still warm and the yolk is perfectly flowing.
Pro Tips
The ice bath is not optional – it’s crucial for stopping the cooking process immediately and preventing that unwanted gray-green ring around the yolk. This ring forms from a reaction between the iron and sulfur in the egg, and while it’s harmless, we want to avoid it for aesthetic reasons and to maintain that perfectly runny center.
Egg age matters significantly for peeling ease. Eggs that are 7 to 10 days old peel much more easily than extremely fresh eggs because the pH of the white becomes less acidic over time, weakening the bond between the shell membrane and the white. If using very fresh eggs, add a teaspoon of baking soda to the water to help with peeling.
Timing is truly everything with jammy eggs. Even 30 seconds can make a difference in the final result. If you prefer a less runny yolk, cook for 8 to 9 minutes, but know that you’re moving toward a soft-boiled egg rather than a jammy egg. Keep detailed notes about your preferred timing so you can replicate it perfectly each time.
For meal prep, you can peel and store jammy eggs in an airtight container in the refrigerator for up to 5 days. To reheat, gently place them in warm (not boiling) water for 1 to 2 minutes, or enjoy them at room temperature. However, the yolk will continue to firm up slightly over time, so eat them sooner rather than later for the best jammy consistency.
Serving suggestions are truly endless – try them on whole grain toast with avocado, over creamy soups, in grain bowls with quinoa and roasted vegetables, atop sautéed greens, or even in a simple salad with crispy bacon and arugula. They’re also beautiful as part of a breakfast board with cured meats, cheeses, and fresh fruit.
For a spicy kick, drizzle with hot sauce or chili oil. For richness, use truffle oil instead of regular olive oil. Fresh herbs like chives, parsley, or dill make excellent garnishes. Crispy breadcrumbs add wonderful texture, and a squeeze of fresh lemon juice brightens all the flavors beautifully.
If cooking multiple batches, you can keep them warm in a bowl of warm (not hot) water while you finish cooking the remaining eggs. This ensures all your eggs are served at the same temperature and consistency.
The key to perfect jammy eggs every single time is consistency and attention to detail. Once you’ve made them a few times, you’ll develop an intuition for the exact moment to pull them from the water.