
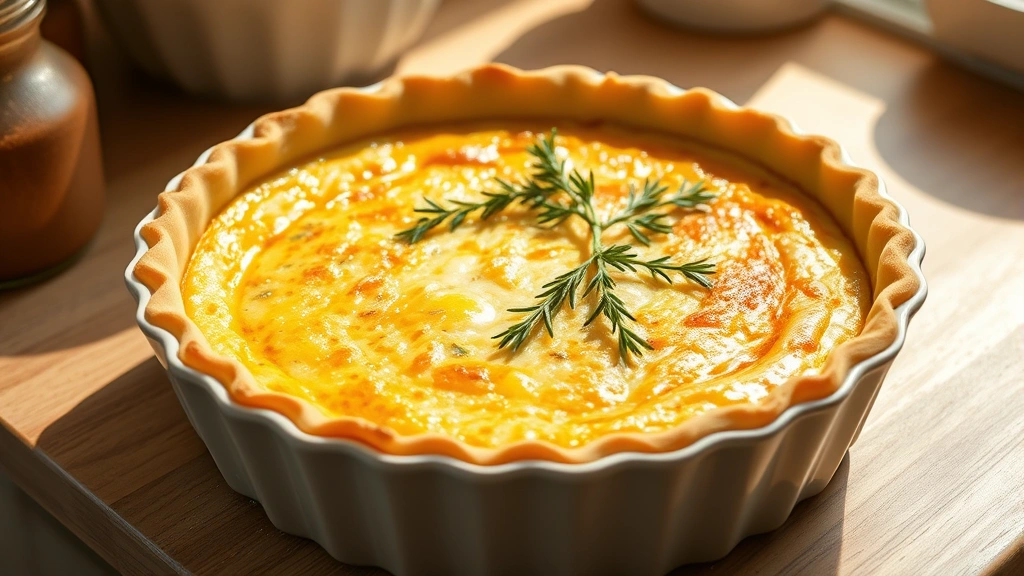
Making the perfect quiche dough from scratch is easier than you think, and it’s absolutely worth the effort! This classic French pastry crust is buttery, flaky, and crispy—the foundation of every showstopping quiche. Whether you’re planning a elegant brunch or a casual weeknight dinner, mastering this quiche dough recipe will elevate your cooking game.
The secret to achieving that coveted tender crumb and golden exterior lies in using cold butter, ice water, and minimal handling. I’m sharing my foolproof technique that works every single time, complete with helpful tips for both food processor and hand-mixing methods. This dough is versatile enough to pair with any filling—from classic bacon carbonara inspired combinations to vegetable-forward options.
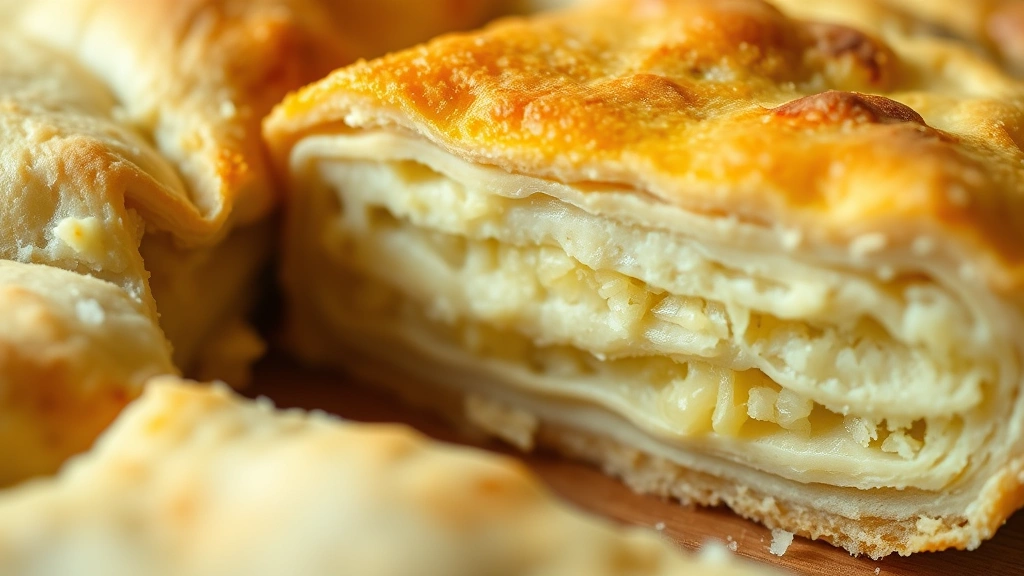
What makes this recipe truly special is that it uses a traditional French pâte brisée method, which creates an incredibly crispy, almost shortbread-like texture. The addition of just one egg yolk creates structure without making the dough tough. I’ve tested this dozens of times to ensure you get restaurant-quality results in your own kitchen.
The beauty of homemade quiche dough is that you can make it ahead—it keeps beautifully in the refrigerator for up to three days or freezes for months. This means you can have elegant, impressive quiches ready whenever inspiration strikes. Pair your quiche with a fresh chickpea salad or pickled red onion for a complete meal that feels fancy but comes together easily.
According to Serious Eats, the key to perfect pie and quiche dough is understanding the role of fat and moisture. I’ve incorporated their scientific approach with my own kitchen experience to create this foolproof recipe. You’ll find that this dough works beautifully whether you’re blind baking it or filling it directly before baking.
For those intimidated by pastry-making, don’t be! This recipe walks you through every single step with detailed instructions. New York Times Cooking emphasizes that even home cooks can master pastry with the right technique, and I completely agree. Once you’ve made this dough successfully once, you’ll have the confidence to make it again and again.
The texture you’re aiming for is crispy on the outside with a tender, almost melt-in-your-mouth interior. This is achieved through the lamination that happens naturally when you work with cold butter and handle the dough minimally. I recommend using a food processor for ease, but I’ll also provide detailed instructions for the hand-mixing method if you prefer that traditional approach.
Consider filling your finished quiche with luxurious ingredients like heavy cream sauce inspired fillings, or keep it simple with eggs, cheese, and vegetables. The possibilities are truly endless, and this dough serves as the perfect canvas for your culinary creativity. Make this recipe once and you’ll understand why homemade quiche dough is worth every minute of effort.
Ingredients
- 1 1/4 cups all-purpose flour
- 1/2 teaspoon fine sea salt
- 1 teaspoon sugar
- 8 tablespoons (1 stick) cold unsalted butter, cubed
- 1 large egg yolk
- 3-4 tablespoons ice water
- 1 tablespoon apple cider vinegar or lemon juice
Instructions
- In a food processor, combine the flour, salt, and sugar. Pulse 2-3 times to combine evenly.
- Add the cold, cubed butter to the food processor and pulse 8-10 times until the mixture resembles coarse breadcrumbs with some pea-sized pieces of butter remaining throughout.
- In a small bowl, whisk together the egg yolk, ice water, and apple cider vinegar until well combined.
- Pour the egg mixture into the food processor and pulse 4-5 times until the dough just begins to come together, being careful not to overwork it.
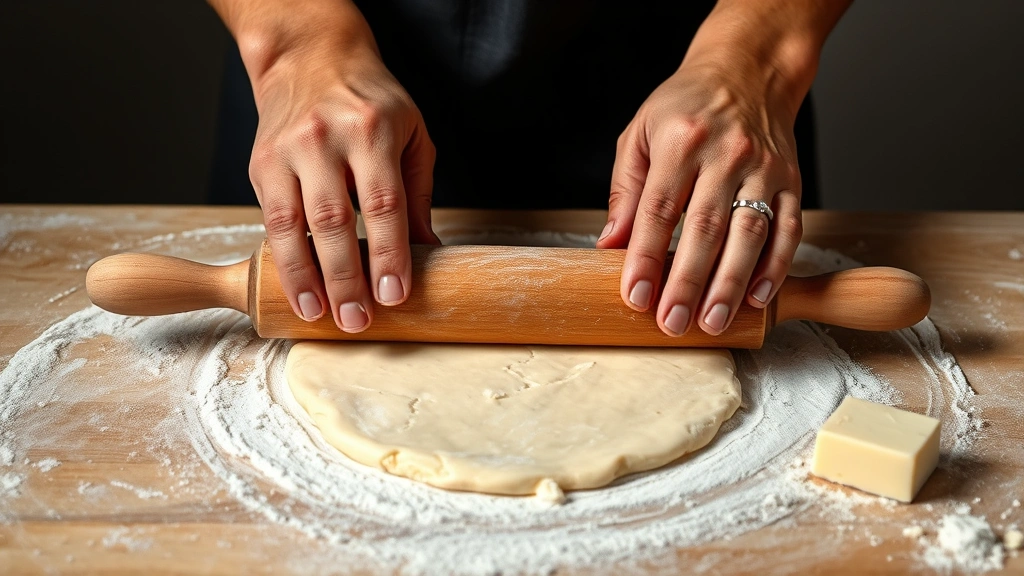
- Turn the dough out onto a lightly floured surface and gently bring it together with your hands into a disk, working as minimally as possible.
- Wrap the dough tightly in plastic wrap and refrigerate for at least 30 minutes, or up to 3 days before using.
- When ready to use, remove the dough from the refrigerator and let it sit at room temperature for 5-10 minutes until slightly softened but still cold.
- On a lightly floured surface, roll the dough out to a 12-inch circle, about 1/8 inch thick, rotating the dough frequently to ensure even thickness.
- Carefully transfer the rolled dough to a 9-inch quiche pan or tart pan with a removable bottom, gently pressing it into the bottom and sides without stretching.
- Trim any excess dough from the edges using a sharp knife, leaving about a 1/4 inch overhang that you’ll fold inward to create a reinforced edge.
- Fold the overhang inward and crimp the edges decoratively with your fingers or a fork.
- Place the lined pan in the refrigerator for at least 15 minutes before filling and baking, or up to overnight.
- For blind baking (optional, recommended for extra crispiness), preheat oven to 400°F, line the dough with parchment paper, fill with pie weights or dried beans, and bake for 15 minutes.
- Remove the weights and parchment, prick the bottom with a fork, and bake an additional 5 minutes until very lightly golden.
- Allow to cool slightly before adding your desired quiche filling and baking according to your specific recipe instructions.
Pro Tips
If you prefer to make the dough by hand, combine the flour, salt, and sugar in a large bowl, then use a pastry cutter or your fingertips to work the cold butter into the mixture until it resembles coarse breadcrumbs. Add the egg mixture gradually, tossing gently with a fork until the dough just comes together.
Don’t skip the resting period in the refrigerator. This allows the gluten to relax, which prevents the dough from shrinking during baking. It also gives the butter time to firm up again, which creates those beautiful flaky layers.
The vinegar or lemon juice in the recipe serves an important purpose—the acidity helps relax the gluten further, creating a more tender crust. This is a professional pastry trick that makes a noticeable difference in texture.
If your dough seems dry and won’t come together, add ice water one teaspoon at a time. If it seems too wet, dust with a bit more flour. The dough should hold together but not be sticky.
Freezing the dough is an excellent option. After shaping in the pan, wrap tightly in plastic wrap and freeze for up to three months. You can bake directly from frozen, just add a few extra minutes to the baking time.
Blind baking is optional but highly recommended if you’re using a very wet filling or want extra insurance against a soggy bottom. Many traditional quiches are baked without blind baking, so use your judgment based on your filling choice.
This dough can also be used for savory tarts, pot pies, or any other pastry application that calls for a traditional pie dough. It’s your new go-to recipe.