
Baked custard is the epitome of elegance and simplicity, a timeless dessert that graces tables from casual family dinners to the most sophisticated dinner parties. This classic custard recipe has been cherished for generations, and once you master the technique, you’ll understand why. The beauty of baked custard lies in its velvety texture, delicate flavor, and the way it jiggles ever so slightly when set to perfection.
What makes a truly perfect baked custard? It all comes down to understanding the science behind this delicate dessert. The eggs must be cooked gently and slowly to create that signature silky texture without becoming rubbery or developing an unpleasant eggy flavor. The ratio of eggs to cream and milk is crucial, and the baking method matters tremendously. A water bath is absolutely essential for achieving even, gentle heat distribution throughout the custard.
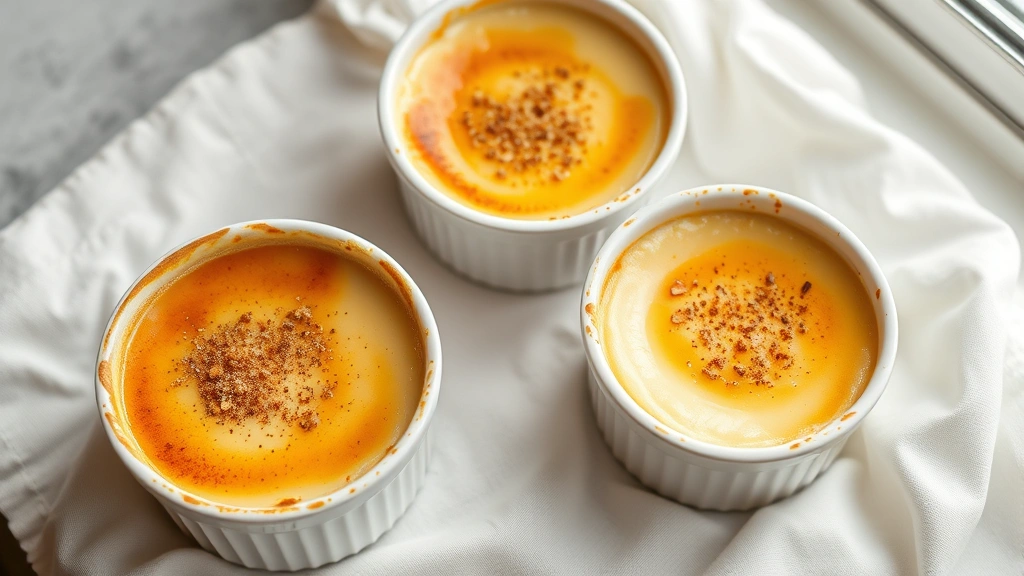
This recipe serves four to six people and requires minimal ingredients, which means quality matters. Use the finest eggs you can find, real vanilla bean if possible (though extract works beautifully), and whole milk combined with heavy cream for the most luxurious results. The nutmeg on top isn’t just a garnish—it’s a nod to traditional preparation and adds a subtle warmth that elevates the entire dish.
Baked custard is wonderfully versatile, too. You can serve it warm, chilled, or at room temperature. Some prefer it with a drizzle of caramel sauce, while others enjoy it plain to appreciate the pure custard flavor. It pairs beautifully with fresh berries, shortbread cookies, or alongside other desserts. For those looking to expand their dessert repertoire, try pairing this with rich cream-based sauces or explore other cream recipes that showcase similar techniques.
The preparation is straightforward, but attention to detail ensures success. Tempering the eggs properly prevents them from scrambling, while the proper oven temperature creates that perfect custard consistency. Whether you’re a seasoned baker or new to the kitchen, this classic custard guide will help you achieve restaurant-quality results at home.
Baked custard also represents an opportunity to practice essential cooking skills that will benefit your entire culinary journey. Understanding how to work with eggs, how to use a water bath, and how to recognize doneness by texture rather than time are techniques that apply to countless other dishes. This dessert teaches patience and precision, rewarding you with something truly special.
For those interested in complementary sides or accompaniments, consider exploring flavor contrasts or fresh elements to serve alongside. And if you’re planning a complete dinner, this dessert pairs perfectly with lighter main courses. Check out additional custard variations for inspiration on how to personalize this classic recipe.
Ingredients
- 2 cups whole milk
- 1 cup heavy cream
- 1 vanilla bean, split and scraped (or 1 teaspoon vanilla extract)
- 4 large eggs
- 1/4 cup granulated sugar
- Pinch of salt
- 1/4 teaspoon freshly grated nutmeg, plus more for garnish
- Hot water for water bath
Instructions
- Preheat your oven to 325°F. Arrange four to six ramekins (6-ounce capacity) in a large roasting pan, ensuring they don’t touch each other or the sides of the pan.
- Pour the whole milk and heavy cream into a medium saucepan. If using a vanilla bean, add the split bean and its scraped seeds to the pan. Heat the mixture over medium heat until it’s steaming and tiny bubbles form around the edges, approximately 5-7 minutes. Do not allow it to boil. If using vanilla extract, you’ll add it later.
- Remove the saucepan from heat and let the cream mixture cool for about 5 minutes. If you used a vanilla bean, leave it in the mixture.
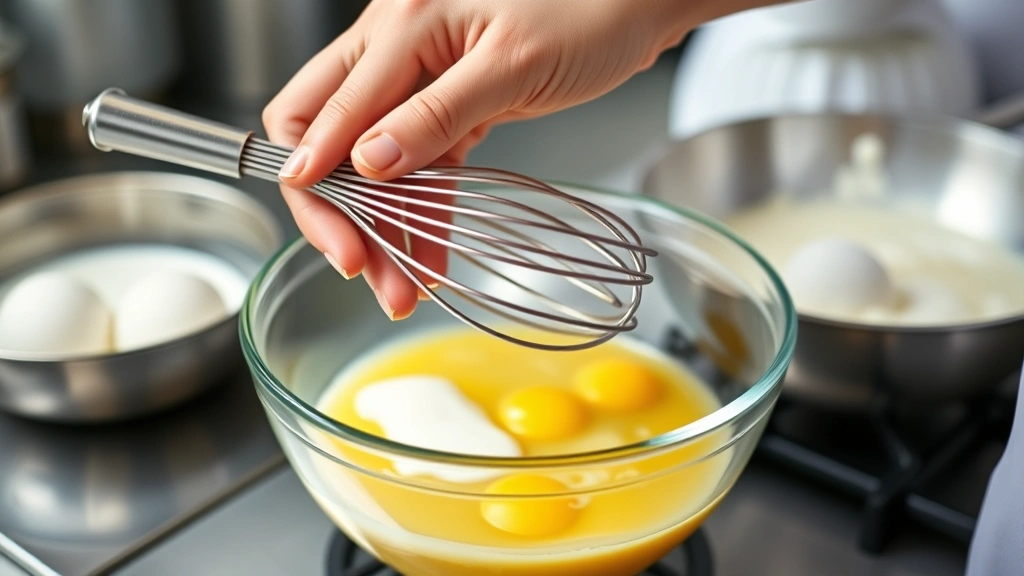
- While the cream cools, place the eggs in a medium mixing bowl. Add the granulated sugar and salt. Whisk together gently and thoroughly until the mixture is pale and slightly thickened, about 2-3 minutes. The goal is to incorporate air without creating excessive foam.
- Slowly pour the warm cream mixture into the egg mixture while whisking constantly. This tempering process prevents the eggs from scrambling. Whisk until the mixture is well combined and smooth.
- If you didn’t use a vanilla bean, add the vanilla extract now and whisk to incorporate. Strain the entire custard mixture through a fine-mesh sieve into a clean bowl, pressing gently with the back of a spoon. This removes any cooked egg bits and creates an incredibly smooth texture.
- Add the nutmeg to the strained custard and whisk gently to distribute evenly.
- Carefully pour the custard mixture into the prepared ramekins, filling each about three-quarters full. Place the roasting pan on the center oven rack.
- Pour hot water into the roasting pan around the ramekins until the water reaches halfway up the sides of the ramekins. This water bath ensures gentle, even cooking.
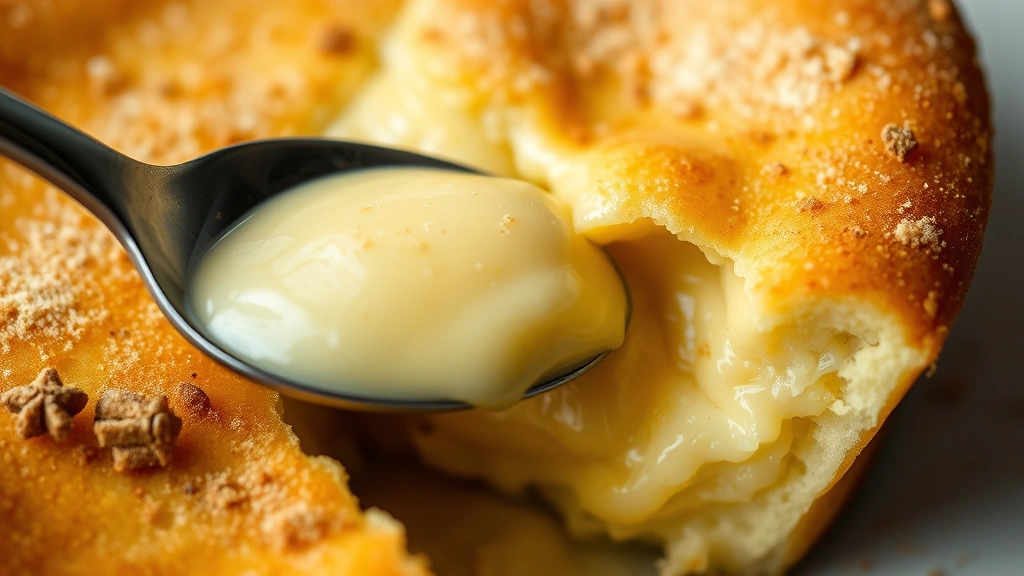
- Bake for 35-40 minutes. The custards are done when the edges are set but the centers still jiggle slightly when gently shaken—about a 1-inch circle in the very center should wobble. The internal temperature should reach 170°F on an instant-read thermometer when inserted near (but not in) the center.
- Carefully remove the roasting pan from the oven and allow the custards to cool in the water bath for 10 minutes.
- Remove the ramekins from the water bath using tongs or a slotted spoon. Place them on a clean kitchen towel to cool further.
- Dust each custard with a small amount of freshly grated nutmeg for garnish.
- Serve the baked custards warm, at room temperature, or chilled according to preference. Cover and refrigerate any leftovers for up to 3 days.
Pro Tips
- The water bath is absolutely critical to achieving the perfect custard texture. It provides gentle, even heat that prevents the custard from curdling or developing a rubbery texture. Never skip this step.
- Doneness is determined by texture, not time. Every oven is different, so start checking at 35 minutes. The custard should jiggle gently in the center when moved, similar to a barely set flan. Overbaked custard will be grainy and unpleasant.
- If you cannot find fresh vanilla beans, high-quality vanilla extract is an excellent substitute. Use pure vanilla extract rather than imitation for the best flavor profile.
- Tempering the eggs is essential. Adding cold eggs to hot cream will cook them, creating a curdled texture. By slowly whisking the warm cream into the eggs, you gradually raise the temperature without shocking the eggs.
- Straining the custard mixture through a fine-mesh sieve is a professional technique that ensures an incredibly smooth, luxurious texture without any grainy bits from cooked egg whites.
- These custards can be made in advance. Prepare them in the morning and bake them a few hours before serving, then simply reheat gently in a warm water bath before serving.
- For individual ramekins, reduce cooking time slightly to 30-35 minutes, as they heat more quickly than a single large custard.
- Fresh nutmeg makes a dramatic difference in flavor. Invest in whole nutmeg and grate it fresh just before serving for the most aromatic result.
- Serve with shortbread cookies, fresh berries, fruit compote, caramel sauce, or chocolate sauce for elegant presentation and complementary flavors.
- Storage: Keep baked custards covered in the refrigerator for up to 3 days. They can be served cold or gently reheated in a water bath.
- For chocolate custard, add 2 ounces of finely chopped dark chocolate to the cream mixture before heating and whisk until melted and smooth.
- These custards freeze well for up to 2 months. Thaw overnight in the refrigerator before serving.